Integrate SonarQube into Pipelines
SonarQube is a mainstream continuous code quality inspection tool that can be used for static and dynamic analysis of code repositories. After SonarQube is integrated into KubeSphere pipelines, if issues are detected during pipeline runs, common code problems such as bugs and vulnerabilities will be displayed directly on the dashboard.
This document demonstrates how to integrate SonarQube into pipelines. Before creating a pipeline using a Jenkinsfile, please refer to the following steps.
Prerequisites
The DevOps extension must be installed and enabled on the KubeSphere platform.
Install SonarQube Server
To integrate SonarQube into your pipelines, you must first install a SonarQube server on a cluster node.
-
Install Helm so you can use this tool to install SonarQube. For example, run the following command to install Helm 3:
curl https://raw.githubusercontent.com/helm/helm/master/scripts/get-helm-3 | bashCheck the Helm version.
helm version

version.BuildInfo{Version:"v3.4.1", GitCommit:"c4e74854886b2efe3321e185578e6db9be0a6e29", GitTreeState:"clean", GoVersion:"go1.14.11"}
Note For more information, please refer to the Helm documentation.
-
Execute the following command to install the SonarQube server.
helm upgrade --install sonarqube sonarqube --repo https://charts.kubesphere.io/main -n \
kubesphere-devops-system --create-namespace --set service.type=NodePort
Note Please ensure you use Helm 3 to install the SonarQube server.
Obtain SonarQube Console Address
-
Execute the following command to obtain the SonarQube NodePort.
export NODE_PORT=$(kubectl get --namespace kubesphere-devops-system -o jsonpath="{.spec.ports[0].nodePort}" services sonarqube-sonarqube) export NODE_IP=$(kubectl get nodes --namespace kubesphere-devops-system -o jsonpath="{.items[0].status.addresses[0].address}") echo http://$NODE_IP:$NODE_PORT -
Expected output: (Your NodeIP and NodePort will be different)
http://10.77.1.201:31377
Configure SonarQube Server
Step 1: Access the SonarQube Console
-
Execute the following command to check the status of SonarQube. Note that you can only access the SonarQube console after SonarQube is up and running.
$ kubectl get pod -n kubesphere-devops-system NAME READY STATUS RESTARTS AGE devops-jenkins-68b8949bb-7zwg4 1/1 Running 0 84m sonarqube-postgresql-0 1/1 Running 0 5m31s sonarqube-sonarqube-bb595d88b-97594 1/1 Running 2 5m31s -
Access the SonarQube console at http://NodeIP:NodePort in your browser.
-
Click Log in in the upper-right corner, then log in using the default account admin/admin.
Note Depending on where the instance is deployed, you may need to set up necessary port forwarding rules and allow the port in your security group to access SonarQube.
Step 2: Create a SonarQube Administrator Token
-
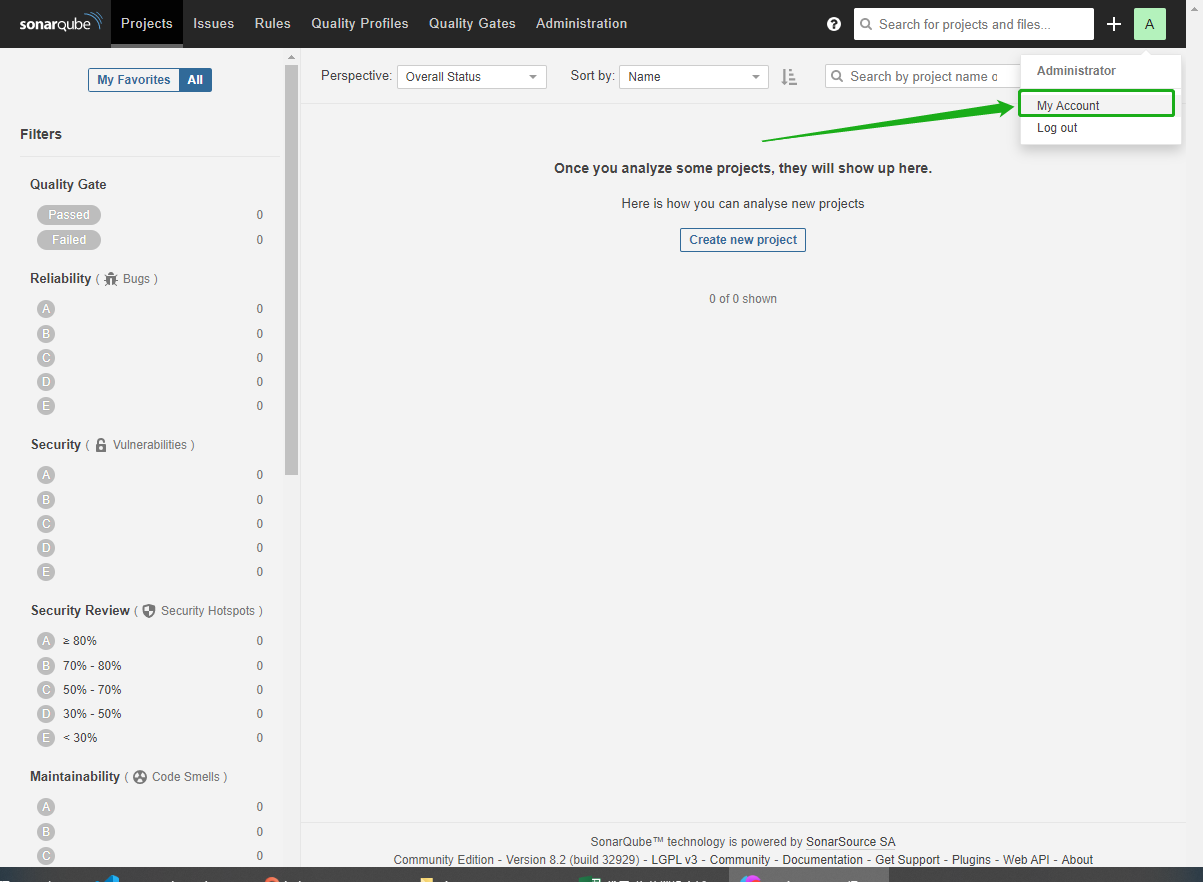
Click the letter A in the upper-right corner, then select My Account from the menu to go to the Profile page.
-
Click Security, enter a token name, for example, kubesphere.
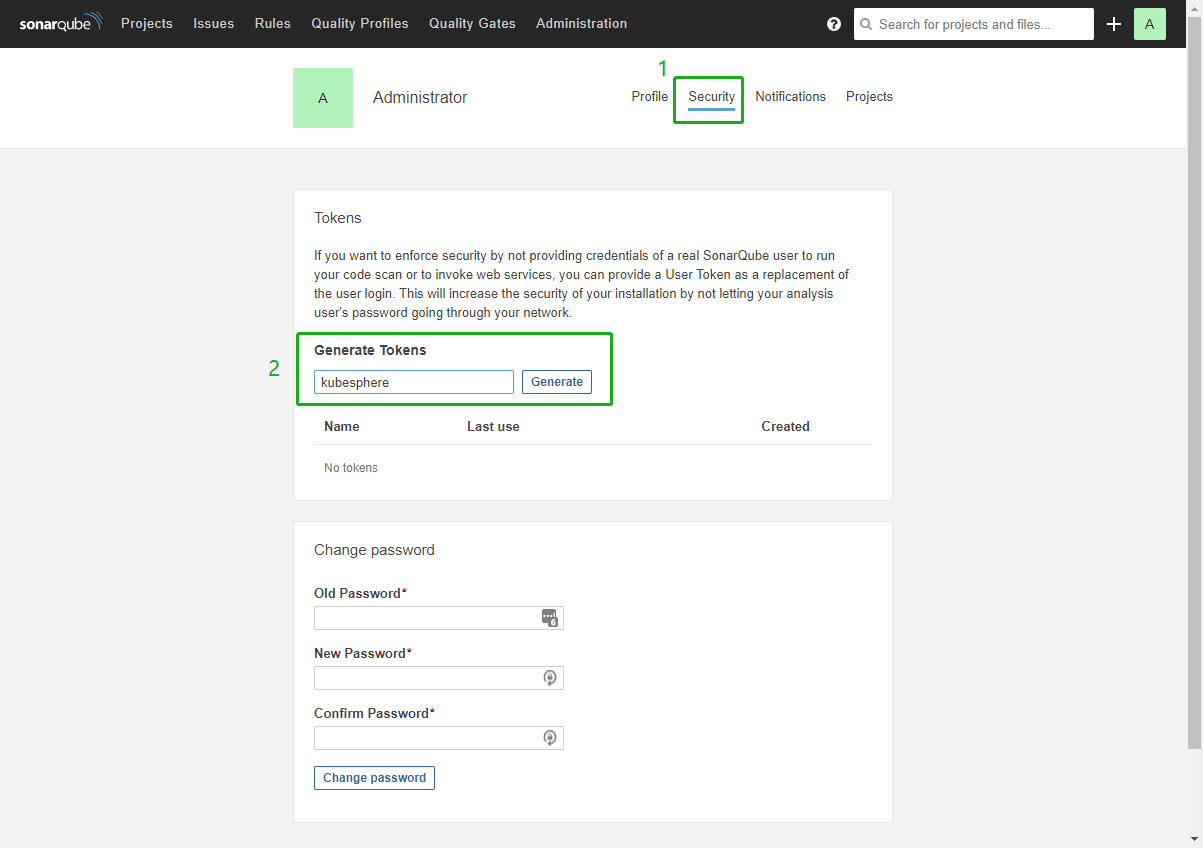
-
Click Generate and copy this token.
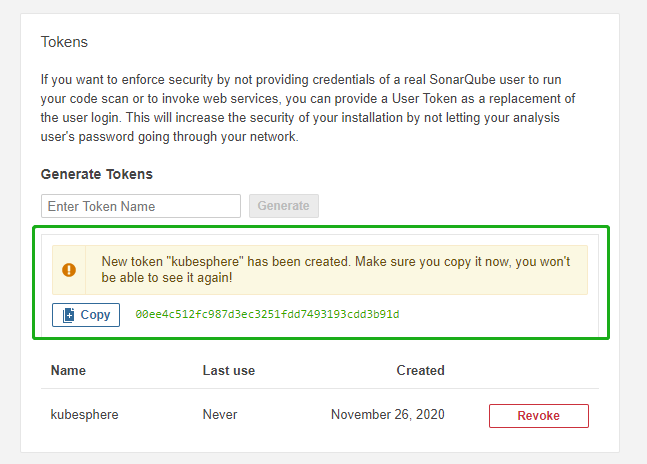
Note As the prompt indicates, you will not be able to view this token again, so please ensure you copy it successfully.
Step 3: Create a Webhook Server
-
Execute the following command to obtain the address for the SonarQube webhook.
export NODE_PORT=$(kubectl get --namespace kubesphere-devops-system -o jsonpath="{.spec.ports[0].nodePort}" services devops-jenkins) export NODE_IP=$(kubectl get nodes --namespace kubesphere-devops-system -o jsonpath="{.items[0].status.addresses[0].address}") echo http://$NODE_IP:$NODE_PORT/sonarqube-webhook/ -
Expected output:
http://10.77.1.201:30180/sonarqube-webhook/ -
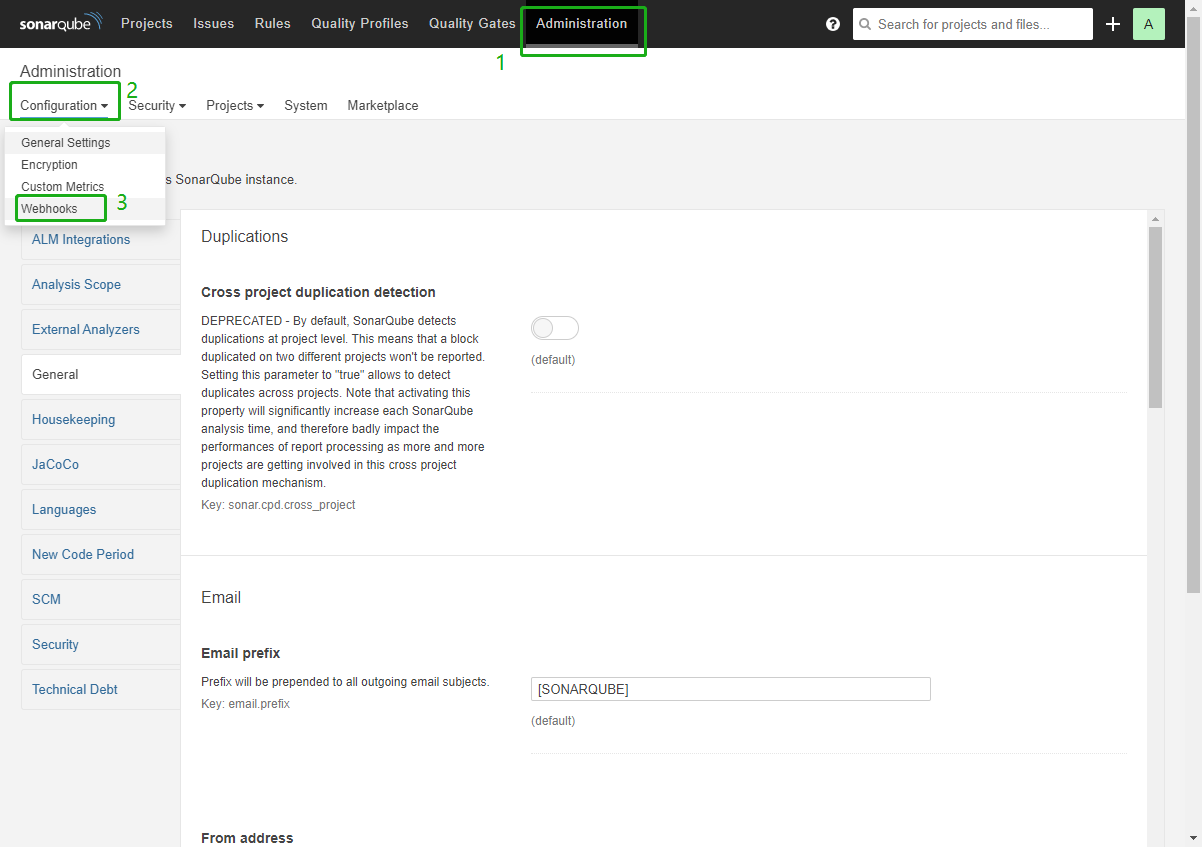
Click Administration, then Configuration, and then Webhooks to create a webhook.
-
Click Create.
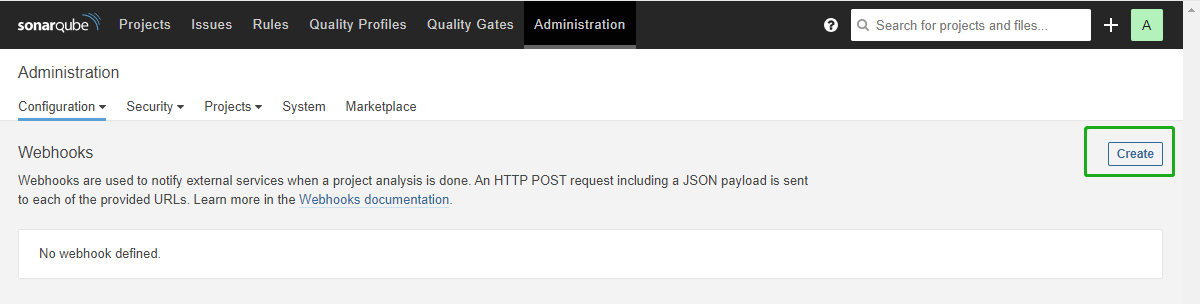
-
In the dialog box that appears, enter the Name and Jenkins Console URL (i.e., the SonarQube webhook address). Click Create to complete the operation.

Step 4: Add SonarQube Server to Jenkins
-
Execute the following command to obtain the Jenkins address.
export NODE_PORT=$(kubectl get --namespace kubesphere-devops-system -o jsonpath="{.spec.ports[0].nodePort}" services devops-jenkins)
export NODE_IP=$(kubectl get nodes --namespace kubesphere-devops-system -o jsonpath="{.items[0].status.addresses[0].address}")
echo http://$NODE_IP:$NODE_PORT
You will get output similar to the following:
http://10.77.1.201:30180 -
Configure by referring to Logging in to the Jenkins Dashboard.
-
Access Jenkins using the address http://NodeIP:30180.
When DevOps is installed, the Jenkins dashboard is also installed by default. Furthermore, Jenkins is configured with KubeSphere LDAP, which means you can log in to Jenkins directly using a KubeSphere account (e.g.,
admin/P@88w0rd). For more information on configuring Jenkins, please refer to Jenkins System Settings.Note Depending on where the instance is deployed, you may need to set up necessary port forwarding rules and allow port 30180 in your security group to access Jenkins.
-
Click Manage Jenkins in the left navigation pane.
-
Scroll down and click Configure System.
-
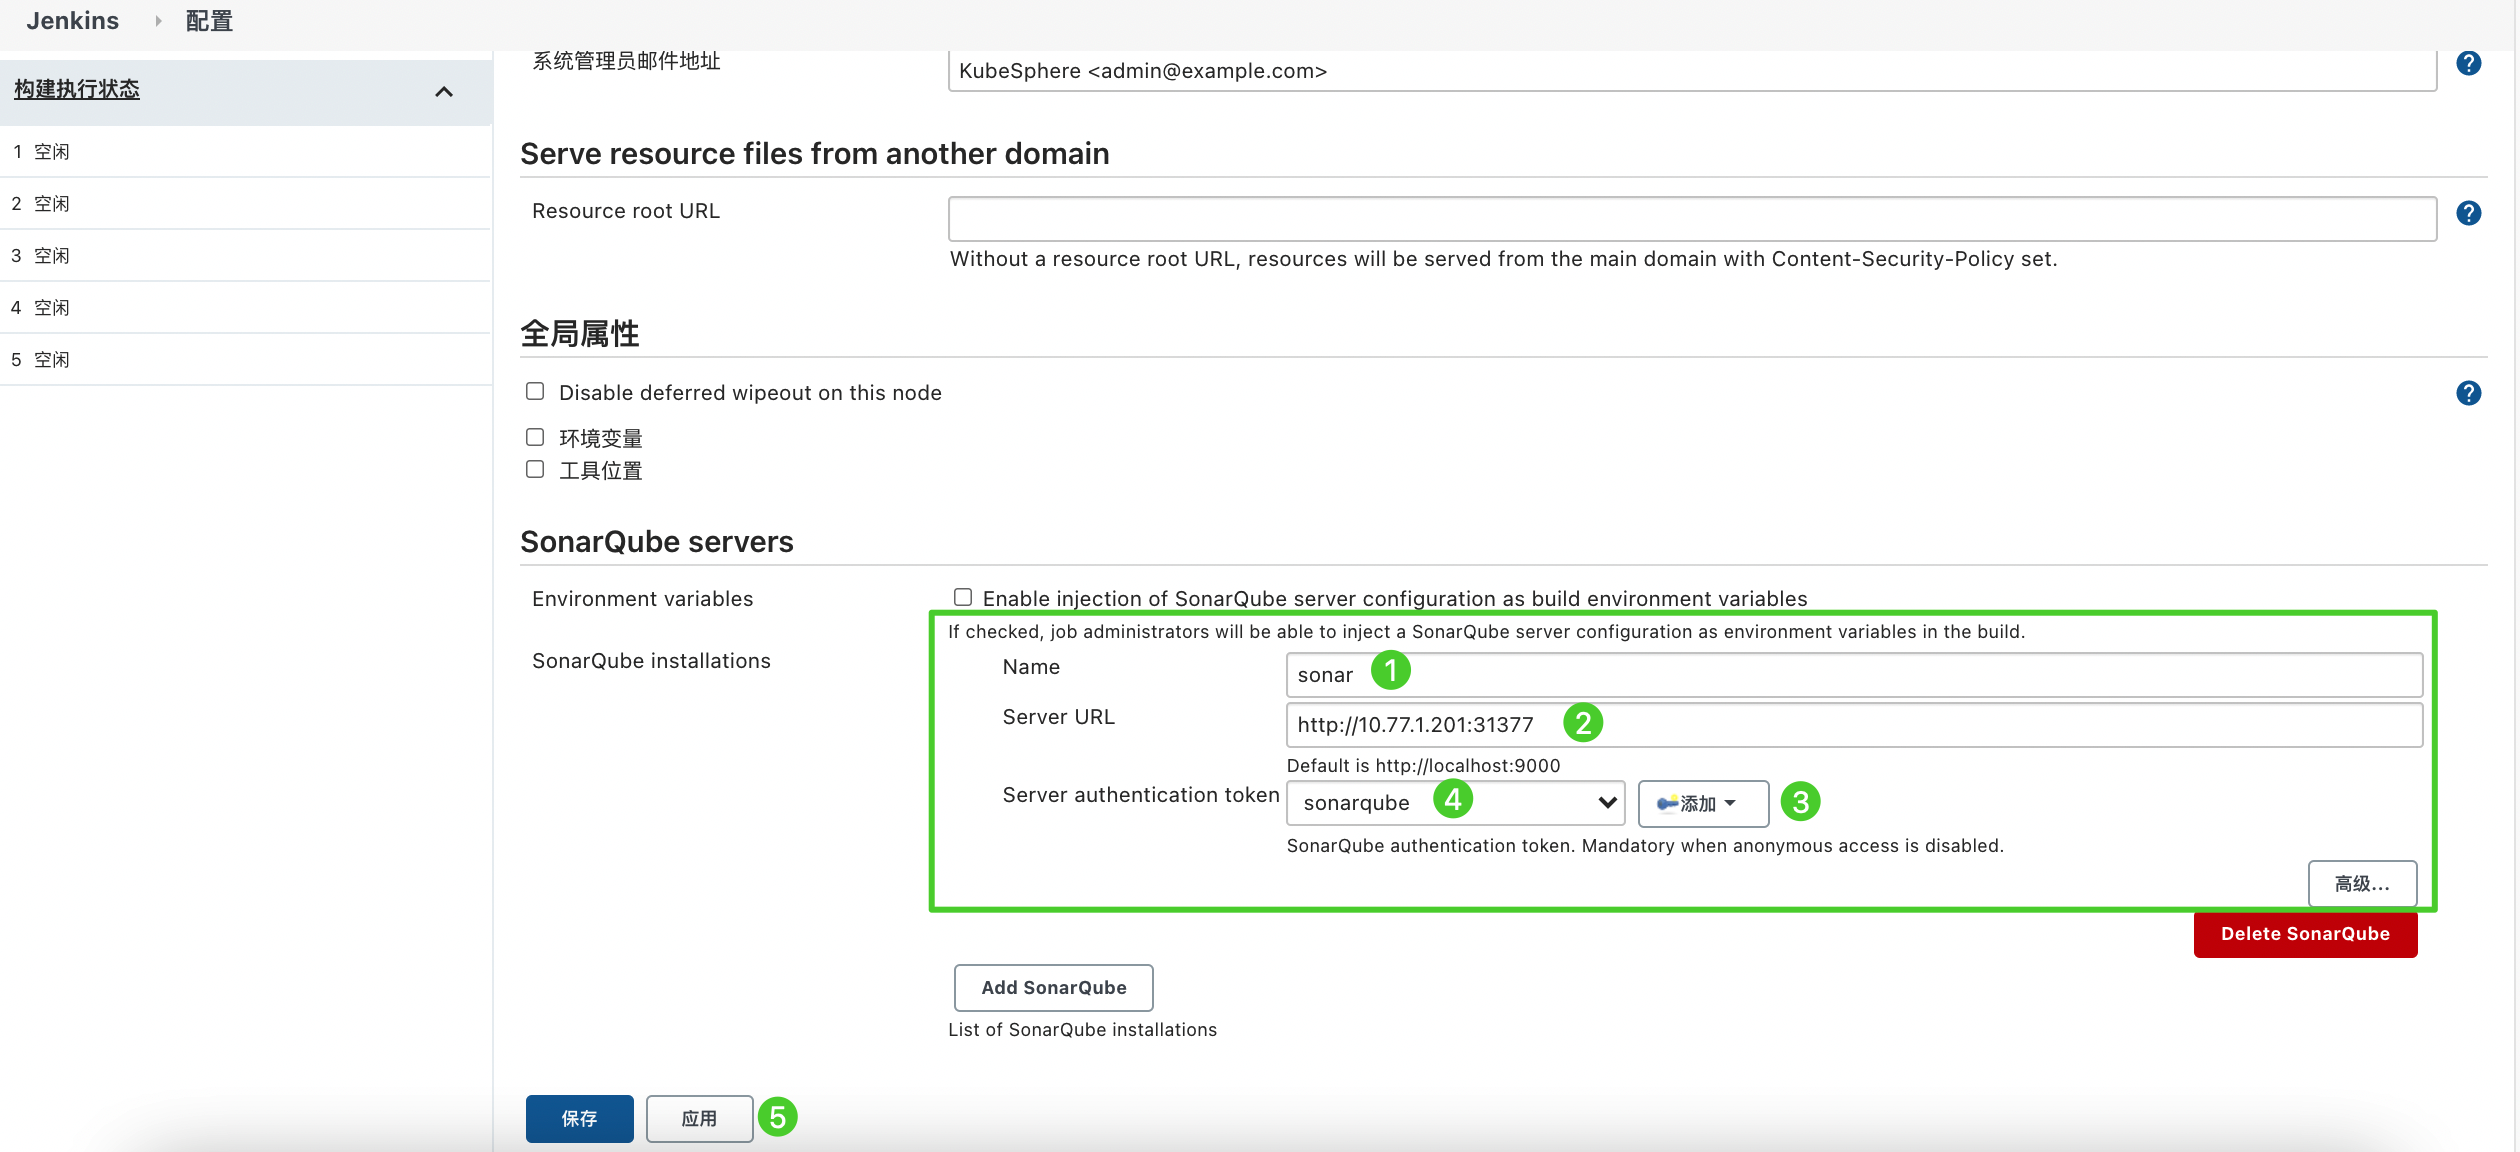
Find SonarQube servers, then click Add SonarQube.
-
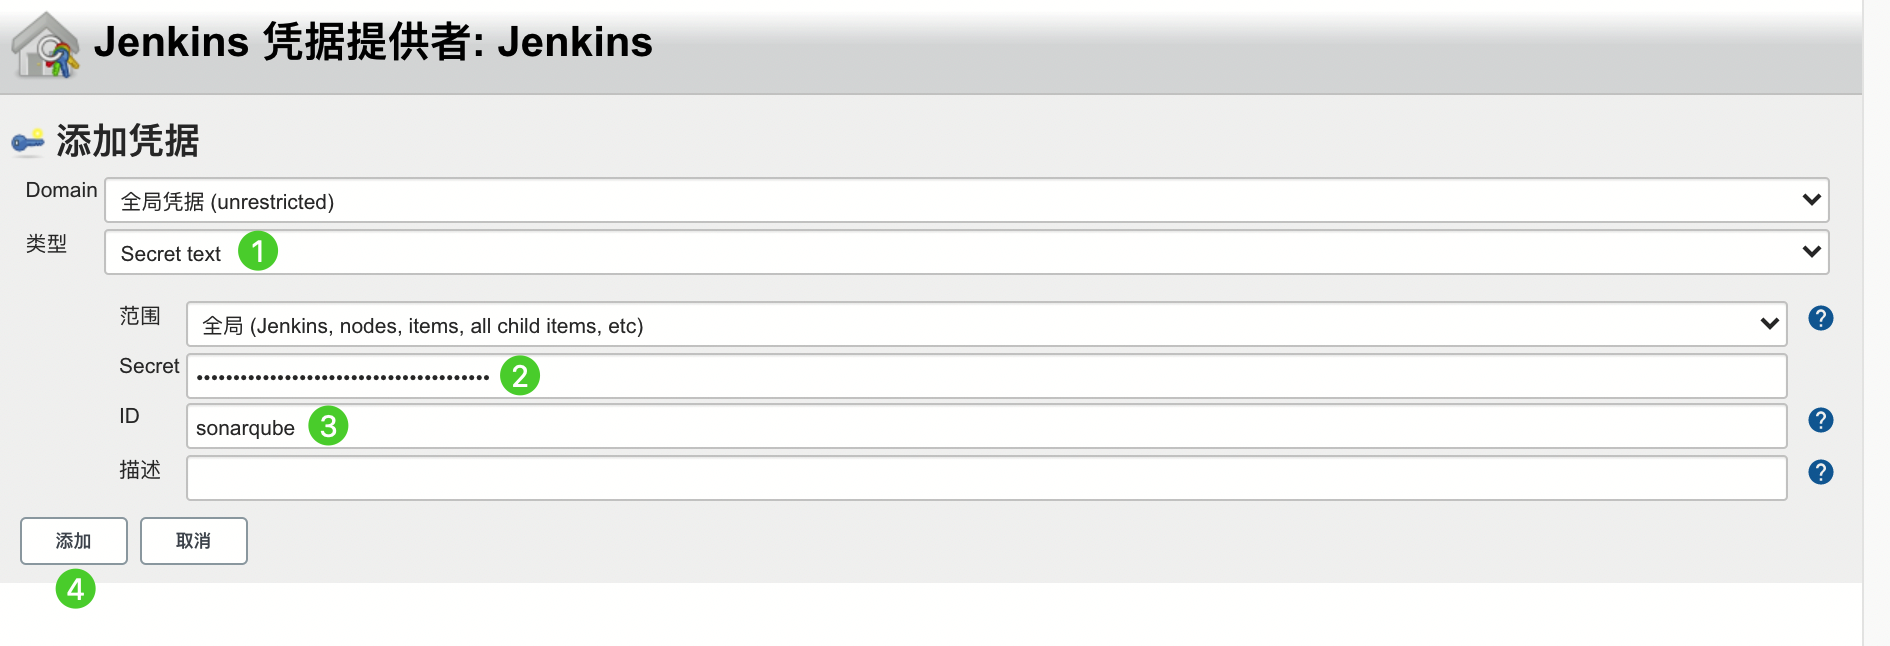
Enter the Name and Server URL (http://NodeIP:NodePort). Click Add, select Jenkins, then create a credential in the dialog box that appears using the SonarQube administrator token (as shown in the second screenshot below). After creating the credential, select it from the dropdown list next to Server authentication token. Click Apply to complete the operation.
Note If the Add button is not working, you can go to Manage Credentials under Manage Jenkins, click Jenkins under Stores scoped to Jenkins, then click Global credentials (unrestricted), then click Add Credentials in the left navigation pane, and refer to the second screenshot below to add a credential using the SonarQube administrator token. After adding the credential, select it from the dropdown list next to Server authentication token.
Step 5: Add SonarQube Configuration to DevOps
-
Execute the following command to edit the ConfigMap
devops-config.kubectl -n kubesphere-devops-system edit cm devops-config -
Add the field
sonarQubeafter thedevopssection and specifyhostandtokenunder it.devops: host: http://devops-jenkins.kubesphere-devops-system username: admin maxConnections: 100 namespace: kubesphere-devops-system workerNamespace: kubesphere-devops-worker sonarQube: host: http://10.77.1.201:31377 token: 00ee4c512fc987d3ec3251fdd7493193cdd3b91d -
Save the file after completing the operation.
Step 6: Add sonarqubeURL to the KubeSphere Console
You need to specify sonarqubeURL so that SonarQube can be accessed directly from the KubeSphere web console.
-
Execute the following command:
kubectl edit cm -n kubesphere-system ks-console-config -
Find data:client:enableKubeConfig, add the devops field below it and specify sonarqubeURL.
client: enableKubeConfig: true devops: # Add this field manually. sonarqubeURL: http://10.77.1.201:31377 # SonarQube IP address. -
Save the file.
Step 7: Restart Services
Execute the following commands to restart the services.
kubectl -n kubesphere-devops-system rollout restart deploy devops-apiserverkubectl -n kubesphere-system rollout restart deploy ks-consoleCreate a SonarQube Token for a New Project
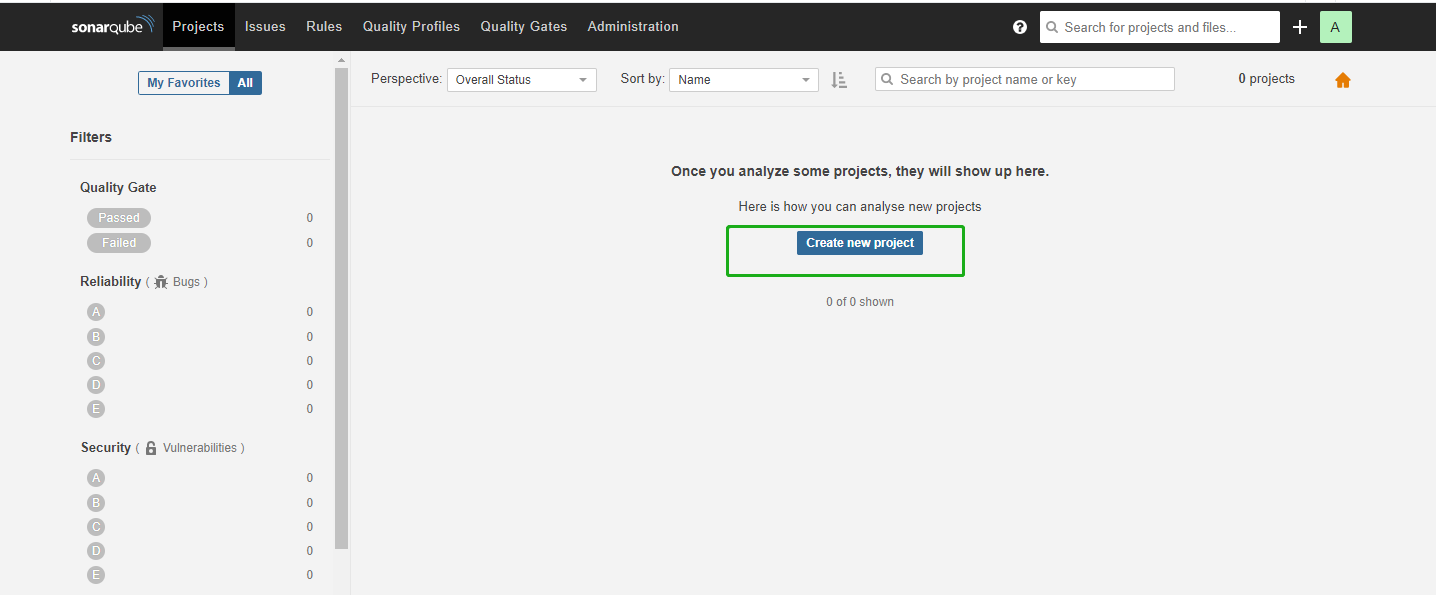
Create a SonarQube token so that the pipeline can communicate with SonarQube when it runs.
-
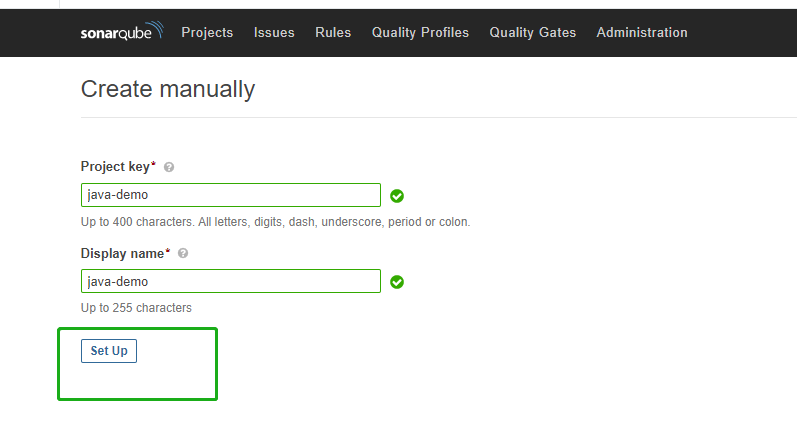
On the SonarQube console, click Create new project.
-
Enter a project key, for example, java-demo, then click Set Up.
-
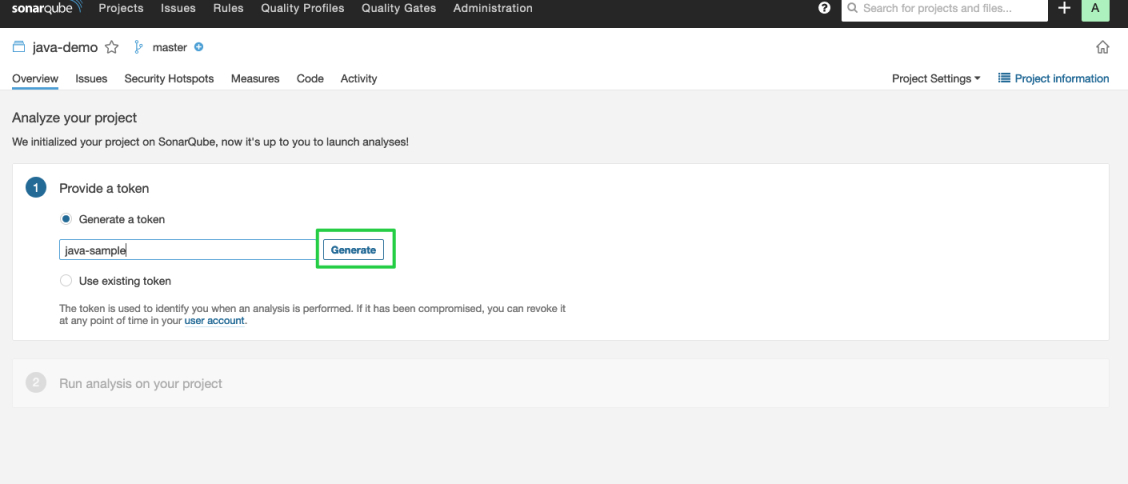
Enter a project name, for example, java-sample, then click Generate.
-
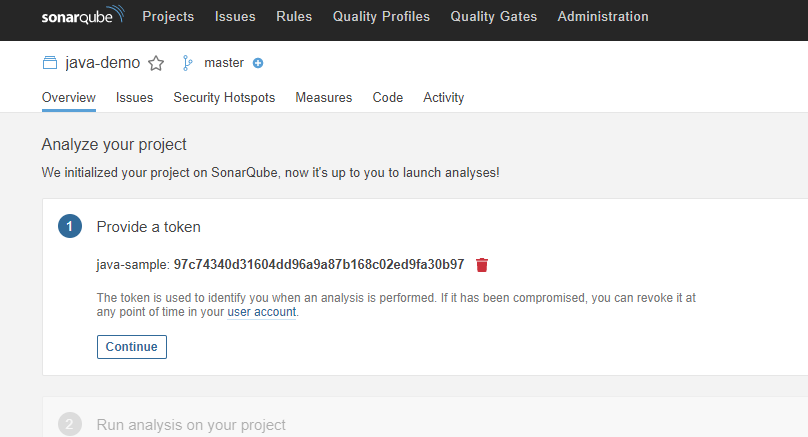
After the token is created, click Continue.
-
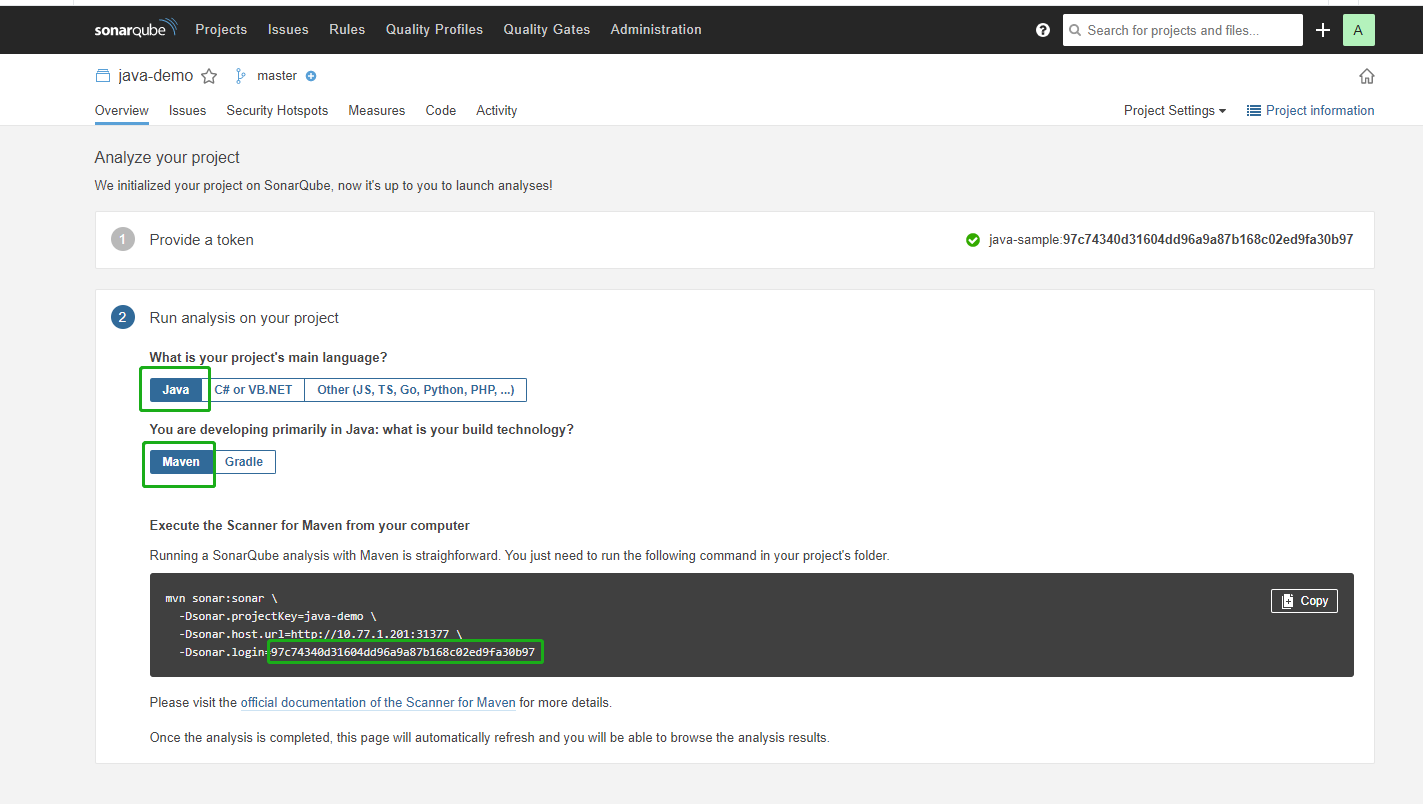
Select Maven, and copy the serial number shown in the green box in the image below. If you want to use it in a pipeline, you need to add this serial number to Credentials.
View Results in the KubeSphere Console
After creating a pipeline using a Jenkinsfile or creating a pipeline using the graphical editing panel, you can view the results of the code quality analysis.