Create a Pipeline Using the Graphical Editing Panel
The graphical editing panel in DevOps contains all necessary operations for Jenkins Stages and Steps. DevOps supports defining these stages and steps directly on the interactive panel without creating any Jenkinsfile.
This document demonstrates how to create a pipeline using the graphical editing panel in KubeSphere. Throughout the process, DevOps will automatically generate a Jenkinsfile based on the settings on the editing panel, and you do not need to manually create a Jenkinsfile. After the pipeline runs successfully, it will create a Deployment and a Service in your development environment and push the image to Docker Hub.
Prerequisites
-
The DevOps extension must be installed and enabled on the KubeSphere platform.
-
Have a Docker Hub account.
-
Have created a workspace, a DevOps project, and a user (e.g., project-regular), and have invited this user to the DevOps project and granted the operator role. Refer to Invite a User to a DevOps Project.
-
Have created a user (e.g., project-admin) who has the Project Creation permission in the workspace.
-
Have set up a CI-dedicated node for running pipelines. Refer to Set a CI Node for Dependency Caching.
-
Configure an email server to receive pipeline notifications (optional). Refer to Set an Email Server for Pipelines.
-
Configure SonarQube to incorporate code analysis into the pipeline (optional). Refer to Integrate SonarQube into Pipelines.
Pipeline Overview
This sample pipeline includes the following stages.
| Description |
|---|
|
Steps 1: Create Credentials
-
Log in to the KubeSphere console as the project-regular user and enter your workspace.
-
In the left navigation pane, select DevOps > Credentials.
-
Select a DevOps project from the drop-down list in the upper left corner of the page.
-
Create the following credentials. For more information on how to create credentials, refer to Credentials.
Description If your account or password contains special characters, such as @ and $, it may cause errors during pipeline execution due to unrecognized characters. In this case, first encode the account or password on a third-party website (e.g., urlencoder), then copy and paste the output as your credential information.
Credential ID Type Purpose dockerhub-id
Username and Password
Docker Hub
demo-kubeconfig
kubeconfig
Kubernetes
-
Create another credential for SonarQube (sonar-token) for Stage 3 (Code Analysis) mentioned above. Select Access Token as the credential type, enter the SonarQube token in the Token field, refer to Create a SonarQube Token for a New Project. Click OK to complete.
-
After creation, you will see the created credentials on the Credentials page.
Steps 2: Create a Project
In this example, the pipeline will deploy the sample application to a project. Therefore, you need to create a project (e.g., kubesphere-sample-dev). After the pipeline runs successfully, the application’s Deployment and Service will be automatically created in this project.
-
Use the project-admin account to create the project. This user will also be the reviewer for the CI/CD pipeline.
-
Invite the project-regular account to this project and grant the operator role.
Steps 3: Create a Pipeline
-
On the DevOps > Pipelines page, click Create.
-
In the dialog that appears, name it graphical-pipeline and click Next.
-
On the Advanced Settings page, click Add to add the following string parameters. These parameters will be used in the pipeline’s Docker commands. After adding, click Create.
Parameter Type Name Value Description String
REGISTRY
docker.ioImage registry address. This example uses docker.io.
String
DOCKERHUB_NAMESPACE
Your Docker ID
Your Docker Hub account or the organization name under that account.
String
APP_NAME
devops-sampleApplication name. This example uses devops-sample.
Description For other fields, use the default values directly or refer to Pipeline Settings for custom configuration.
Steps 4: Edit the Pipeline
-
Click the pipeline name to enter its details page.
-
To use the graphical editing panel, click Edit Pipeline under the Pipeline Configuration tab. In the dialog that appears:
-
Click Custom Pipeline and follow the steps below to set up each stage.
-
Or use the built-in pipeline templates provided by DevOps.
-
-
Click Next, then click Create.
| Description |
|---|
The Sync Status on the pipeline details page shows the synchronization result between KubeSphere and Jenkins. You can also click Edit Jenkinsfile to manually create a Jenkinsfile for the pipeline. |
Stage 1: Pull Source Code (Checkout SCM)
The graphical editing panel includes two areas: the Canvas on the left and the Content on the right. It automatically generates a Jenkinsfile based on your configuration of different stages and steps, providing a more user-friendly experience for developers.
| Description |
|---|
Pipelines include Declarative Pipelines and Scripted Pipelines. Currently, using this panel to create declarative pipelines is supported. For more information on pipeline syntax, refer to Jenkins Documentation. |
-
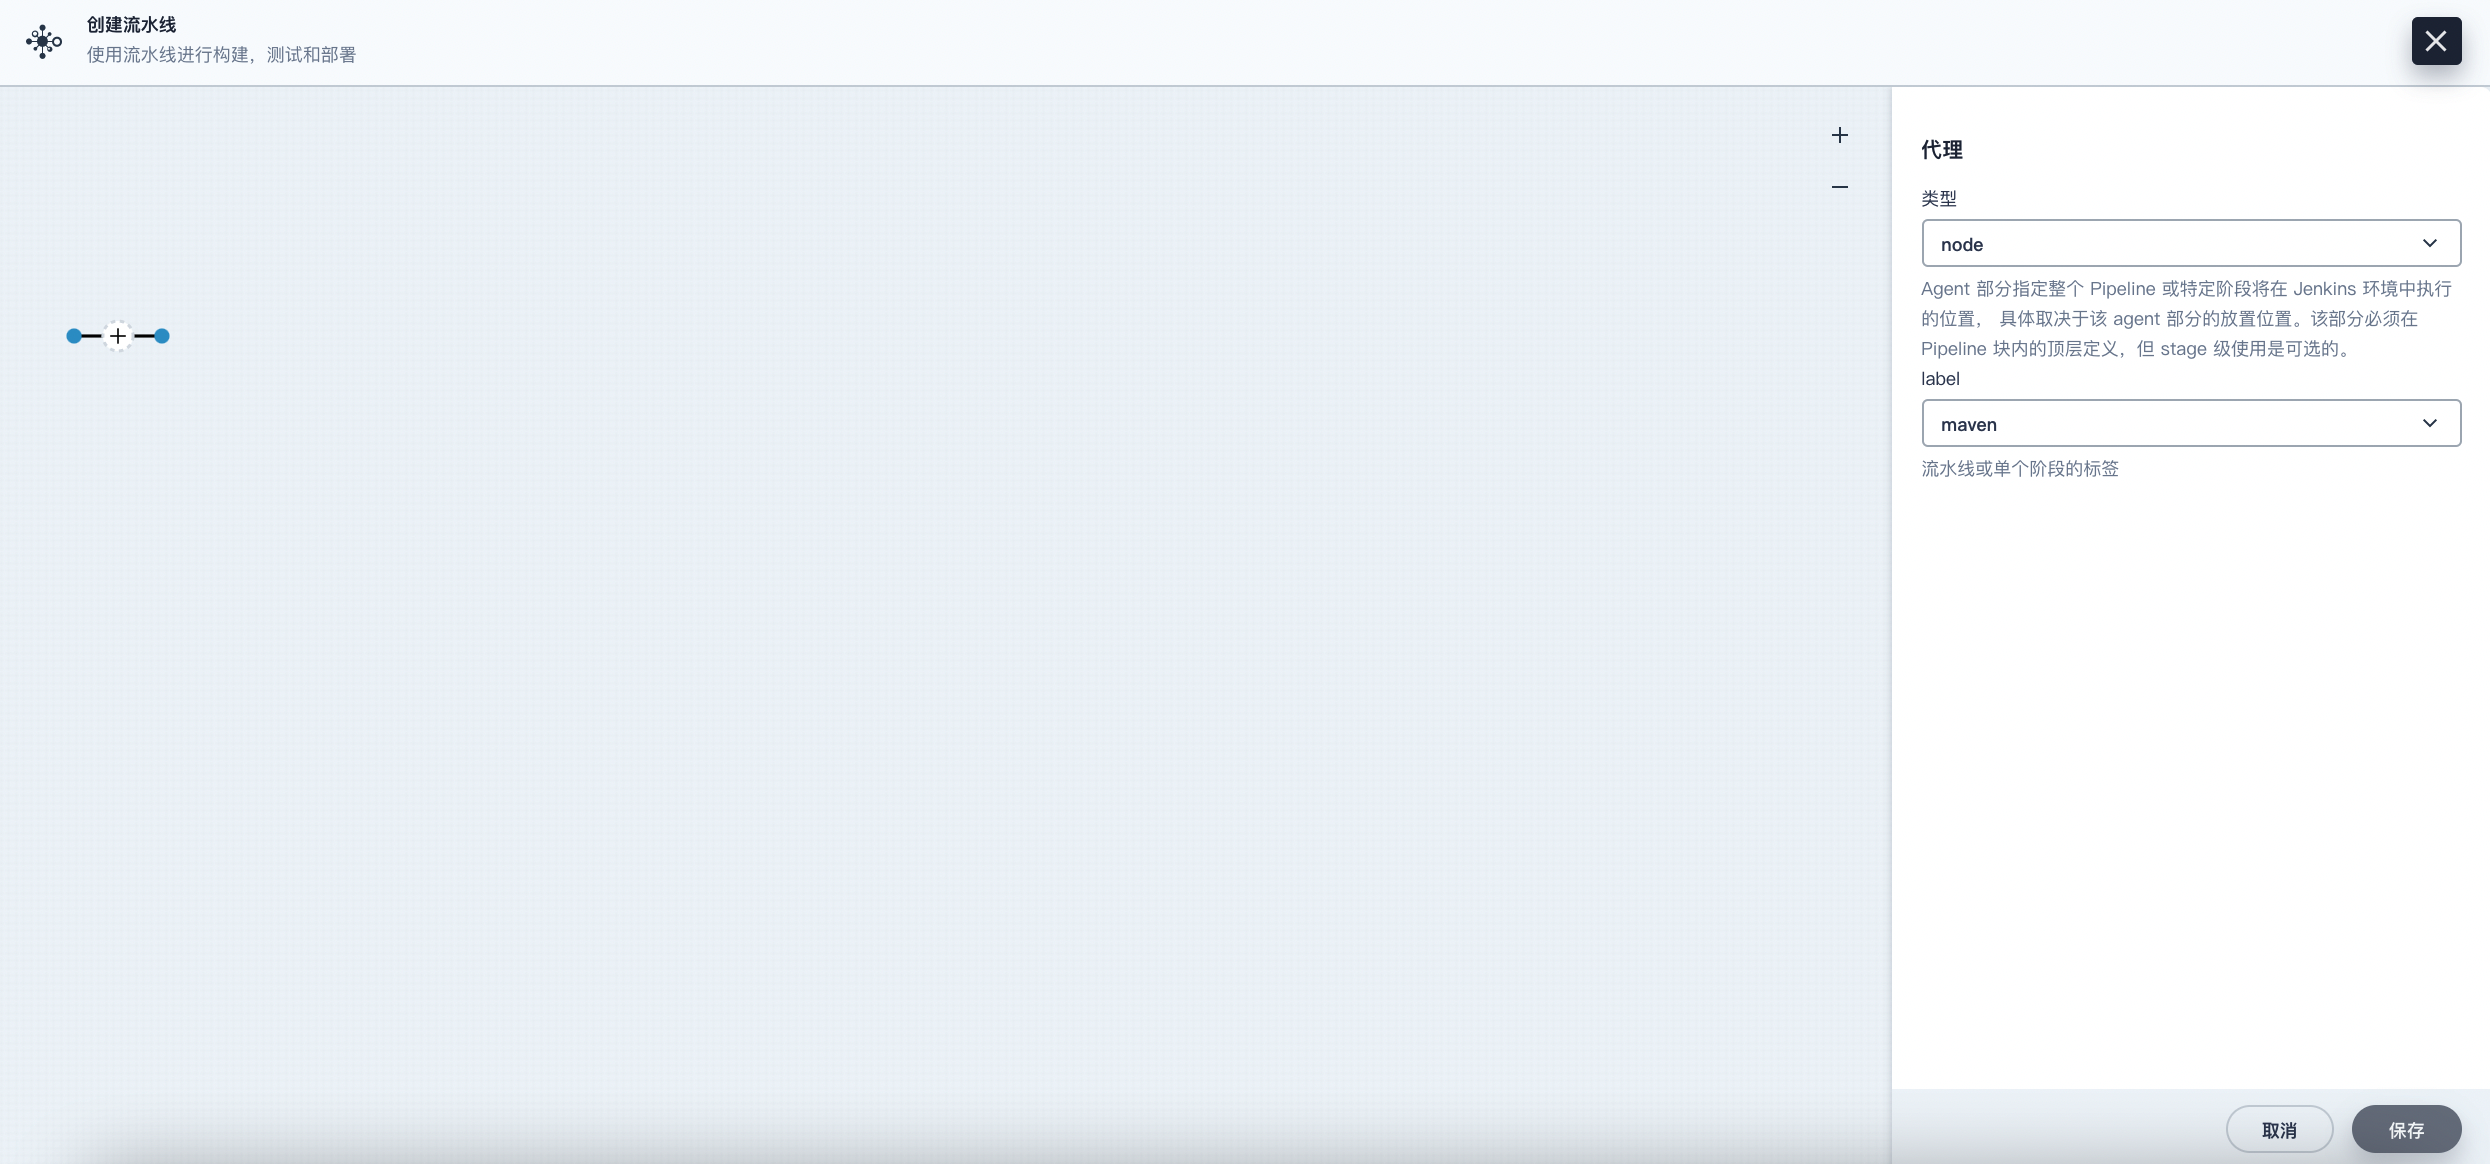
On the graphical editing panel, select node from the Type dropdown list and maven from the Label dropdown list.
Note Agent is used to define the execution environment. The Agent directive specifies where and how Jenkins executes the pipeline. For more information, please refer to Choosing a Jenkins Agent.
-
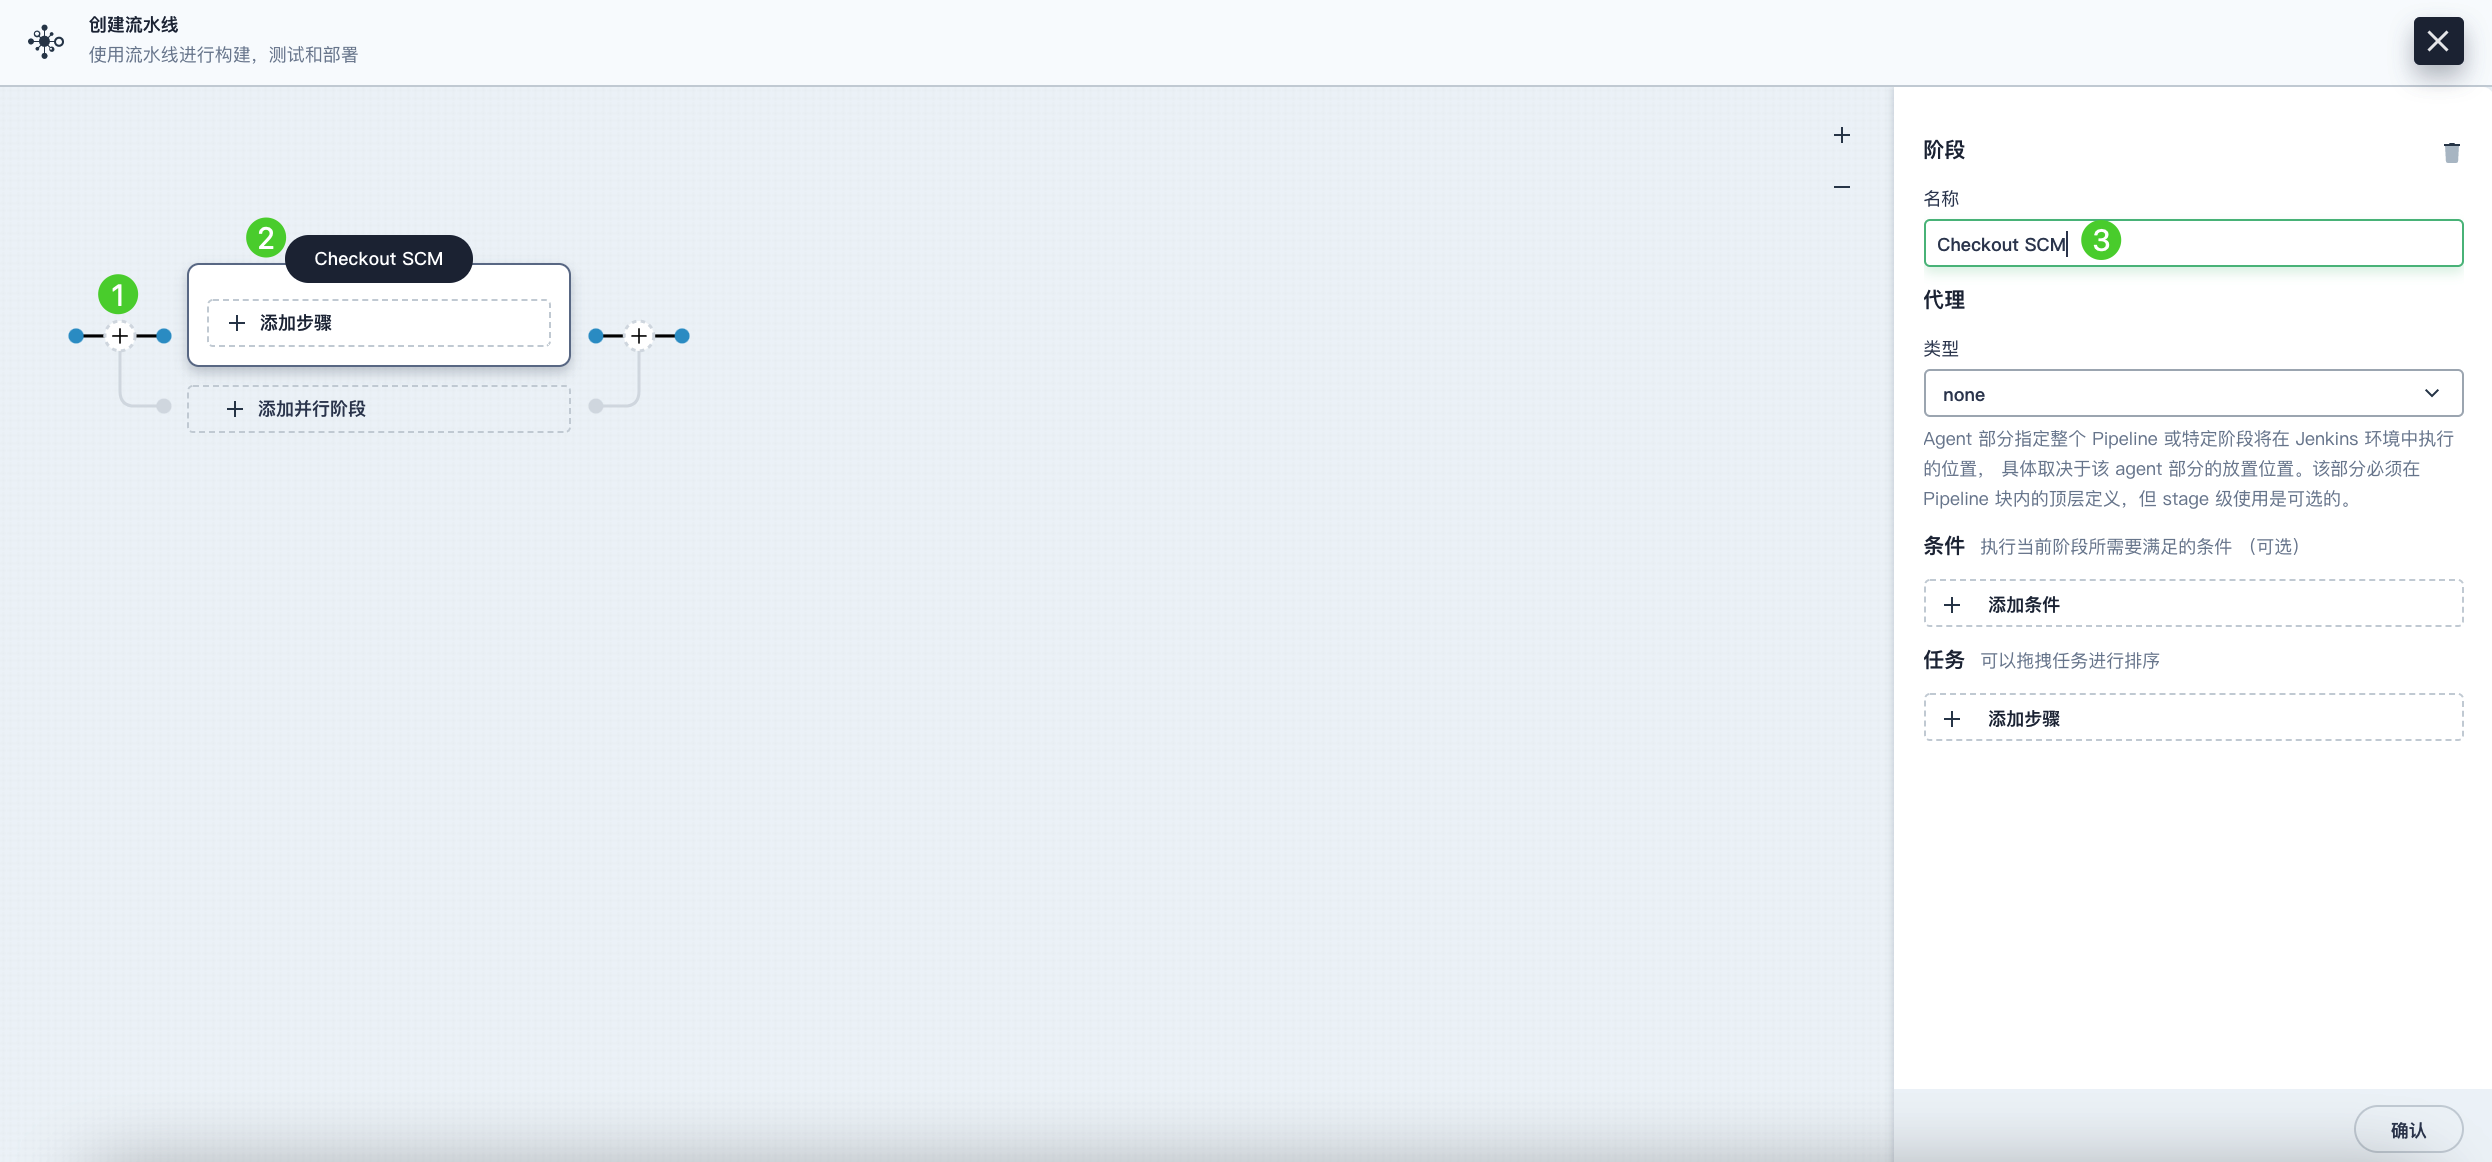
Click the plus icon on the left to add a stage. Click the text box above Add Step, then set a name for this stage (e.g., Checkout SCM) in the Name field on the right.
-
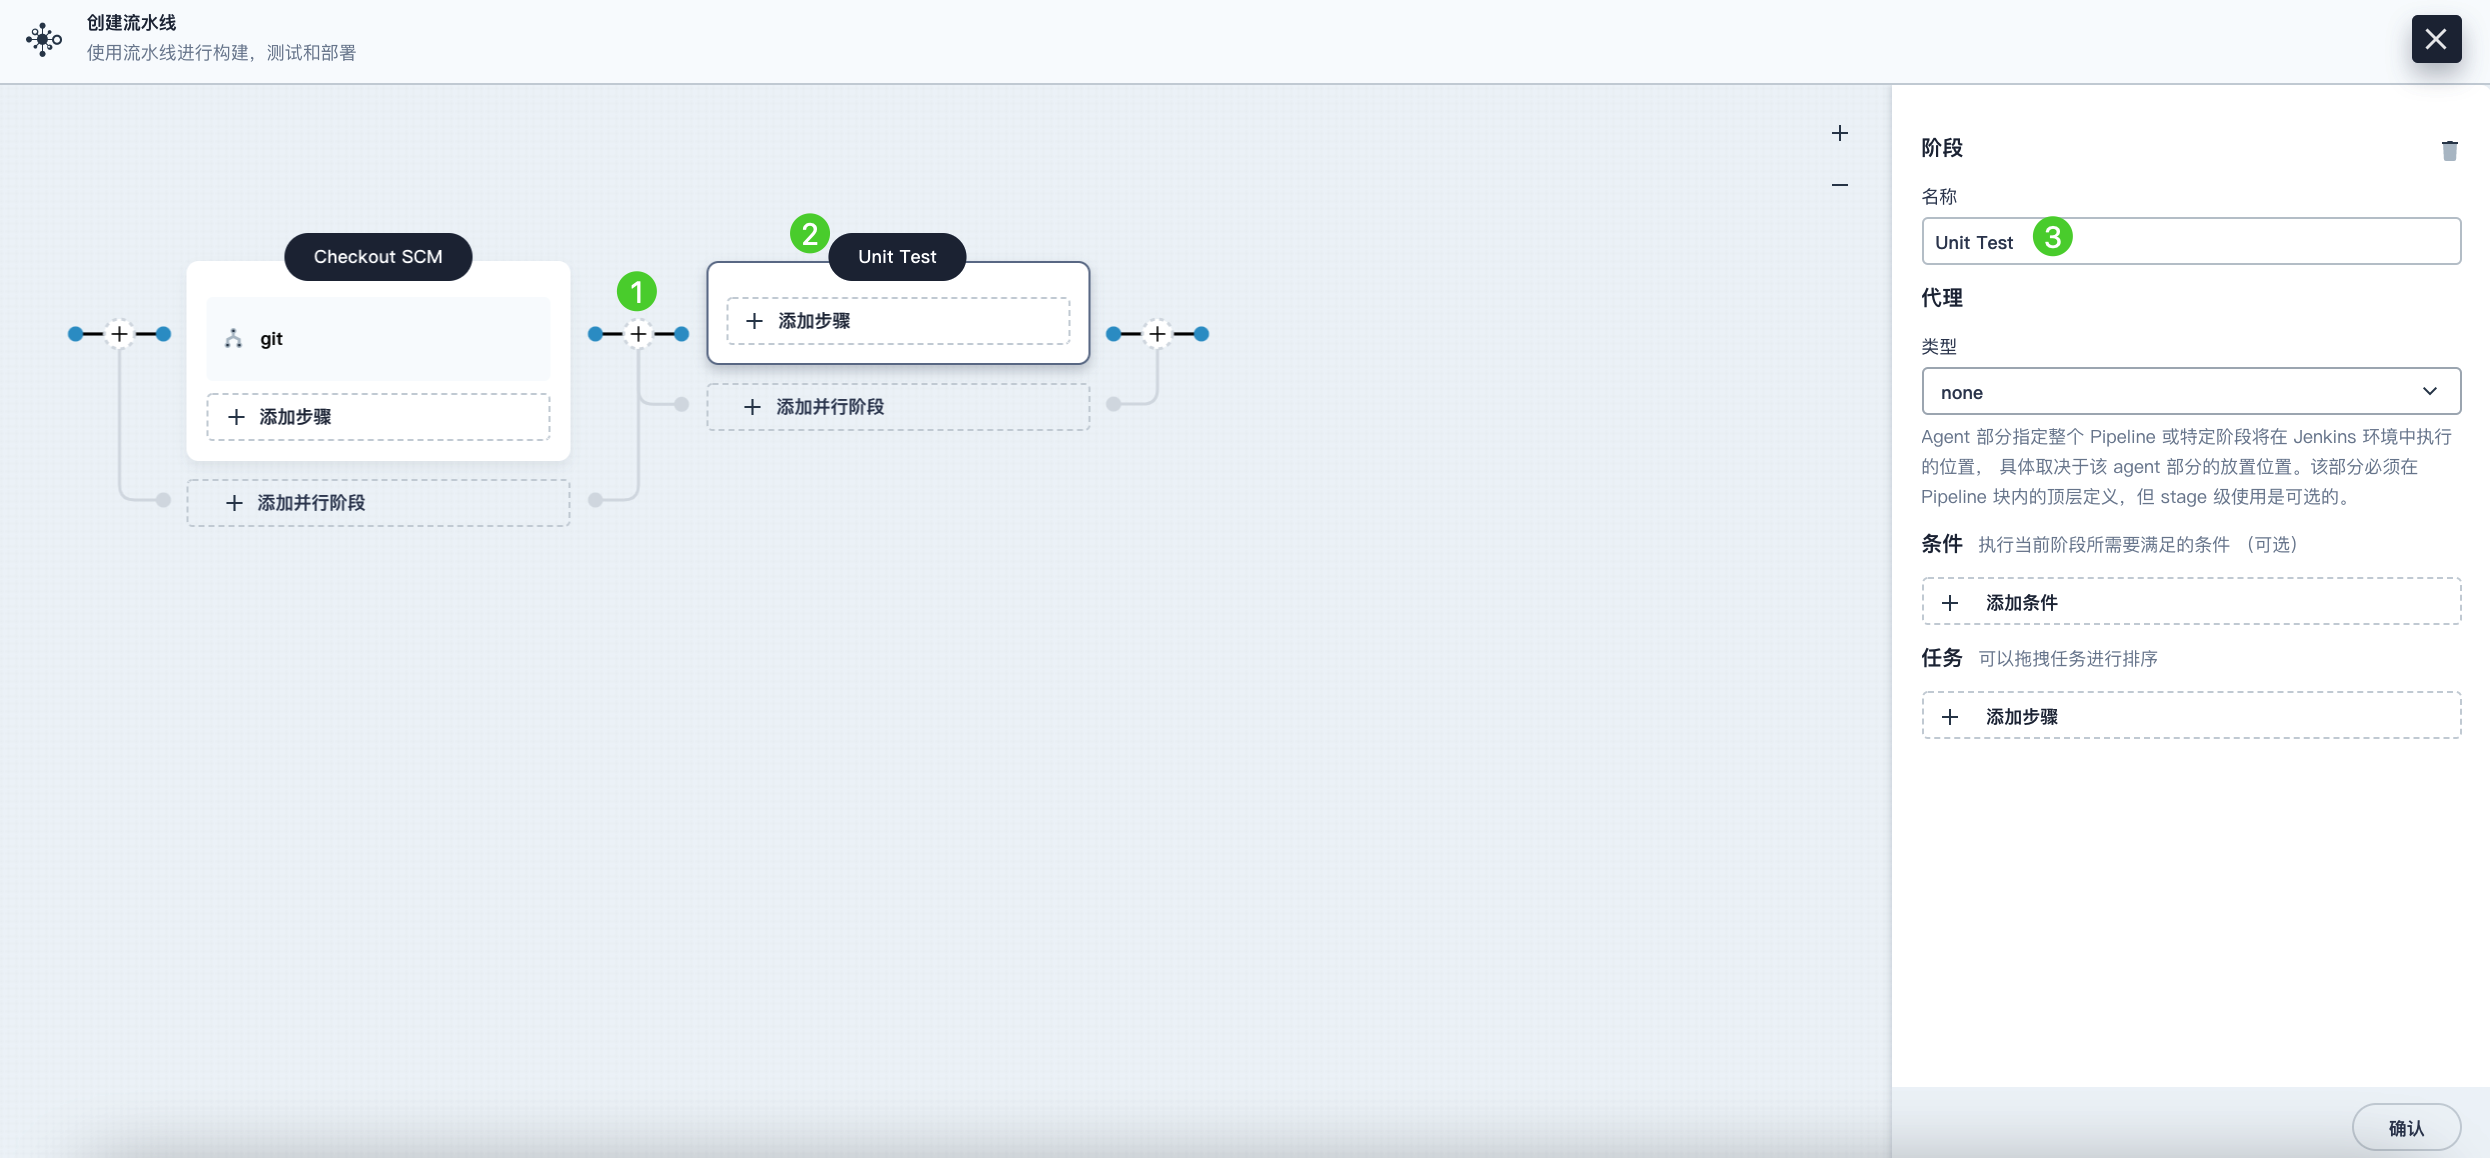
Click Add Step. Select Git Clone from the list to pull the sample code from GitHub. In the pop-up dialog, fill in the required fields. Click OK to complete the operation.
-
URL: Enter the GitHub repository address https://github.com/kubesphere/devops-maven-sample.git. Note, this is a sample address; please use your own repository address.
-
Credential ID: No credential ID is required for this example.
-
Branch: Enter v4.1.0-sonarqube. If the code analysis stage is not needed, use the default v4.1.0 branch.

-
Stage 2: Unit Test
-
Click the plus icon to the right of Stage 1 to add a new stage for executing unit tests in a container. Name it Unit Test.
-
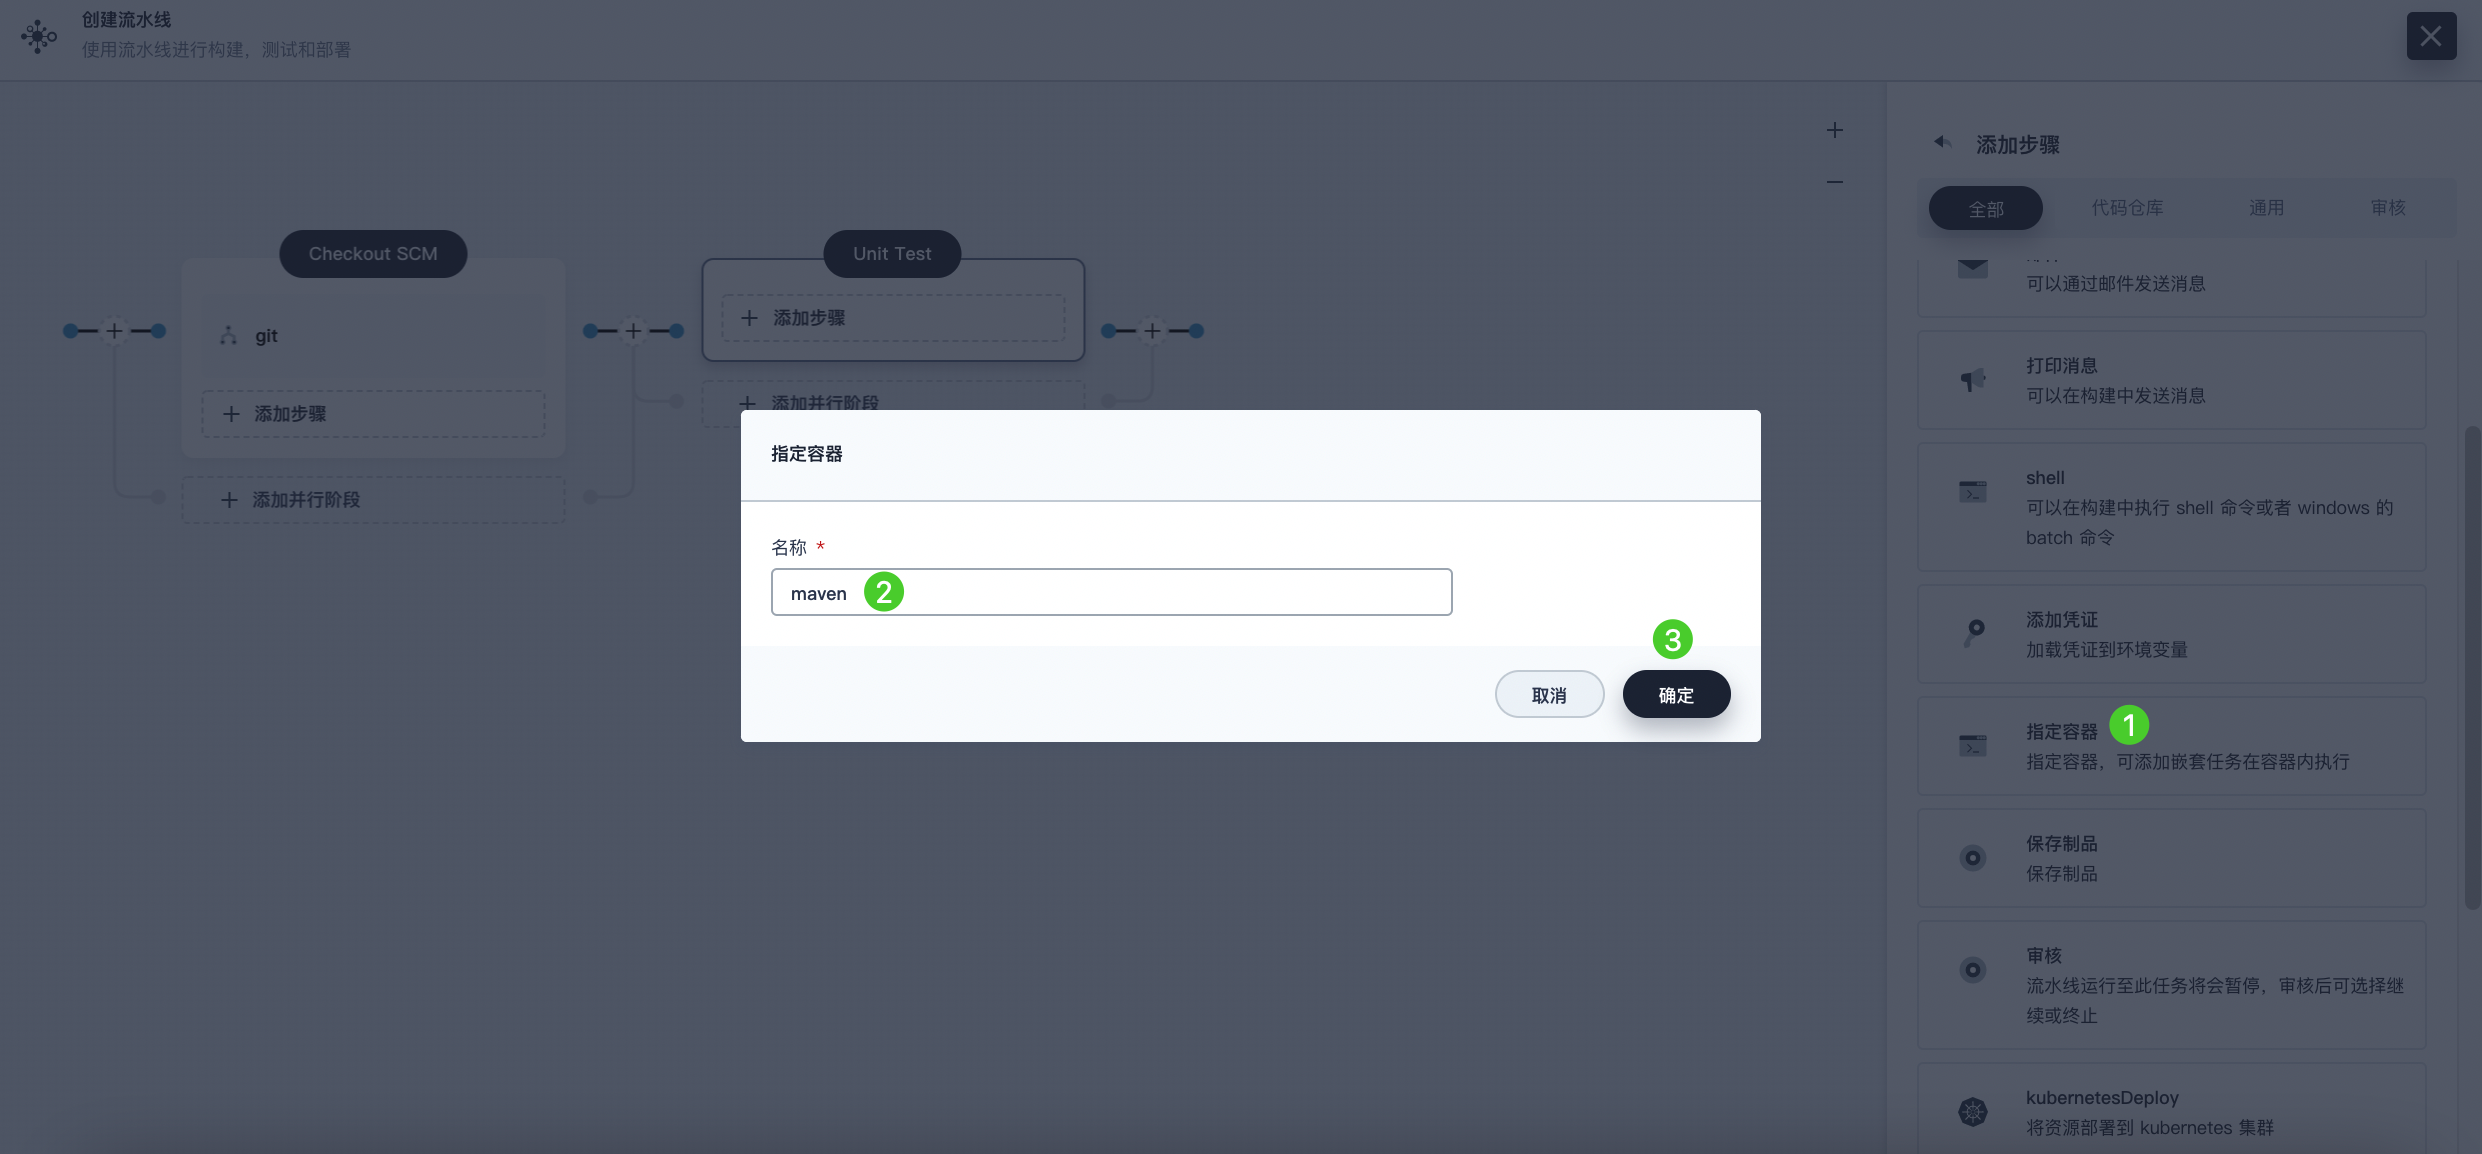
Click Add Step, select Specify Container from the list. Name it maven and then click OK.
-
Click Add Nested Step under the maven container step, select shell from the list, and enter the following command. Click OK to save the operation.
mvn clean testNote On the graphical editing panel, you can specify a series of steps to be executed within a given stage directive.
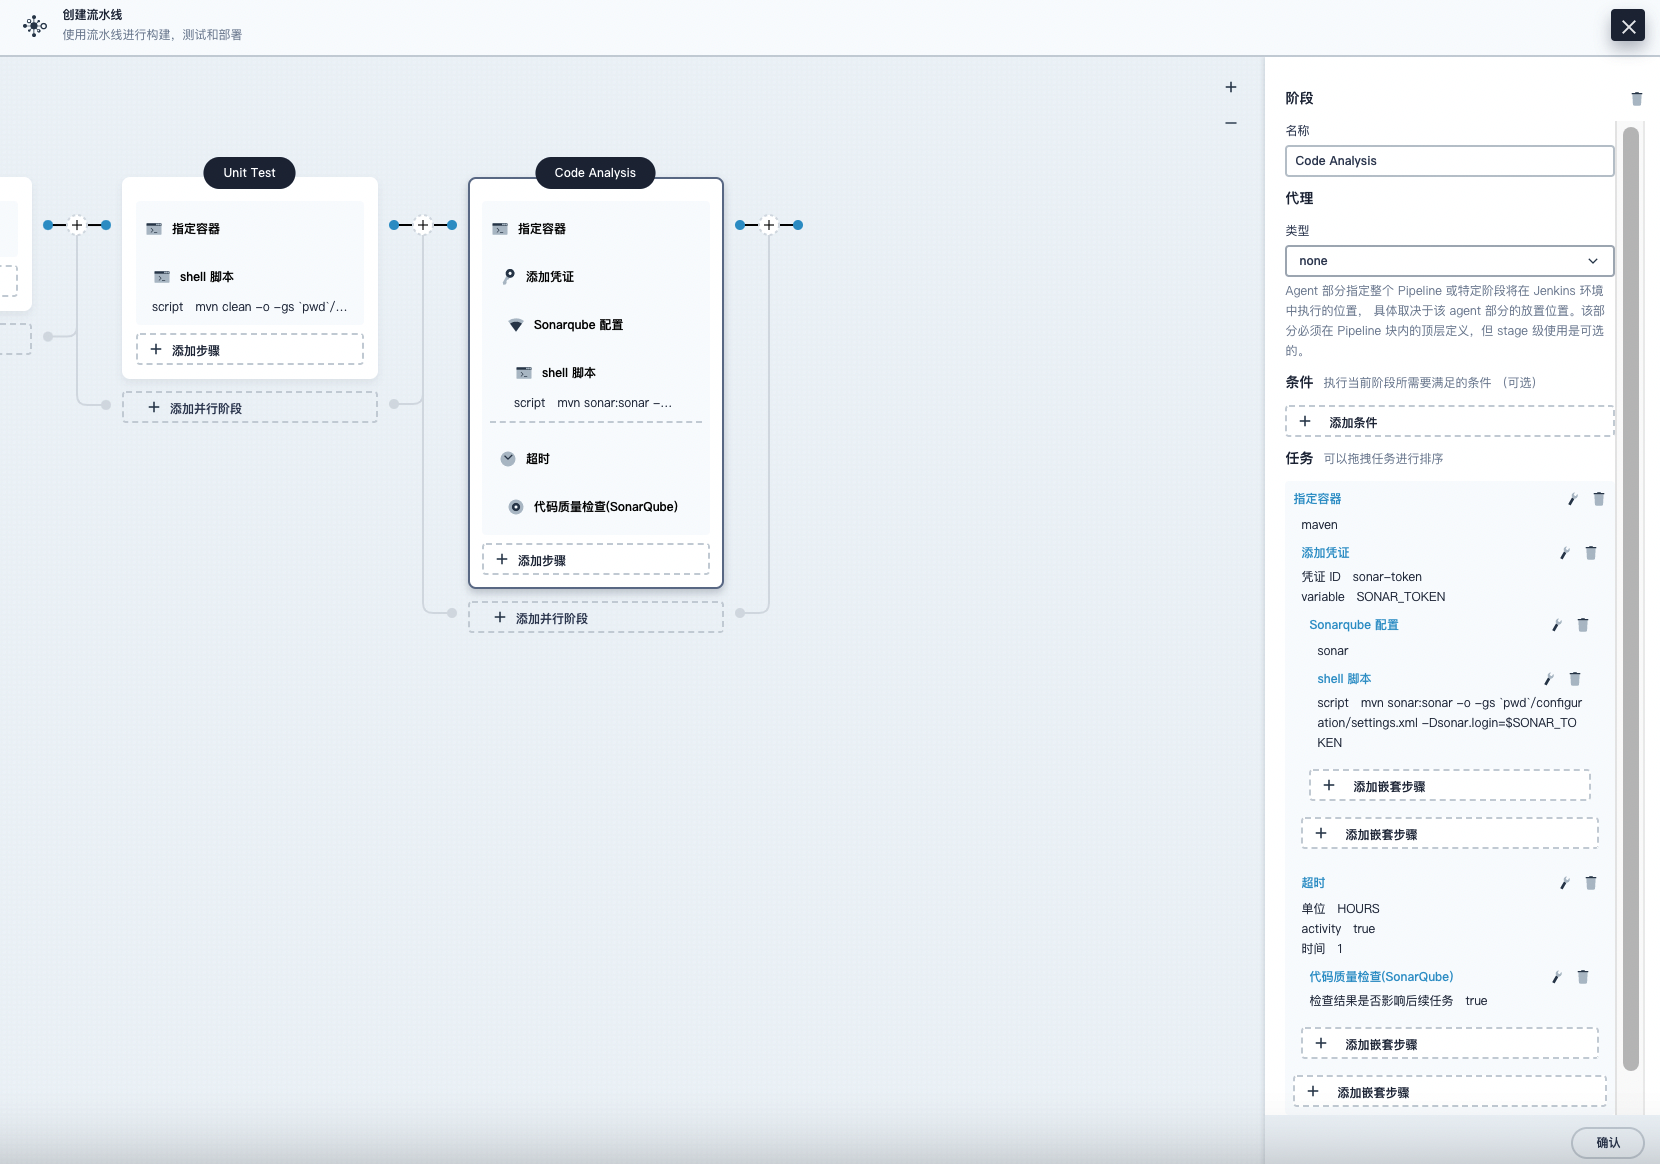
Stage 3: Code Analysis (Optional)
This stage uses SonarQube for code testing. You can skip this stage if code analysis is not needed.
-
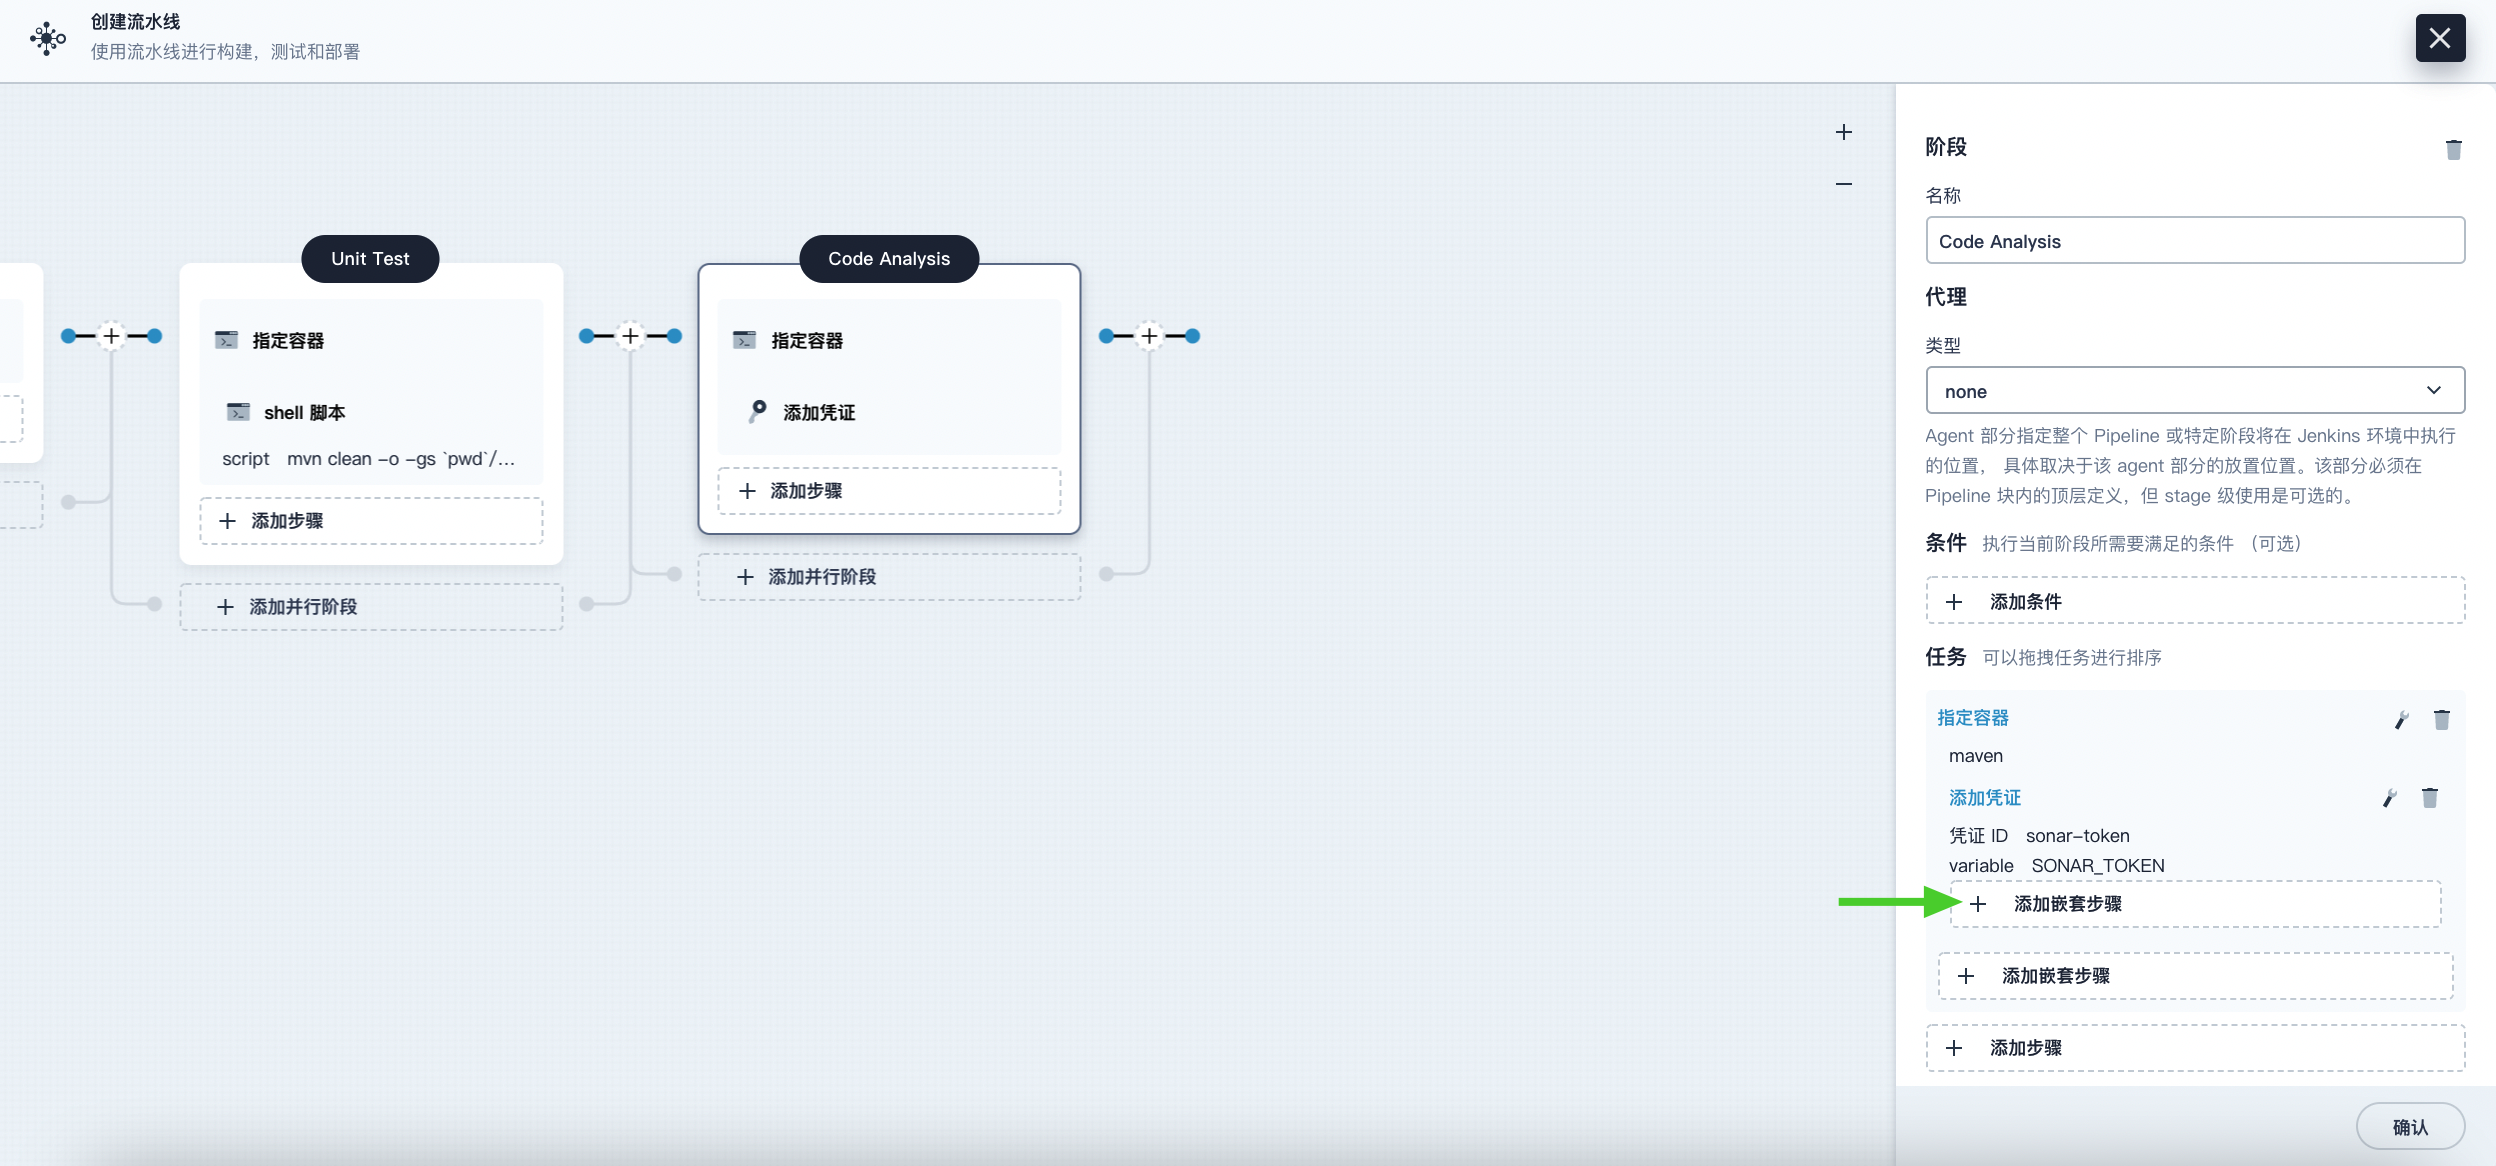
Click the plus icon to the right of the Unit Test stage to add a stage for SonarQube code analysis in a container. Name it Code Analysis.
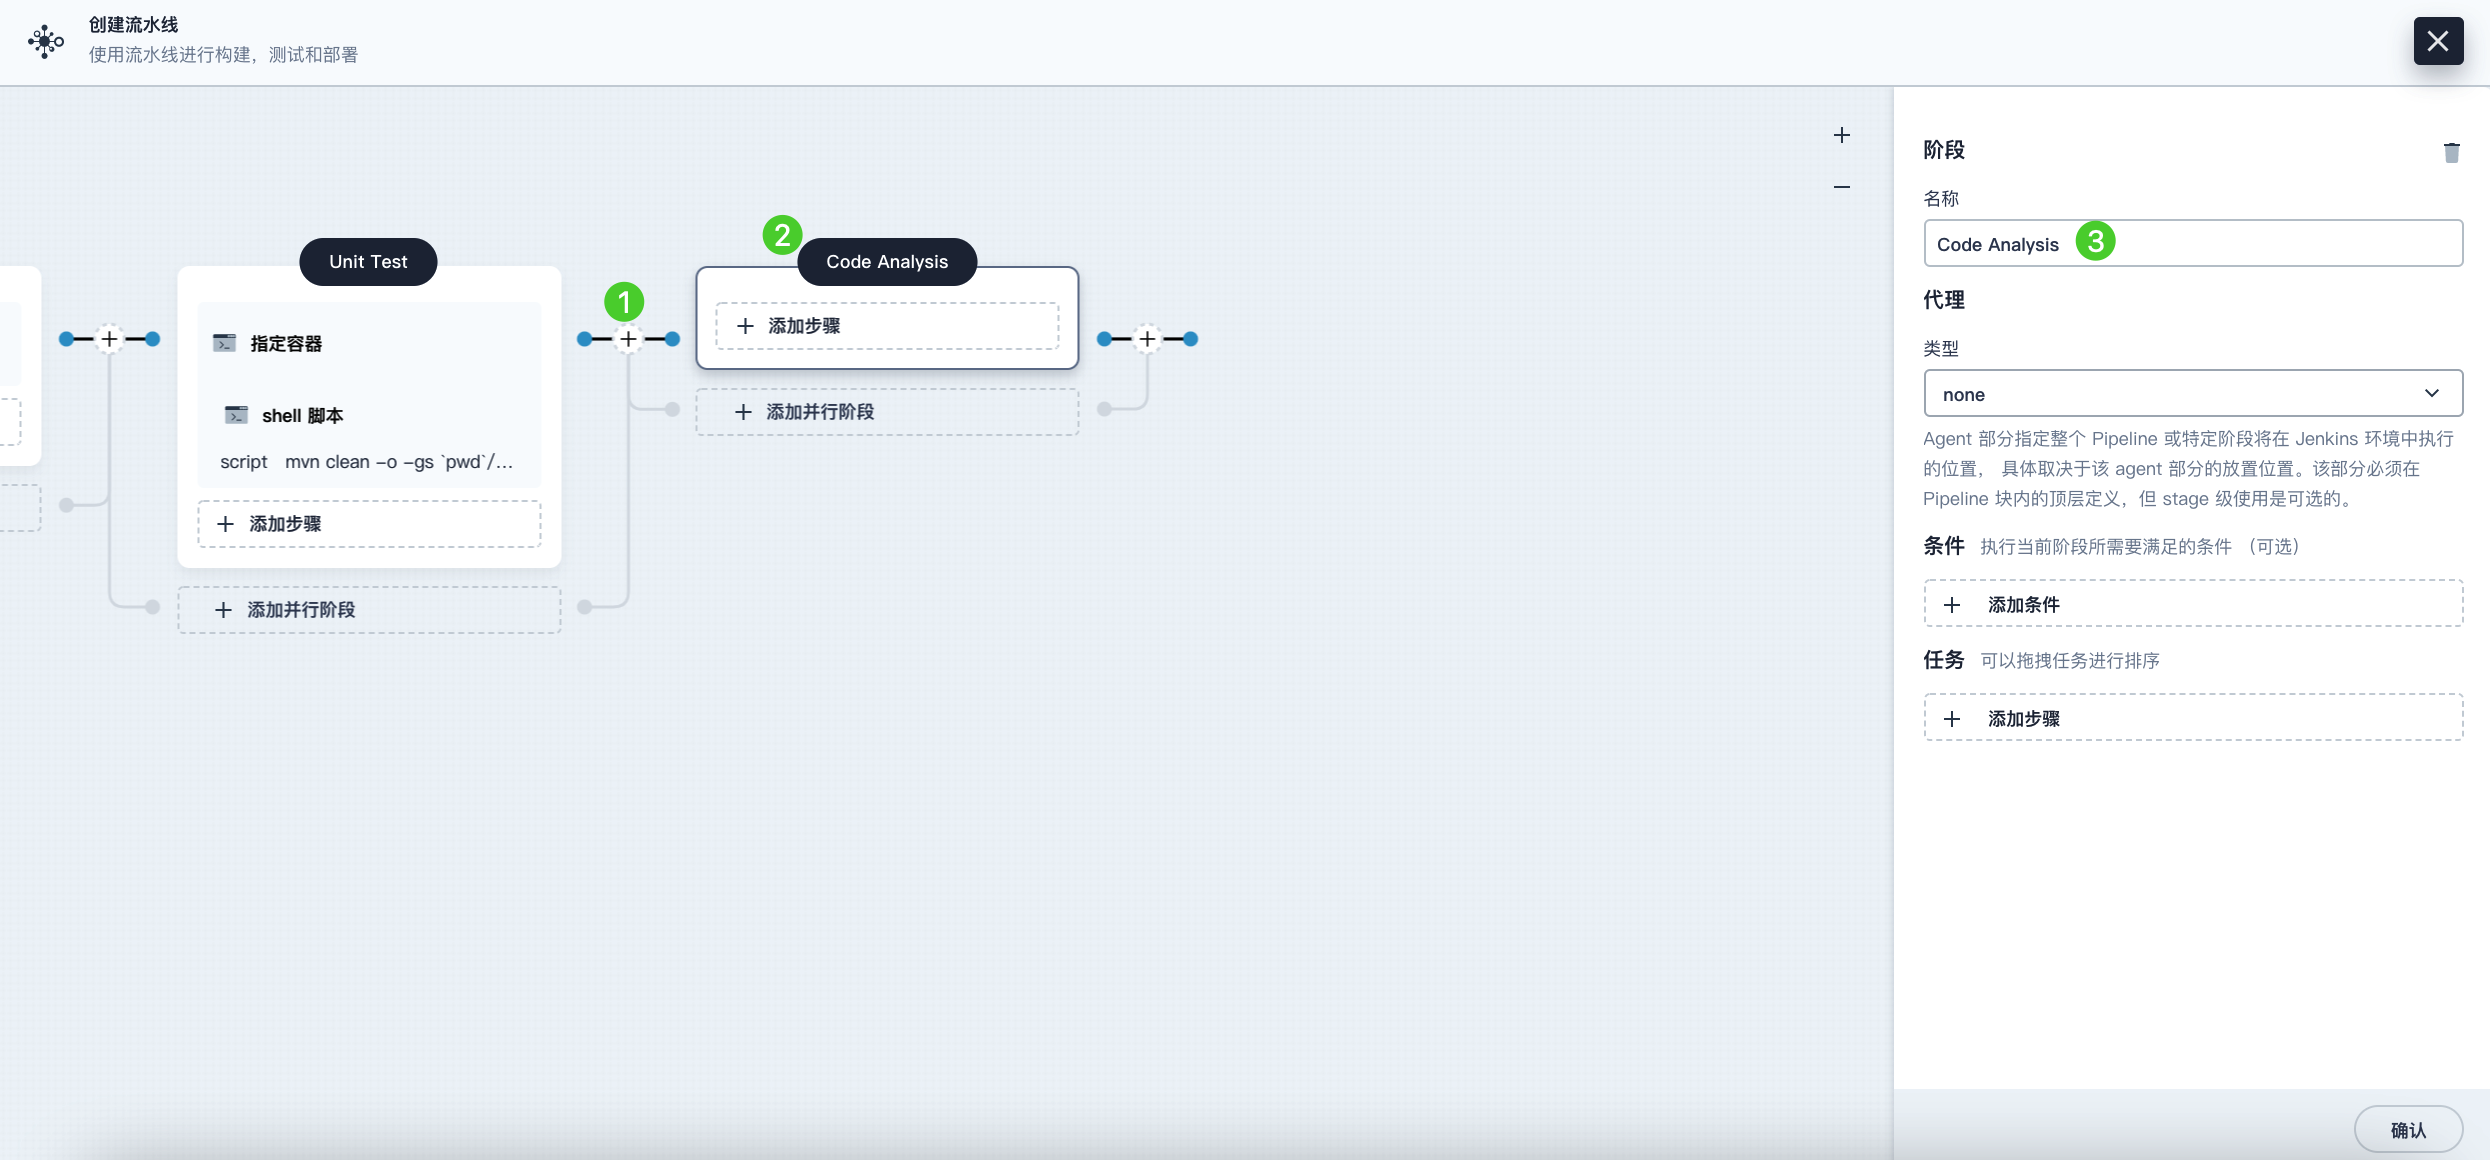
-
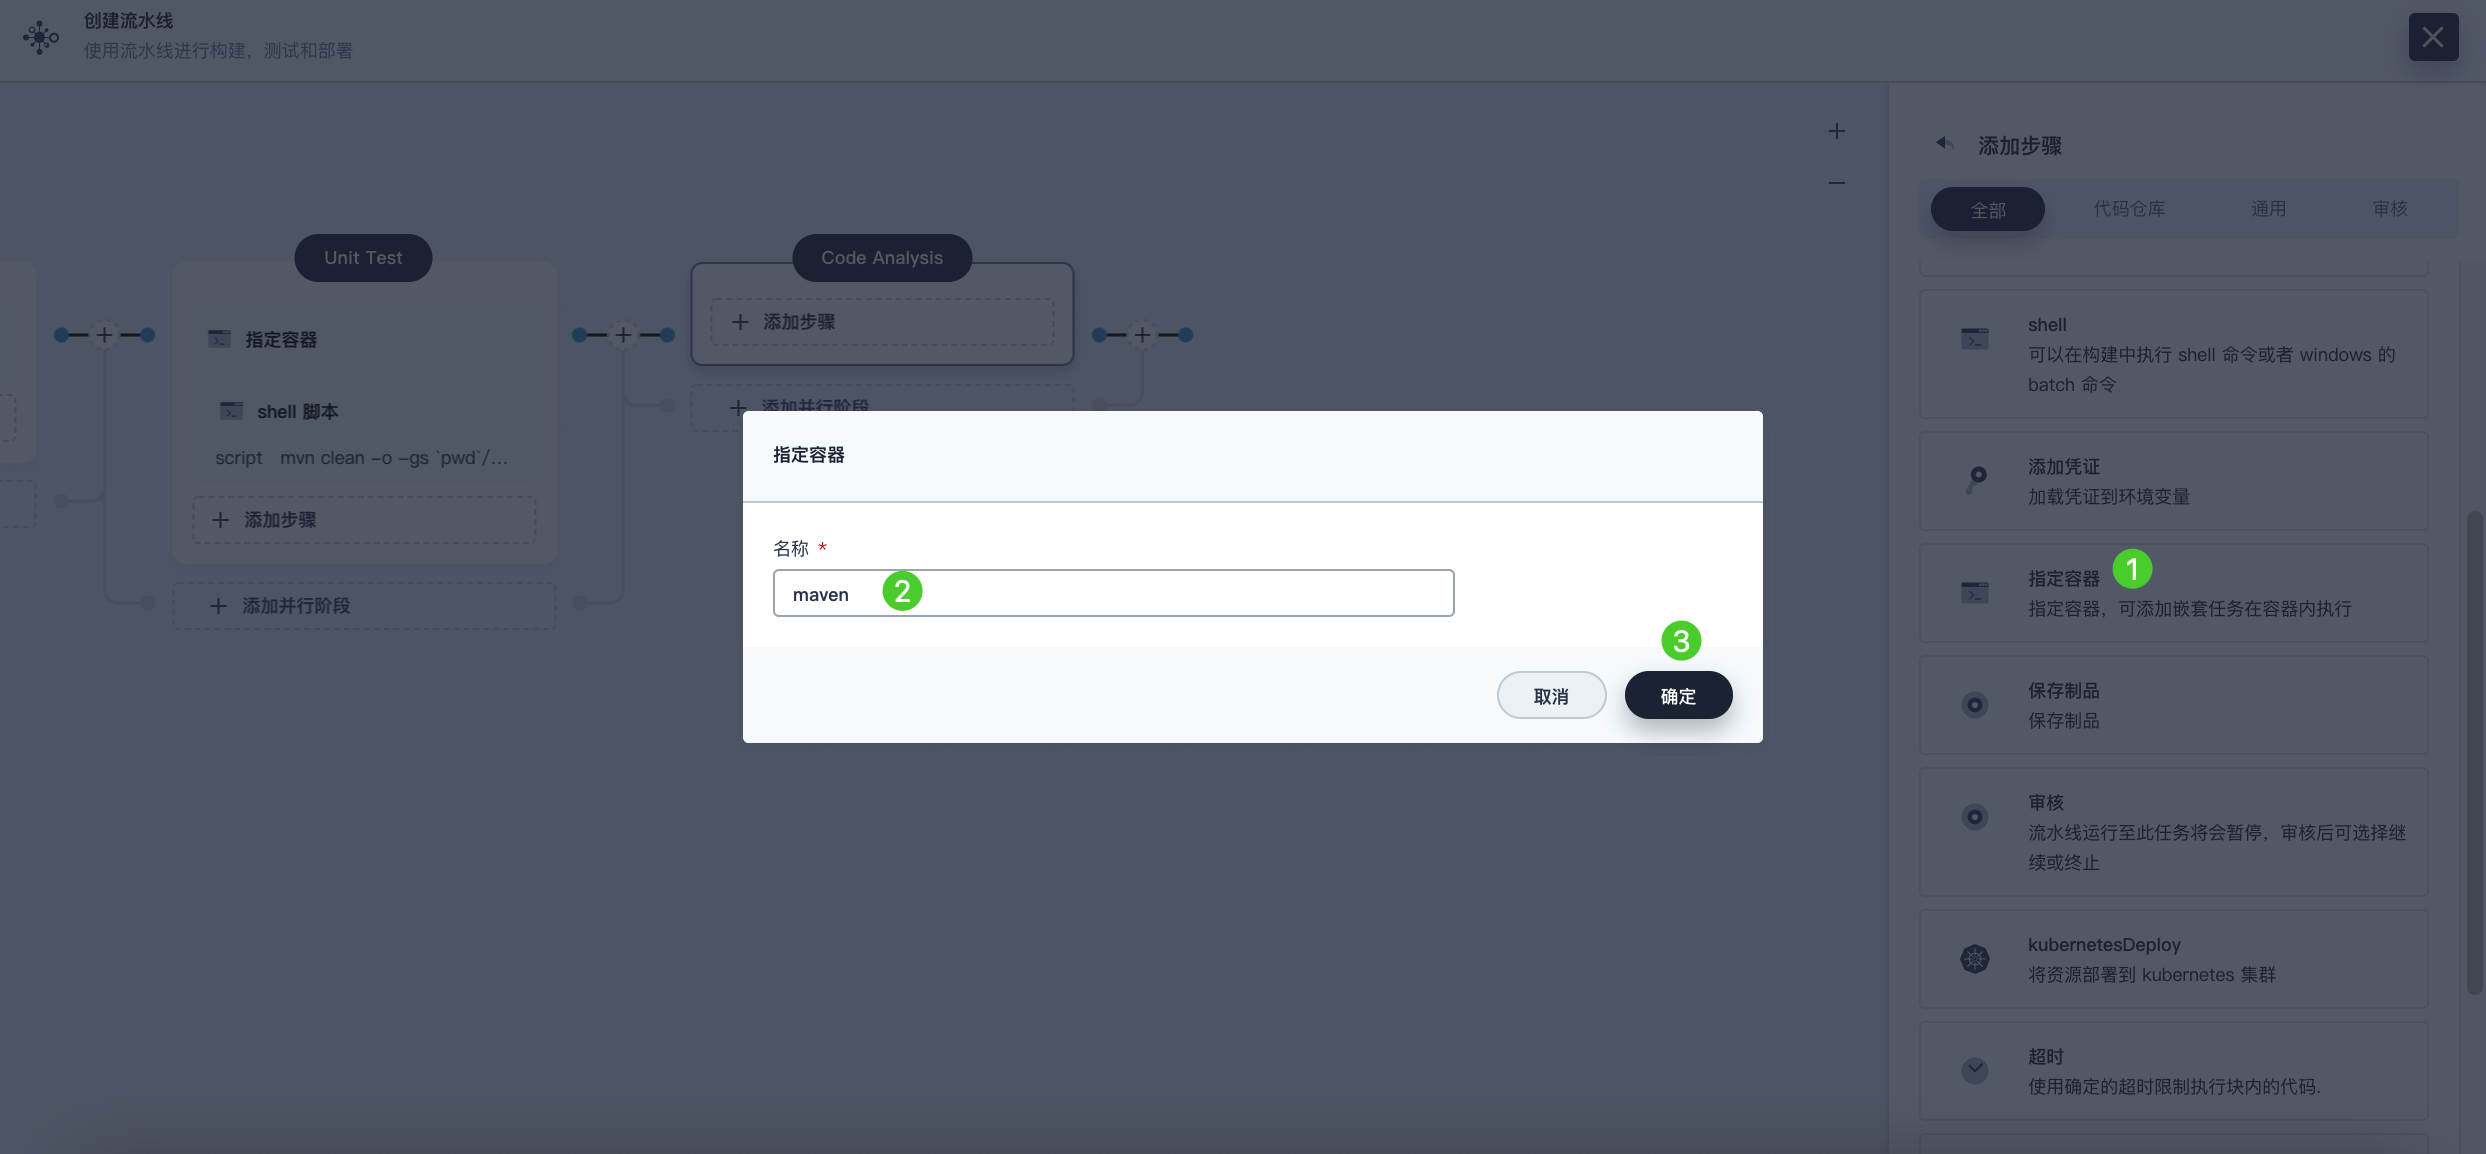
In Code Analysis, click Add Step, select Specify Container. Name it maven and then click OK.
-
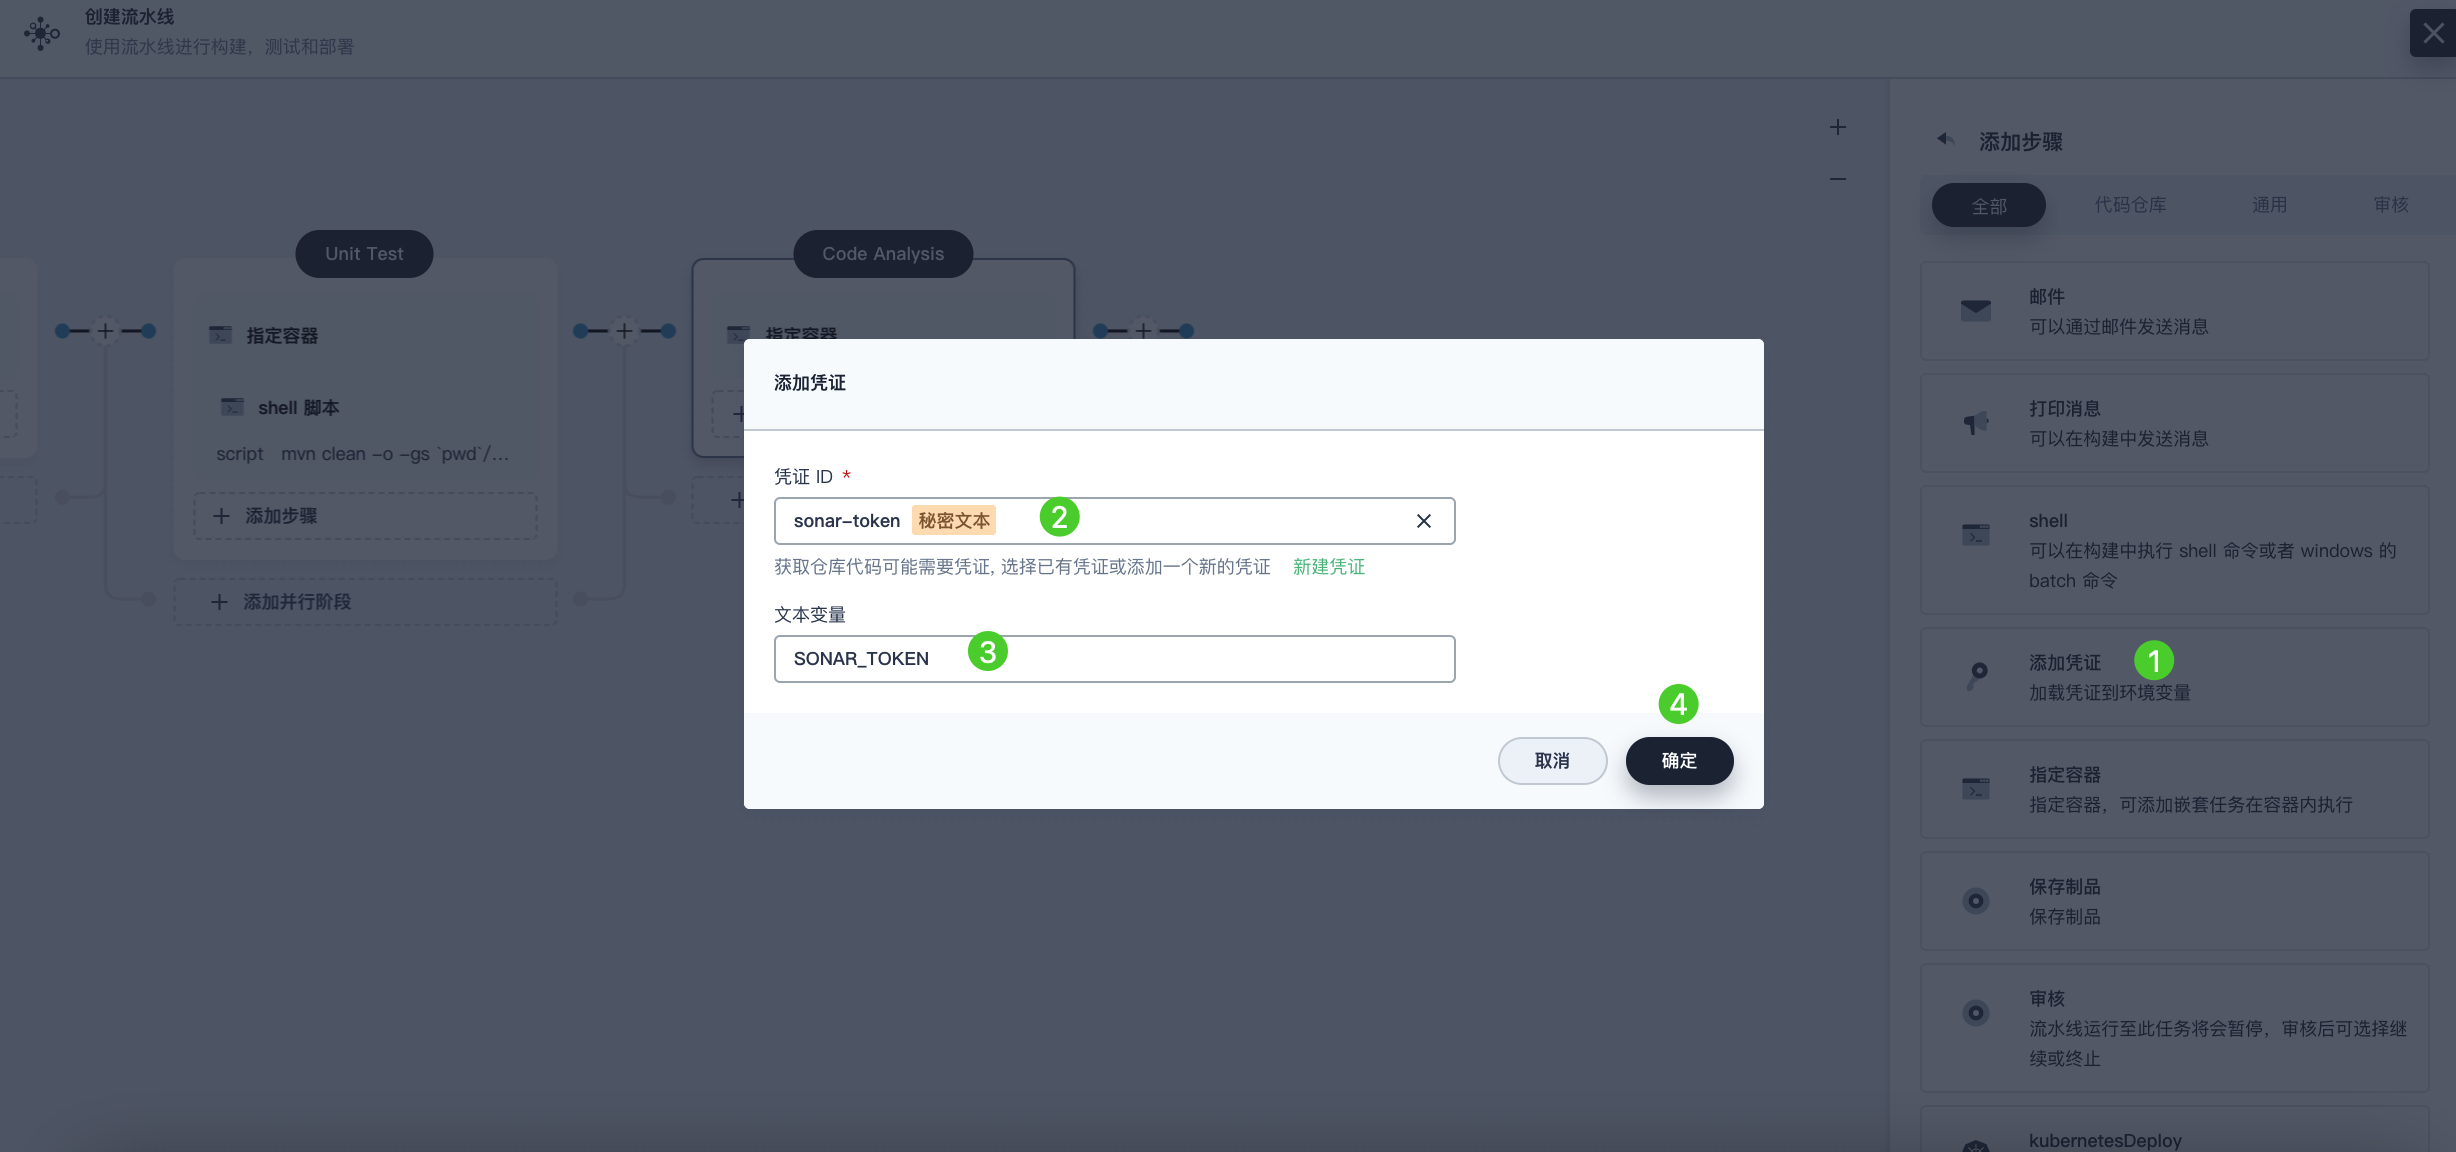
Click Add Nested Step under the maven container step to add a nested step. Click Add Credential and select the SonarQube token (sonar-token) from the Credential ID list. Enter SONAR_TOKEN in the Text Variable field, then click OK.
-
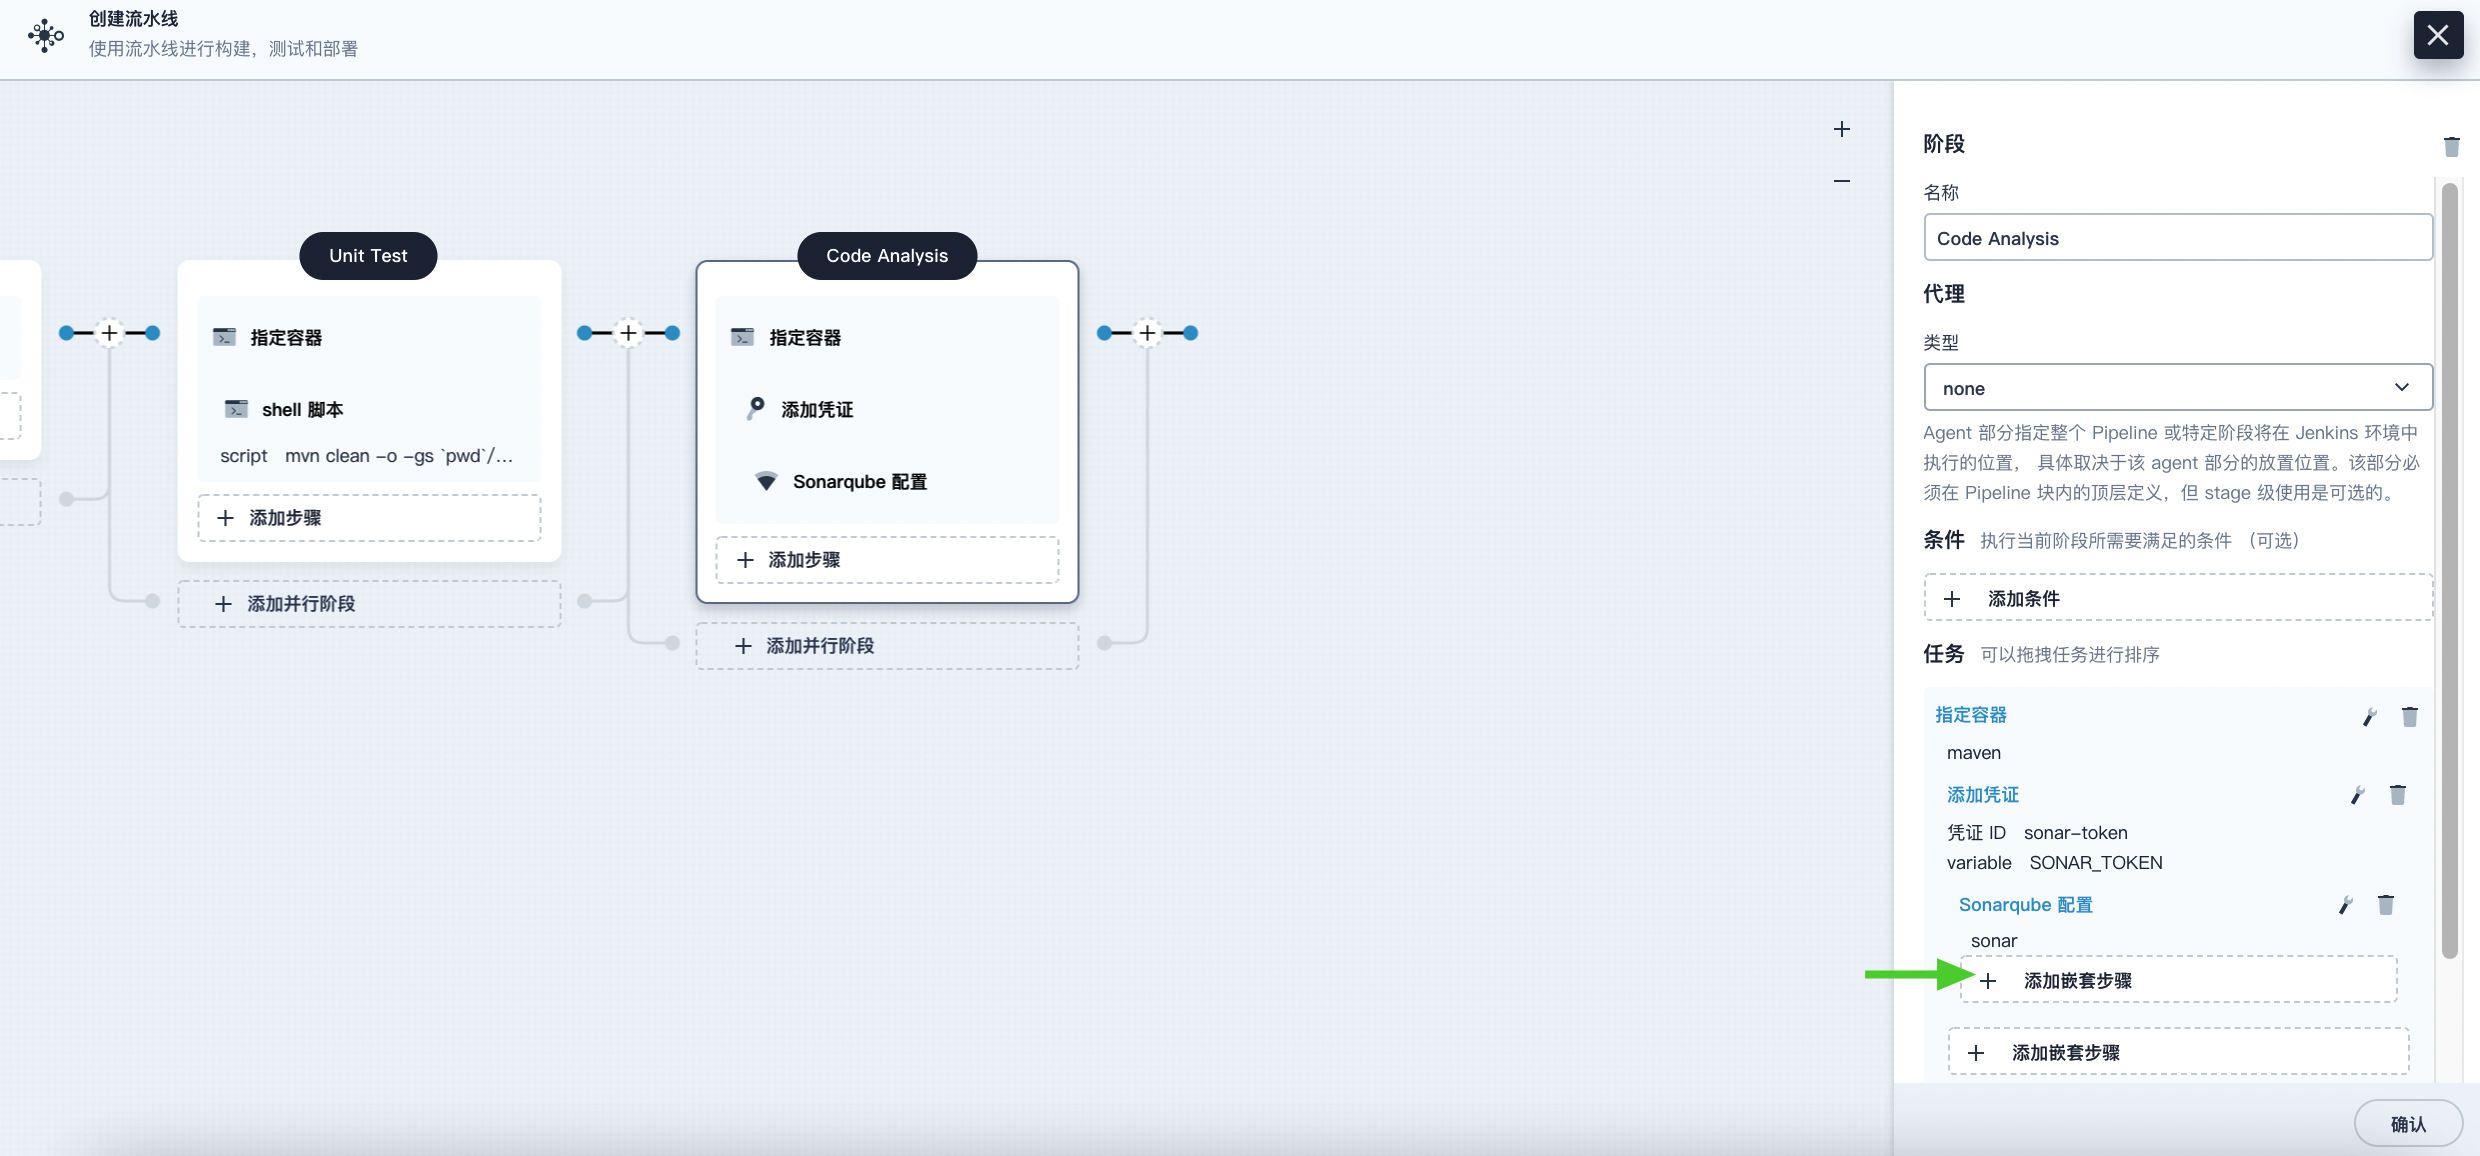
Under the Add Credential step, click Add Nested Step to add a nested step for it.
-
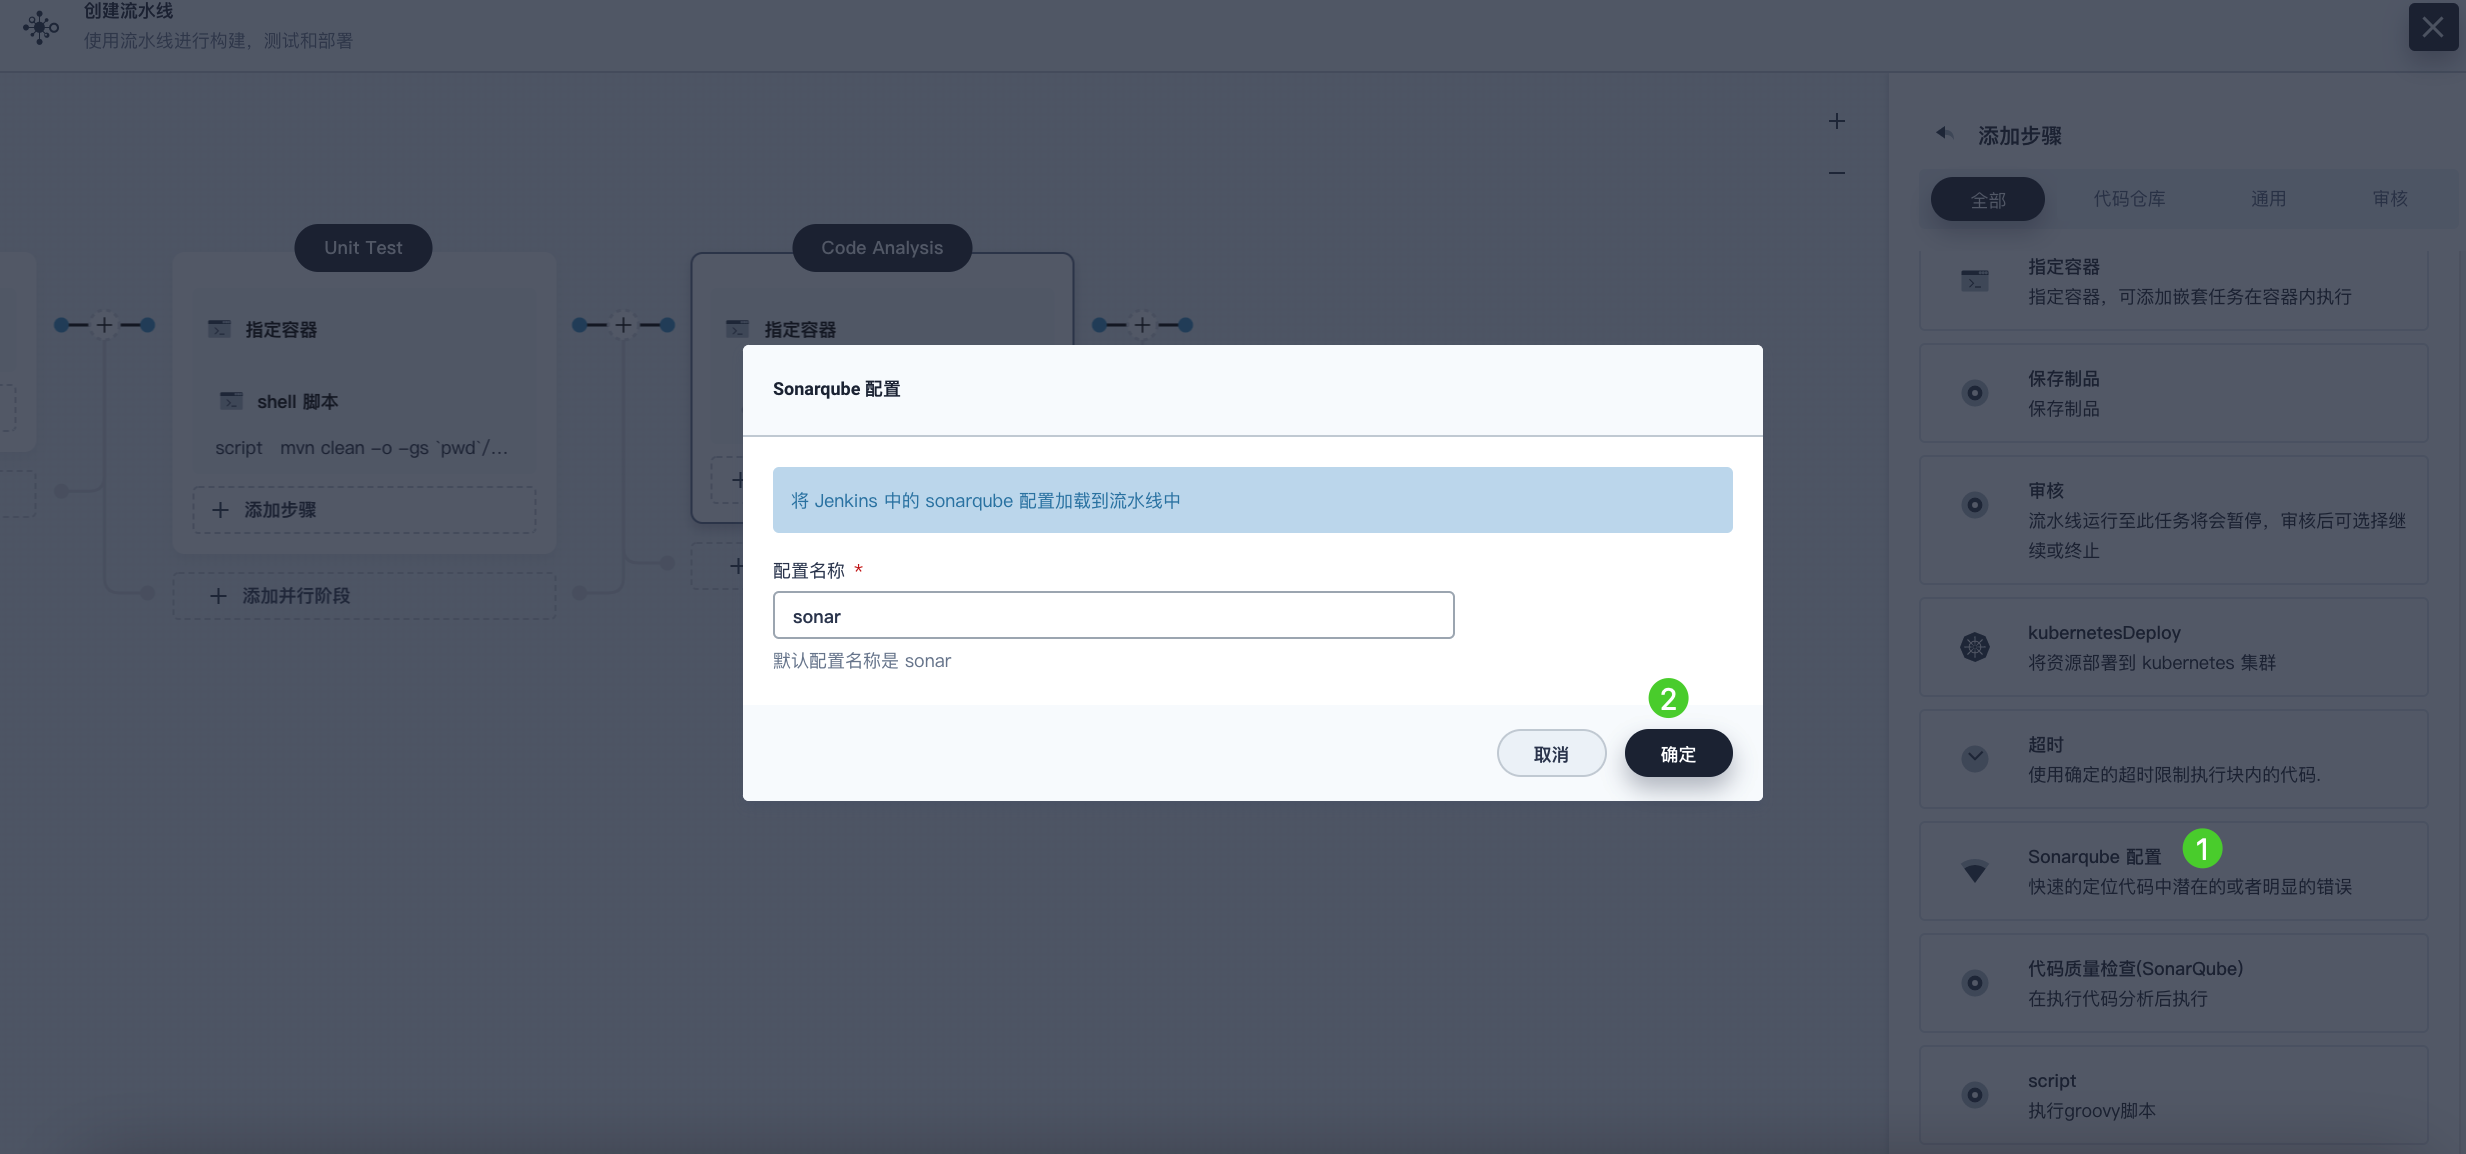
Click Sonarqube Configuration, enter the name sonar in the pop-up dialog, and click OK to save the operation.
-
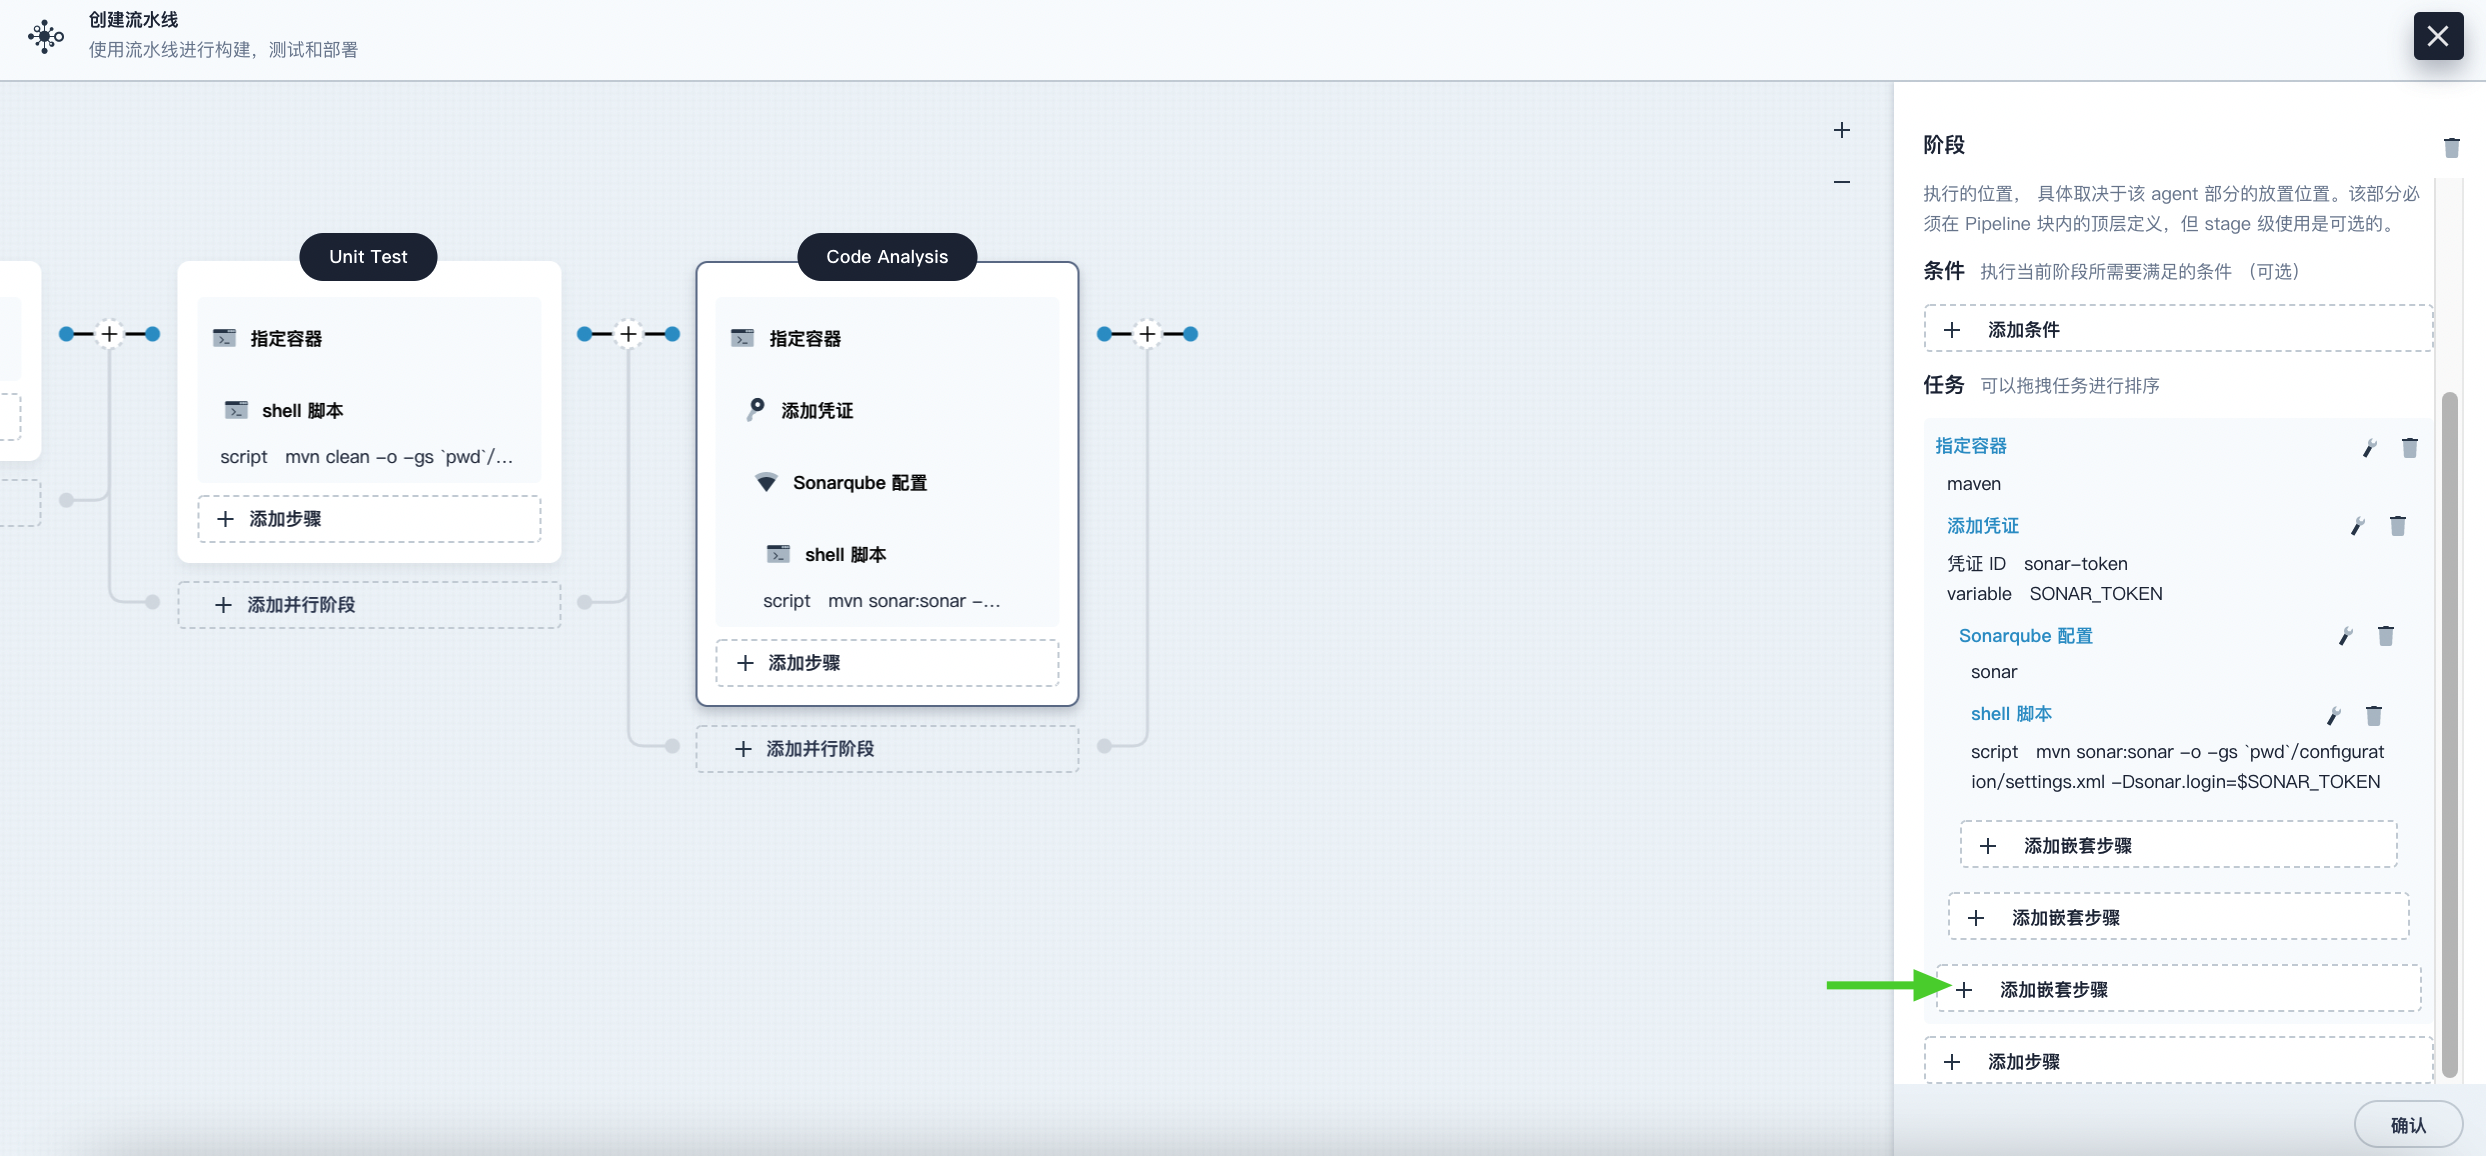
Under the Sonarqube Configuration step, click Add Nested Step to add a nested step for it.
-
Click shell and enter the following command in the command line for SonarQube authentication and analysis, then click OK to complete the operation.
mvn sonar:sonar -Dsonar.login=$SONAR_TOKEN -
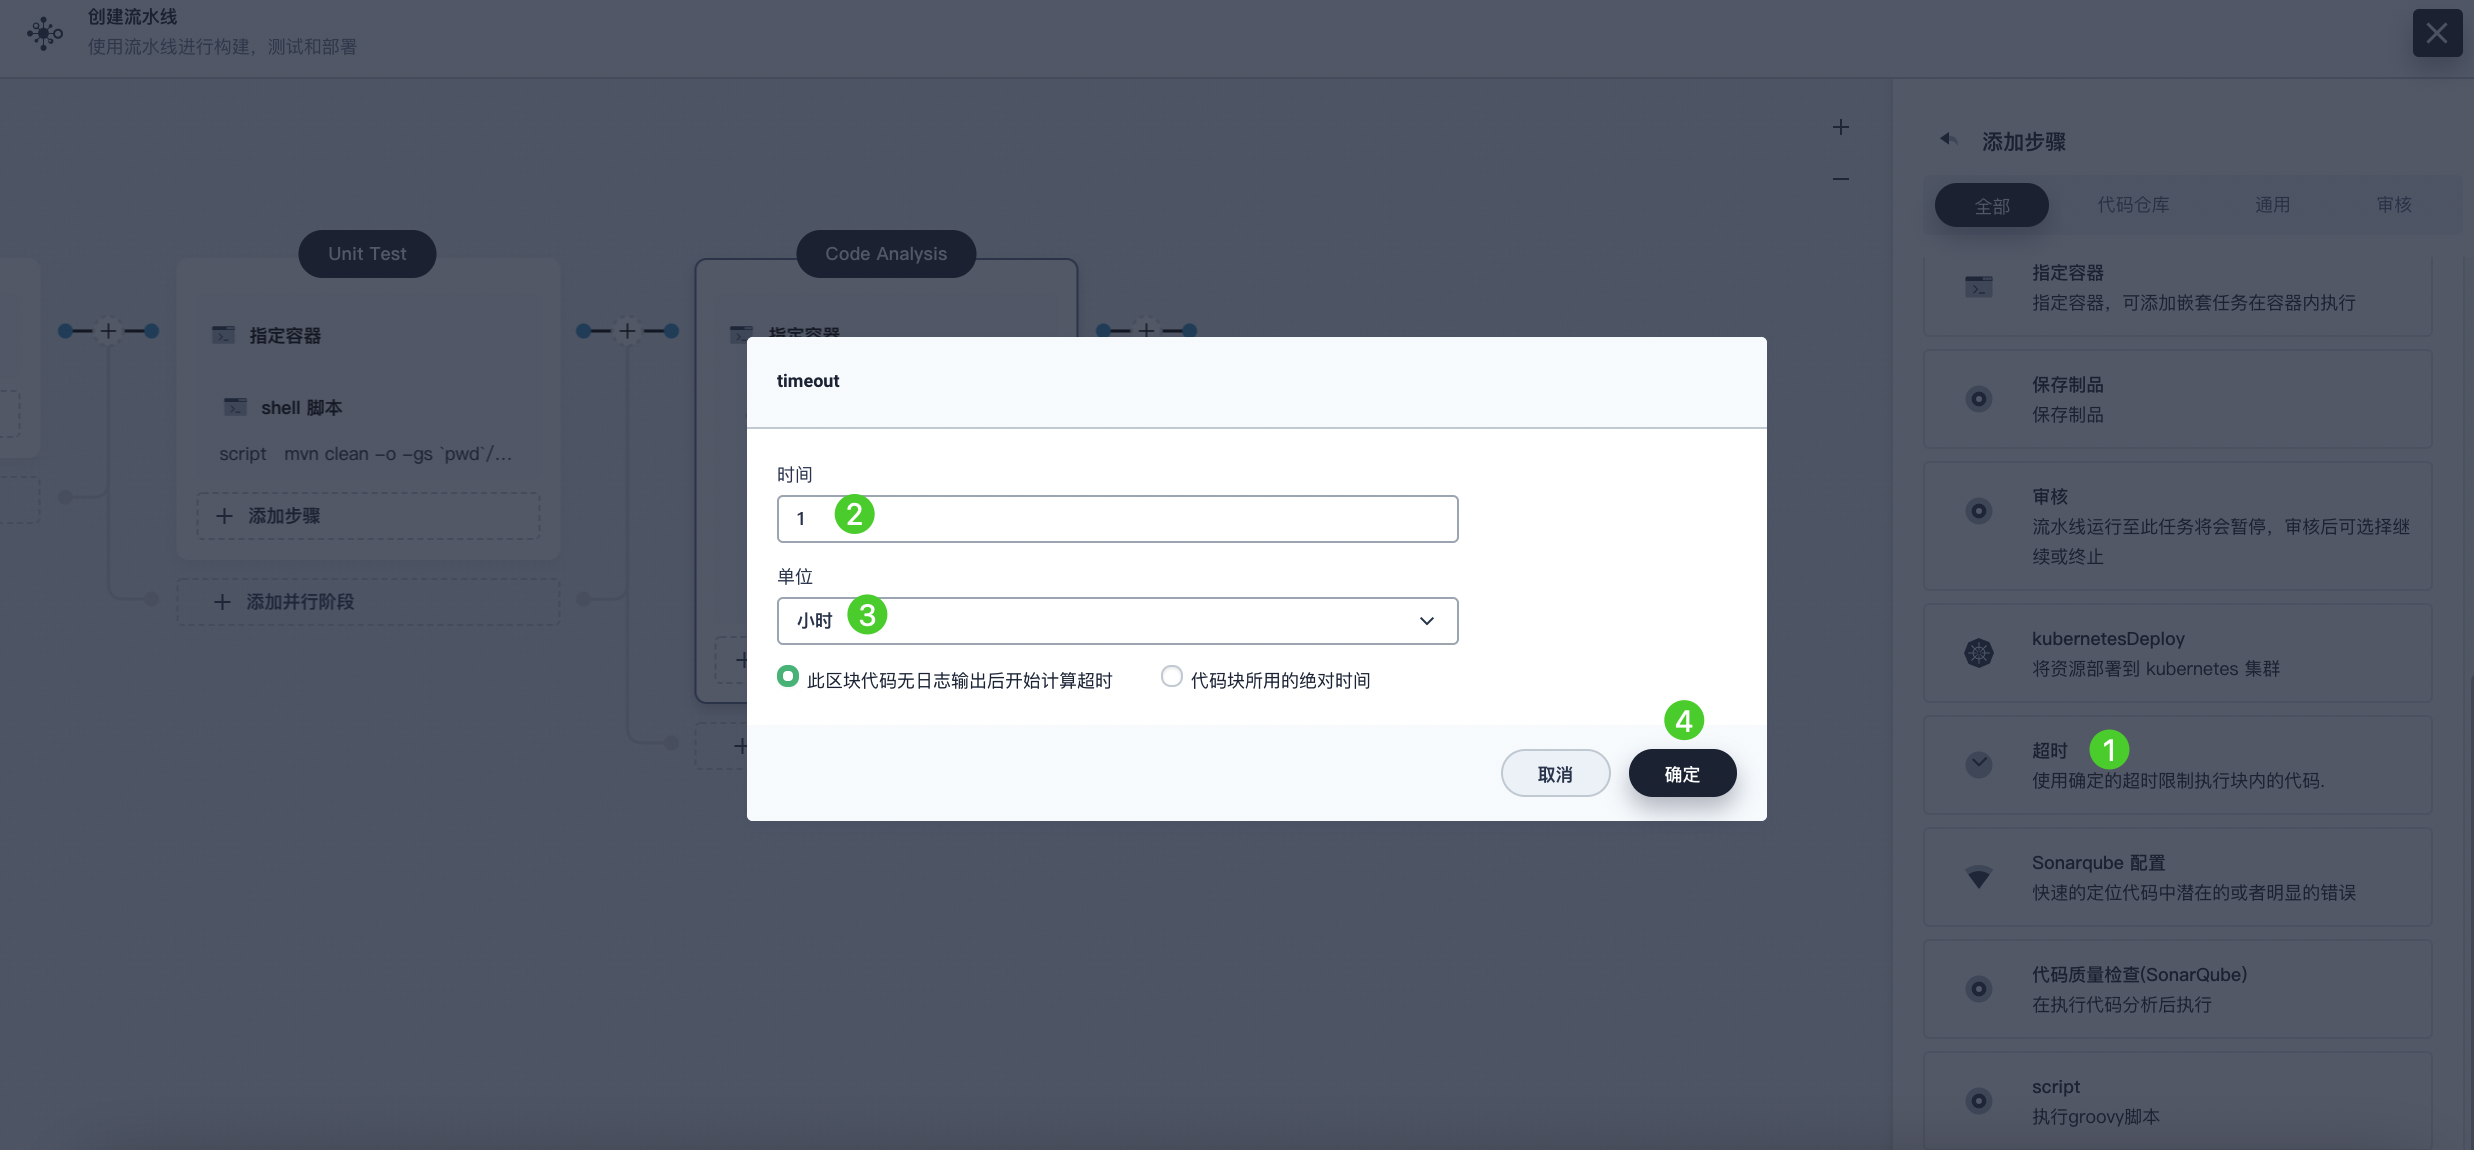
Click Add Nested Step (the third one) under the Specify Container step, select Timeout. Enter 1 in the time field and select Hour as the unit, then click OK to complete the operation.
-
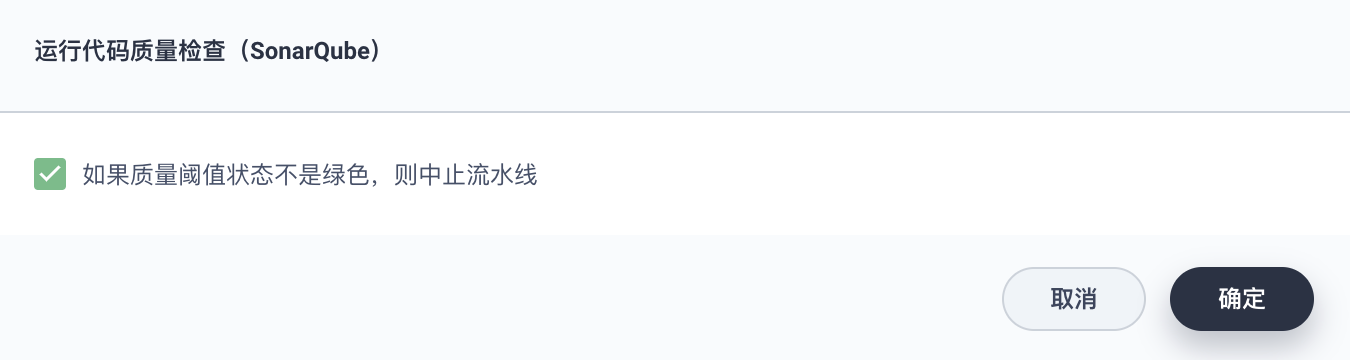
Click Add Nested Step under the Timeout step, select Run Code Quality Check (SonarQube). In the pop-up dialog, check Abort the pipeline if the quality gate status is not green. Click OK to save the operation.
Stage 4: Build and Push Image
-
Click the plus icon to the right of the previous stage to add a new stage for building and pushing the image to Docker Hub. Name it Build and Push.
-
In Build and Push, click Add Step, select Specify Container, name it maven, and then click OK.
-
Click Add Nested Step under the maven container step, select shell from the list, and enter the following command in the pop-up window. Click OK to complete the operation.
mvn -Dmaven.test.skip=true clean package -
Click Add Nested Step again and select shell. In the command line, enter the following command to build the Docker image according to the Dockerfile. Click OK to confirm the operation.
docker build -f Dockerfile-online -t $REGISTRY/$DOCKERHUB_NAMESPACE/$APP_NAME:SNAPSHOT-$BUILD_NUMBER .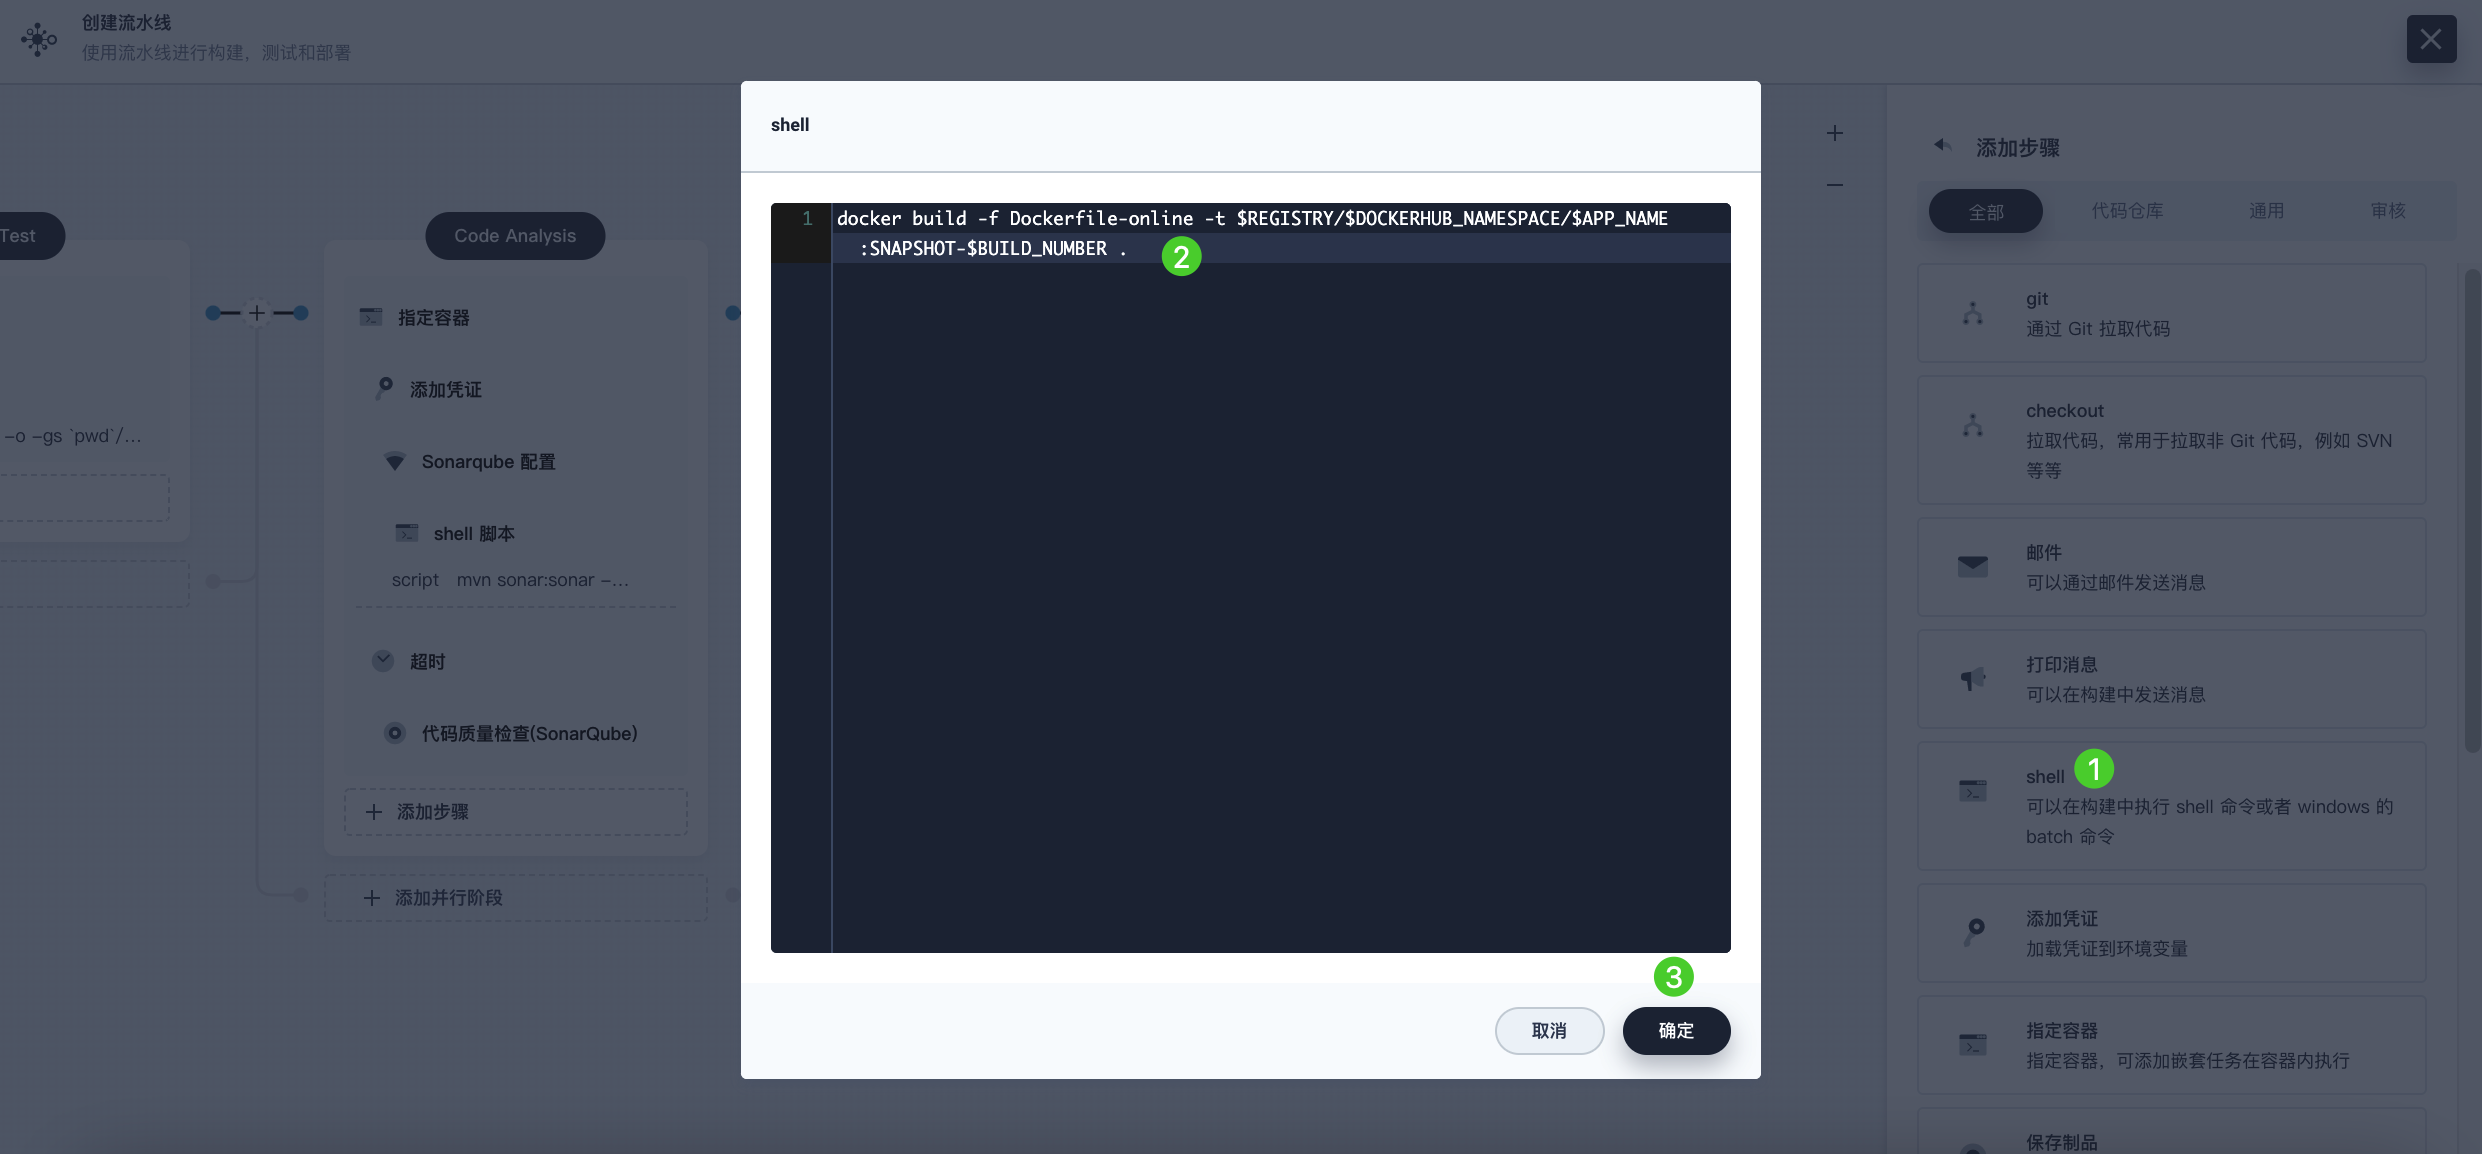
-
Click Add Nested Step again and select Add Credential. In the pop-up dialog, fill in the following fields and click OK to confirm the operation.
-
Credential Name: Select the Docker Hub credential you created, for example, dockerhub-id.
-
Username Variable: Enter DOCKER_USERNAME.
-
Password Variable: Enter DOCKER_PASSWORD.
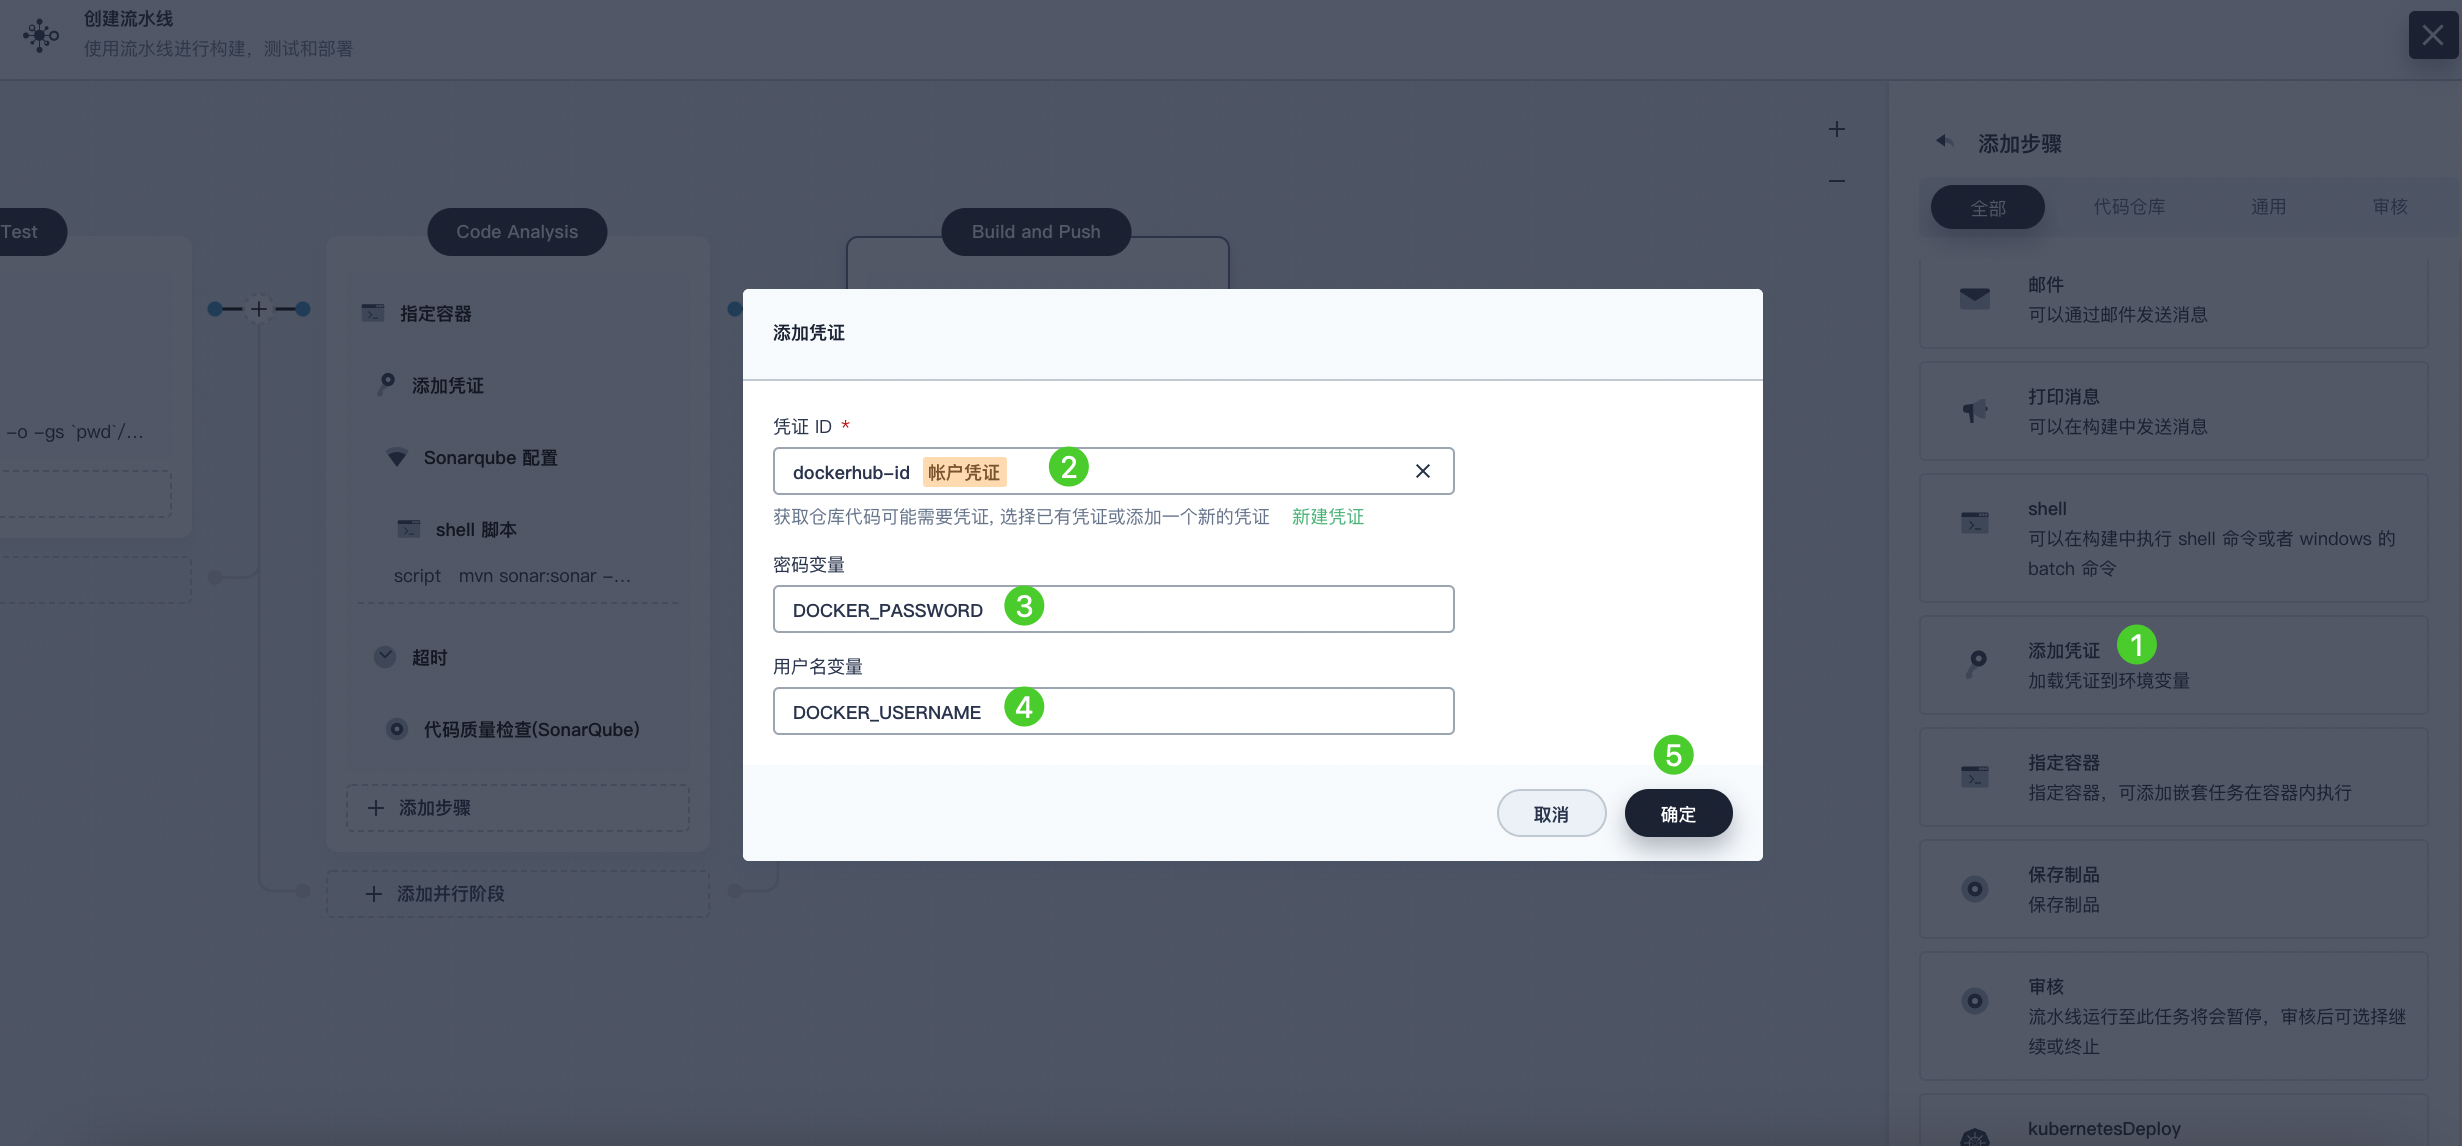
Note For security reasons, account information is displayed as variables in the script.
-
-
Under the Add Credential step, click Add Nested Step (the first one). Select shell and enter the following command in the pop-up window to log in to Docker Hub. Click OK to confirm the operation.
echo "$DOCKER_PASSWORD"|docker login $REGISTRY -u "$DOCKER_USERNAME" --password-stdin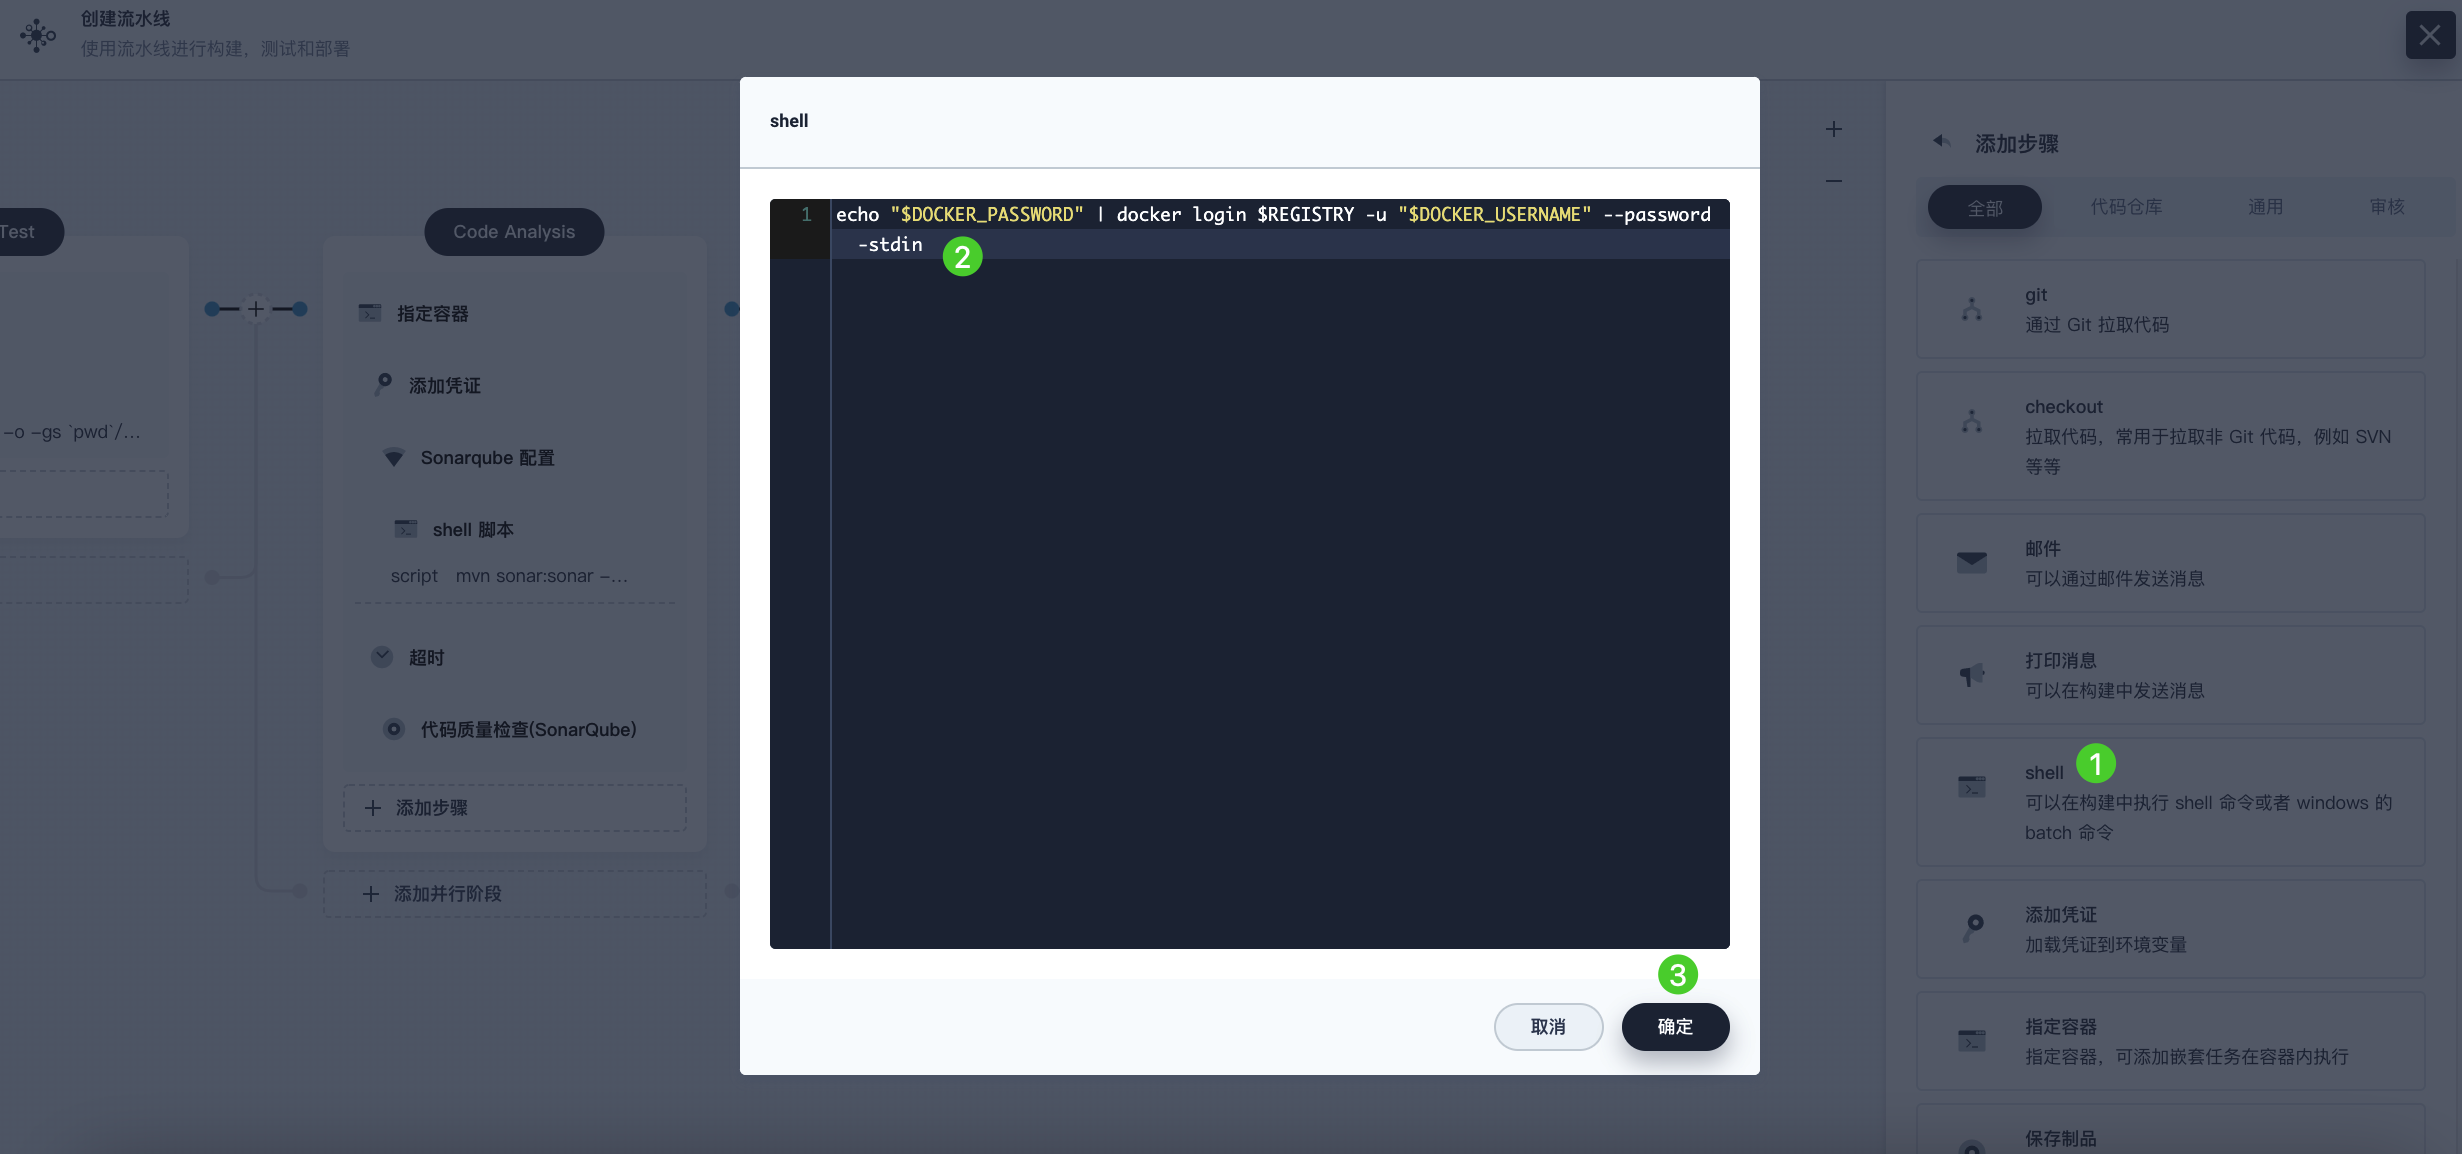
-
Click Add Nested Step again under the Add Credential step. Select shell and enter the following command to push the SNAPSHOT image to Docker Hub. Click OK to complete the operation.
docker push $REGISTRY/$DOCKERHUB_NAMESPACE/$APP_NAME:SNAPSHOT-$BUILD_NUMBER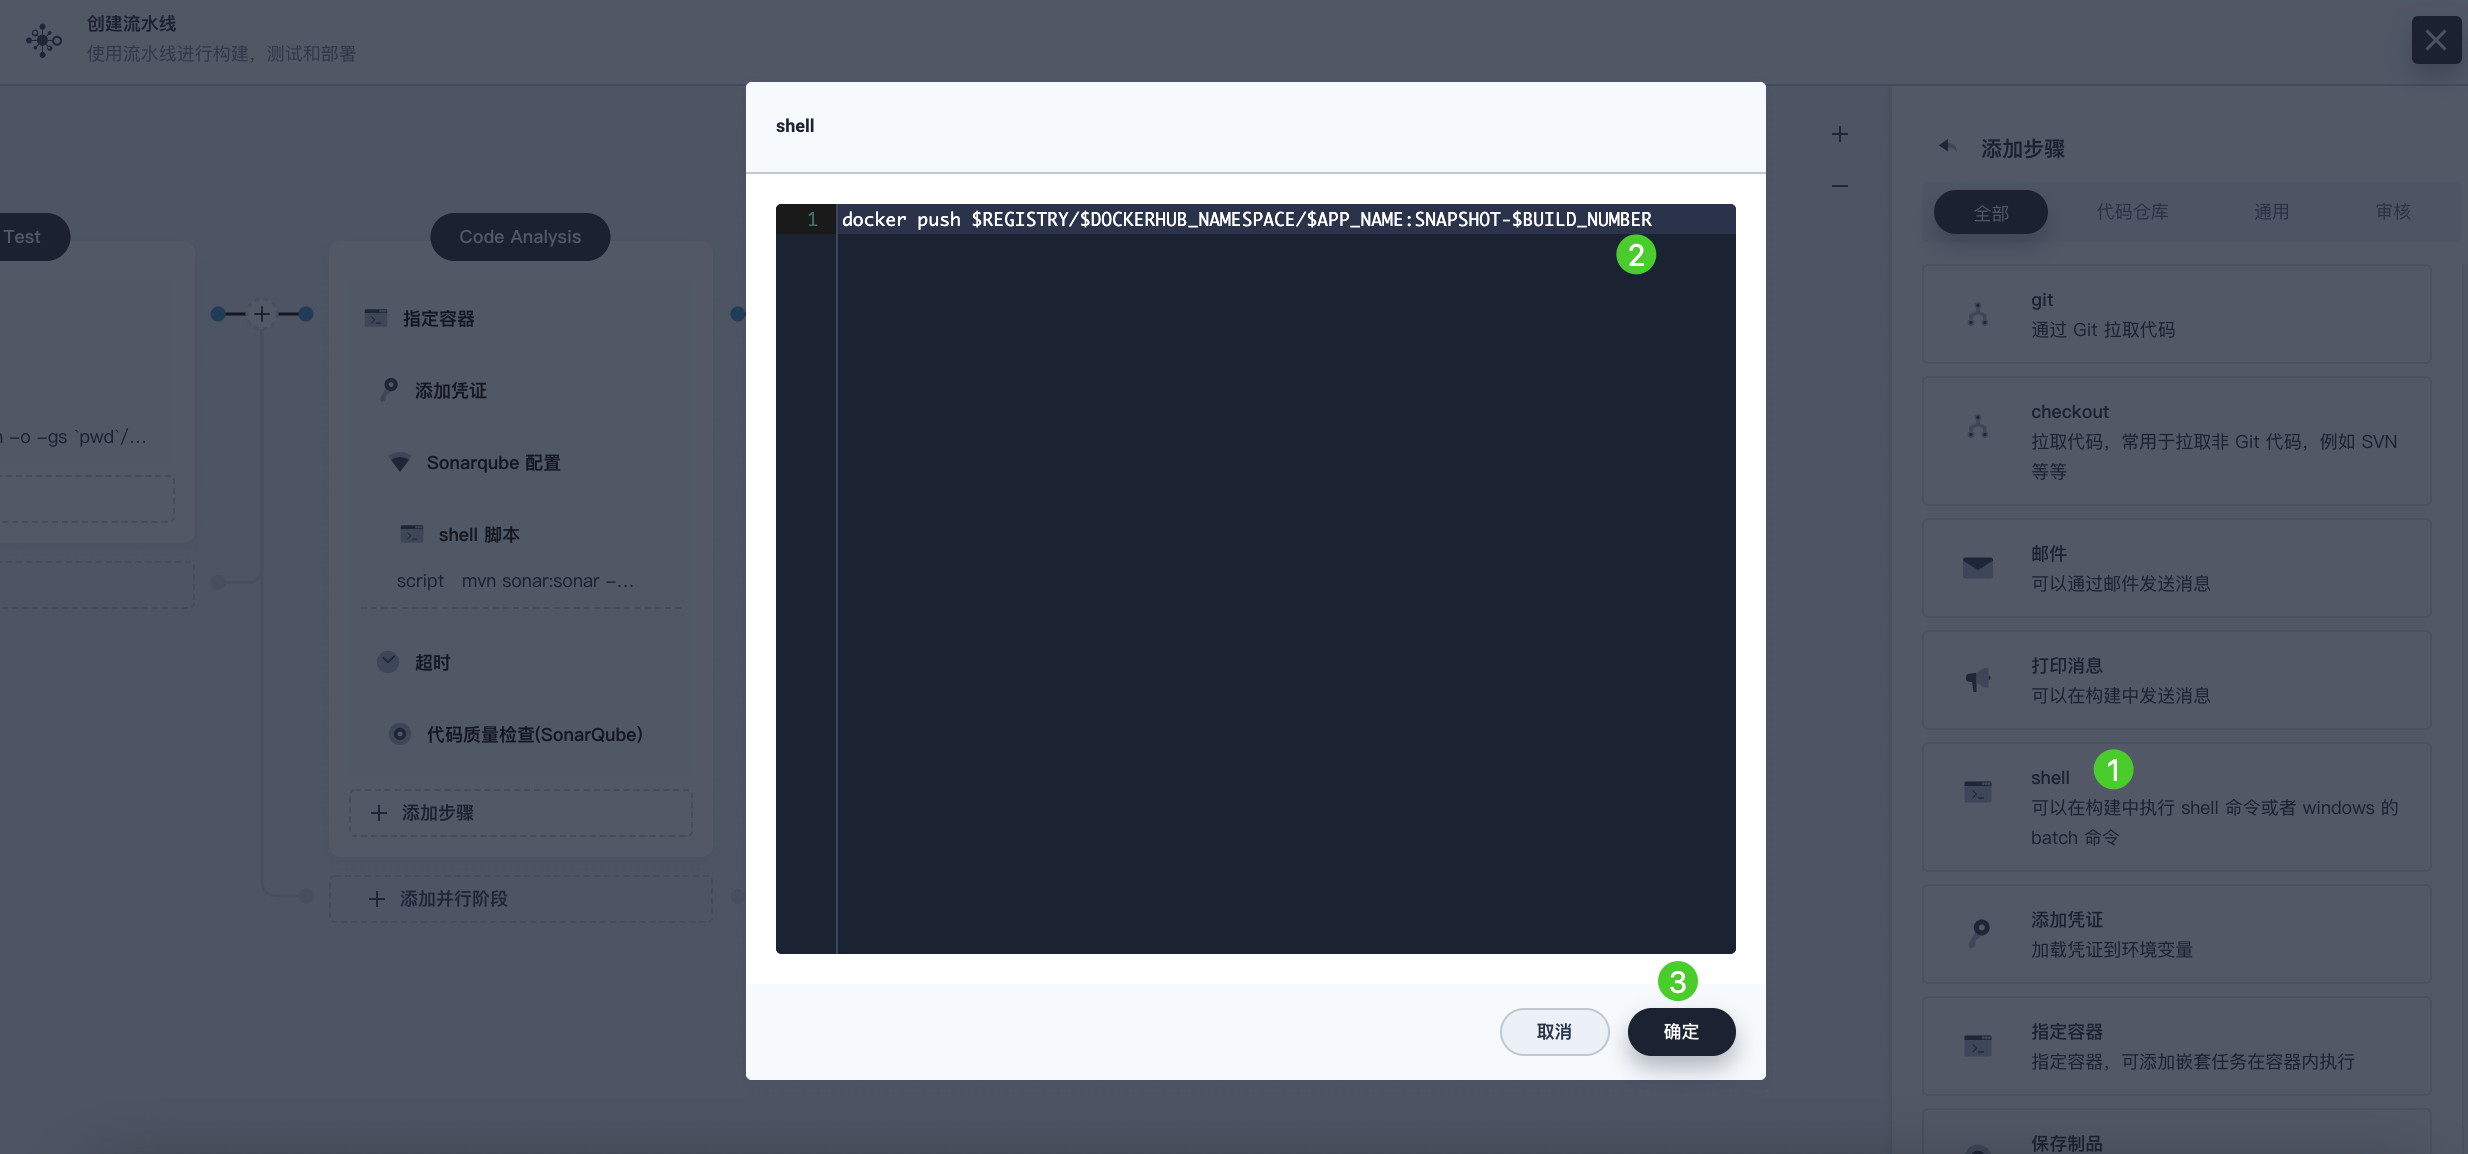
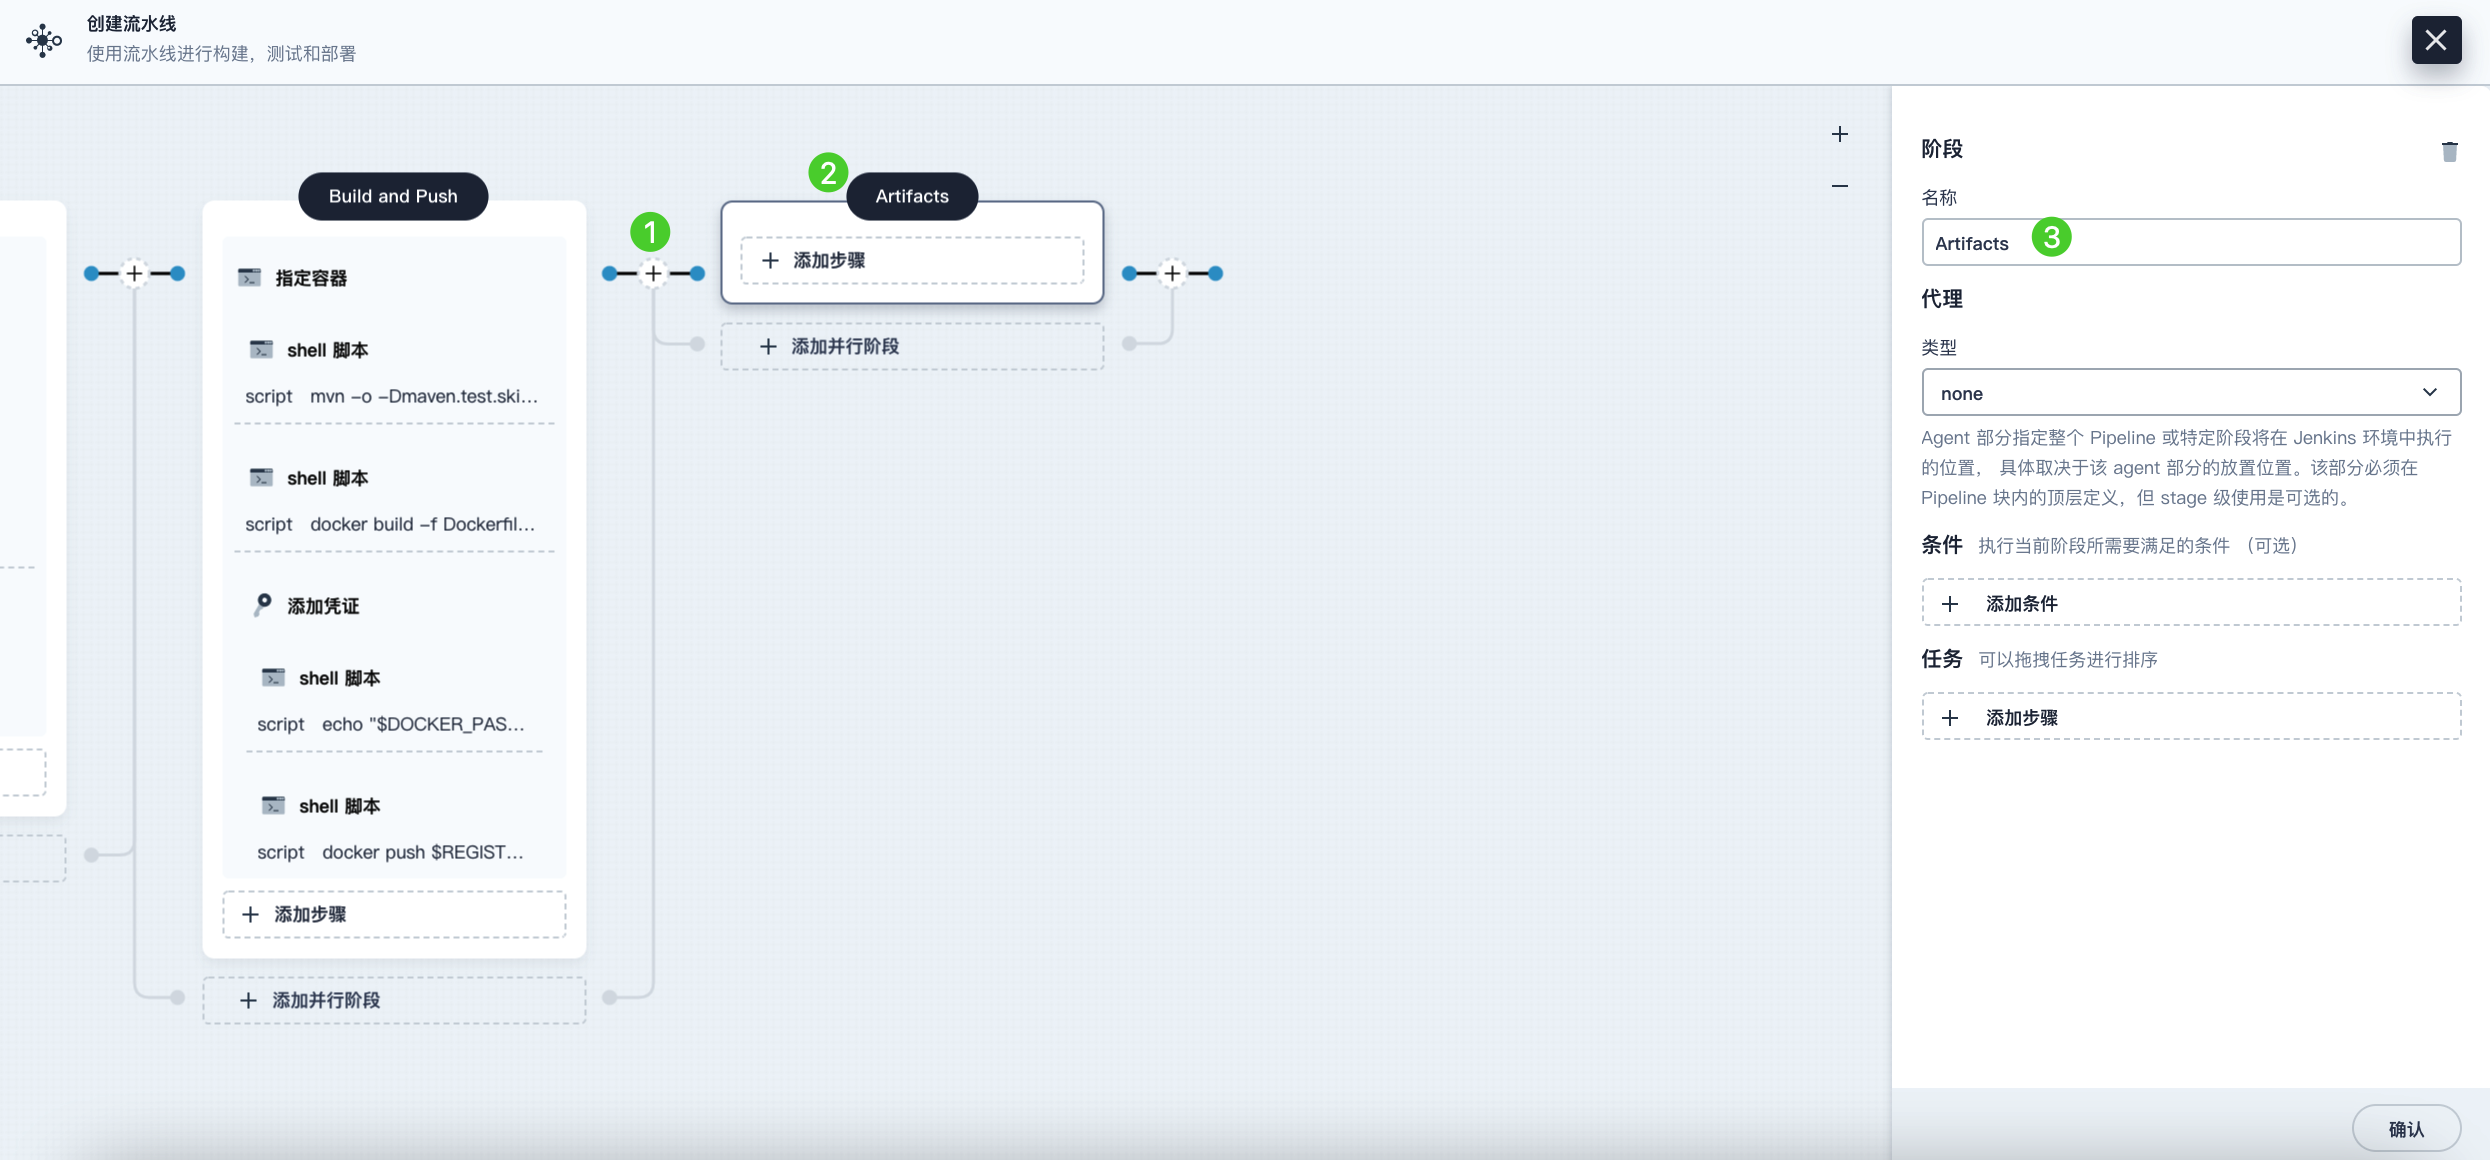
Stage 5: Generate Artifacts
-
Click the plus icon on the right side of the Build and Push stage to add a new stage for saving artifacts, and name it Artifacts. This example uses a JAR file package.
-
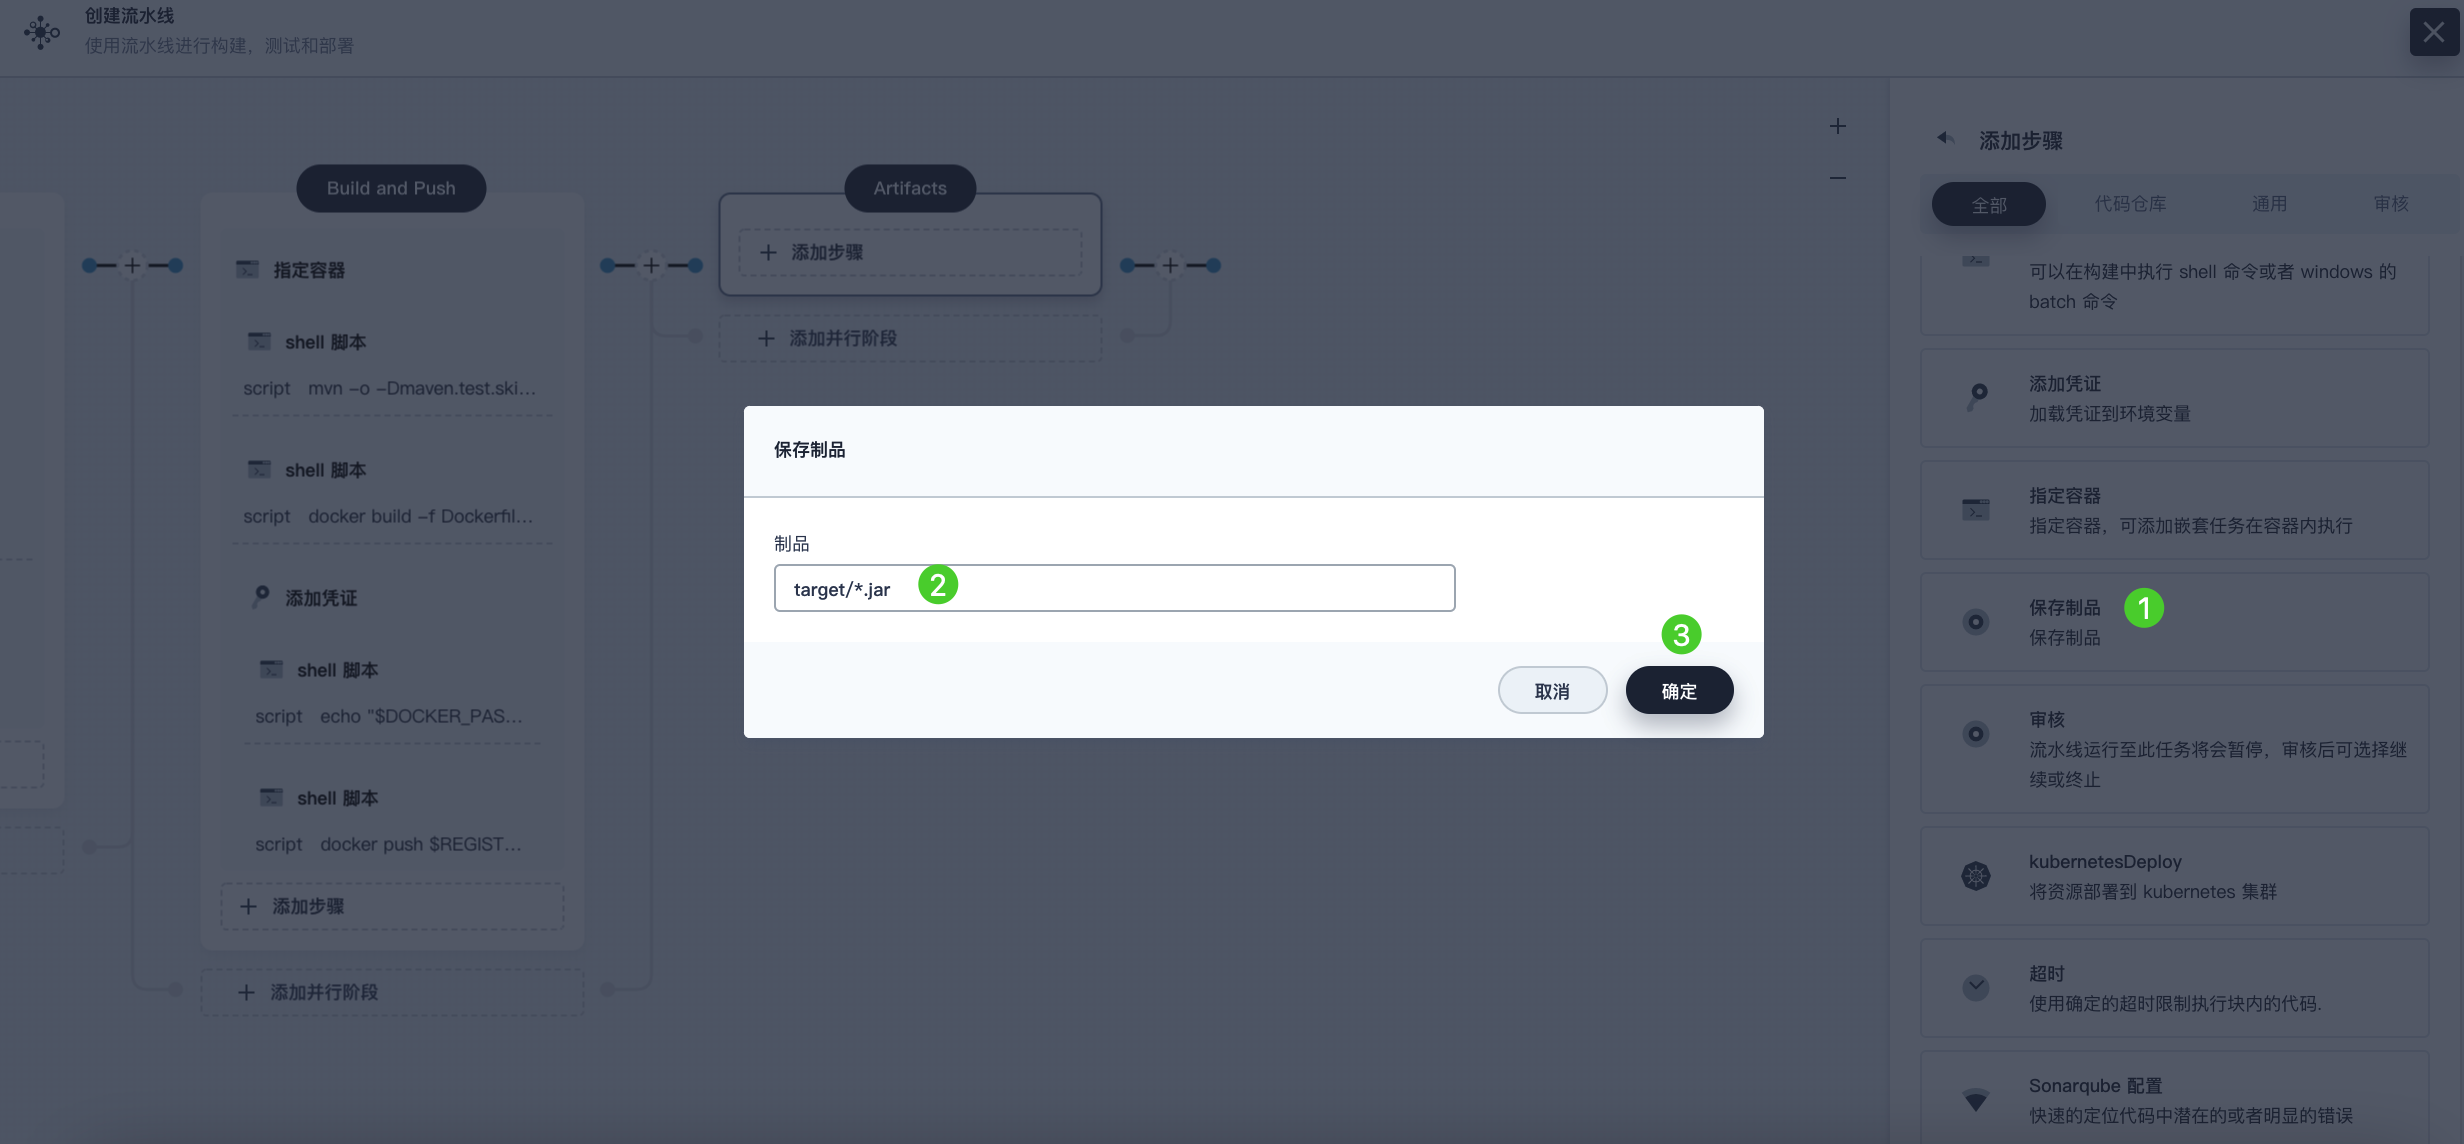
Select the Artifacts stage, click Add Step, and select Archive Artifacts. In the pop-up dialog, enter target/*.jar to set it as the save path for artifacts in Jenkins. Click OK to complete the operation.
Stage 6: Deploy to Development Environment
-
Click the plus icon on the right side of the Artifacts stage to add the final stage and name it Deploy to Dev. This stage is used to deploy resources to your development environment (i.e., the kubesphere-sample-dev project).
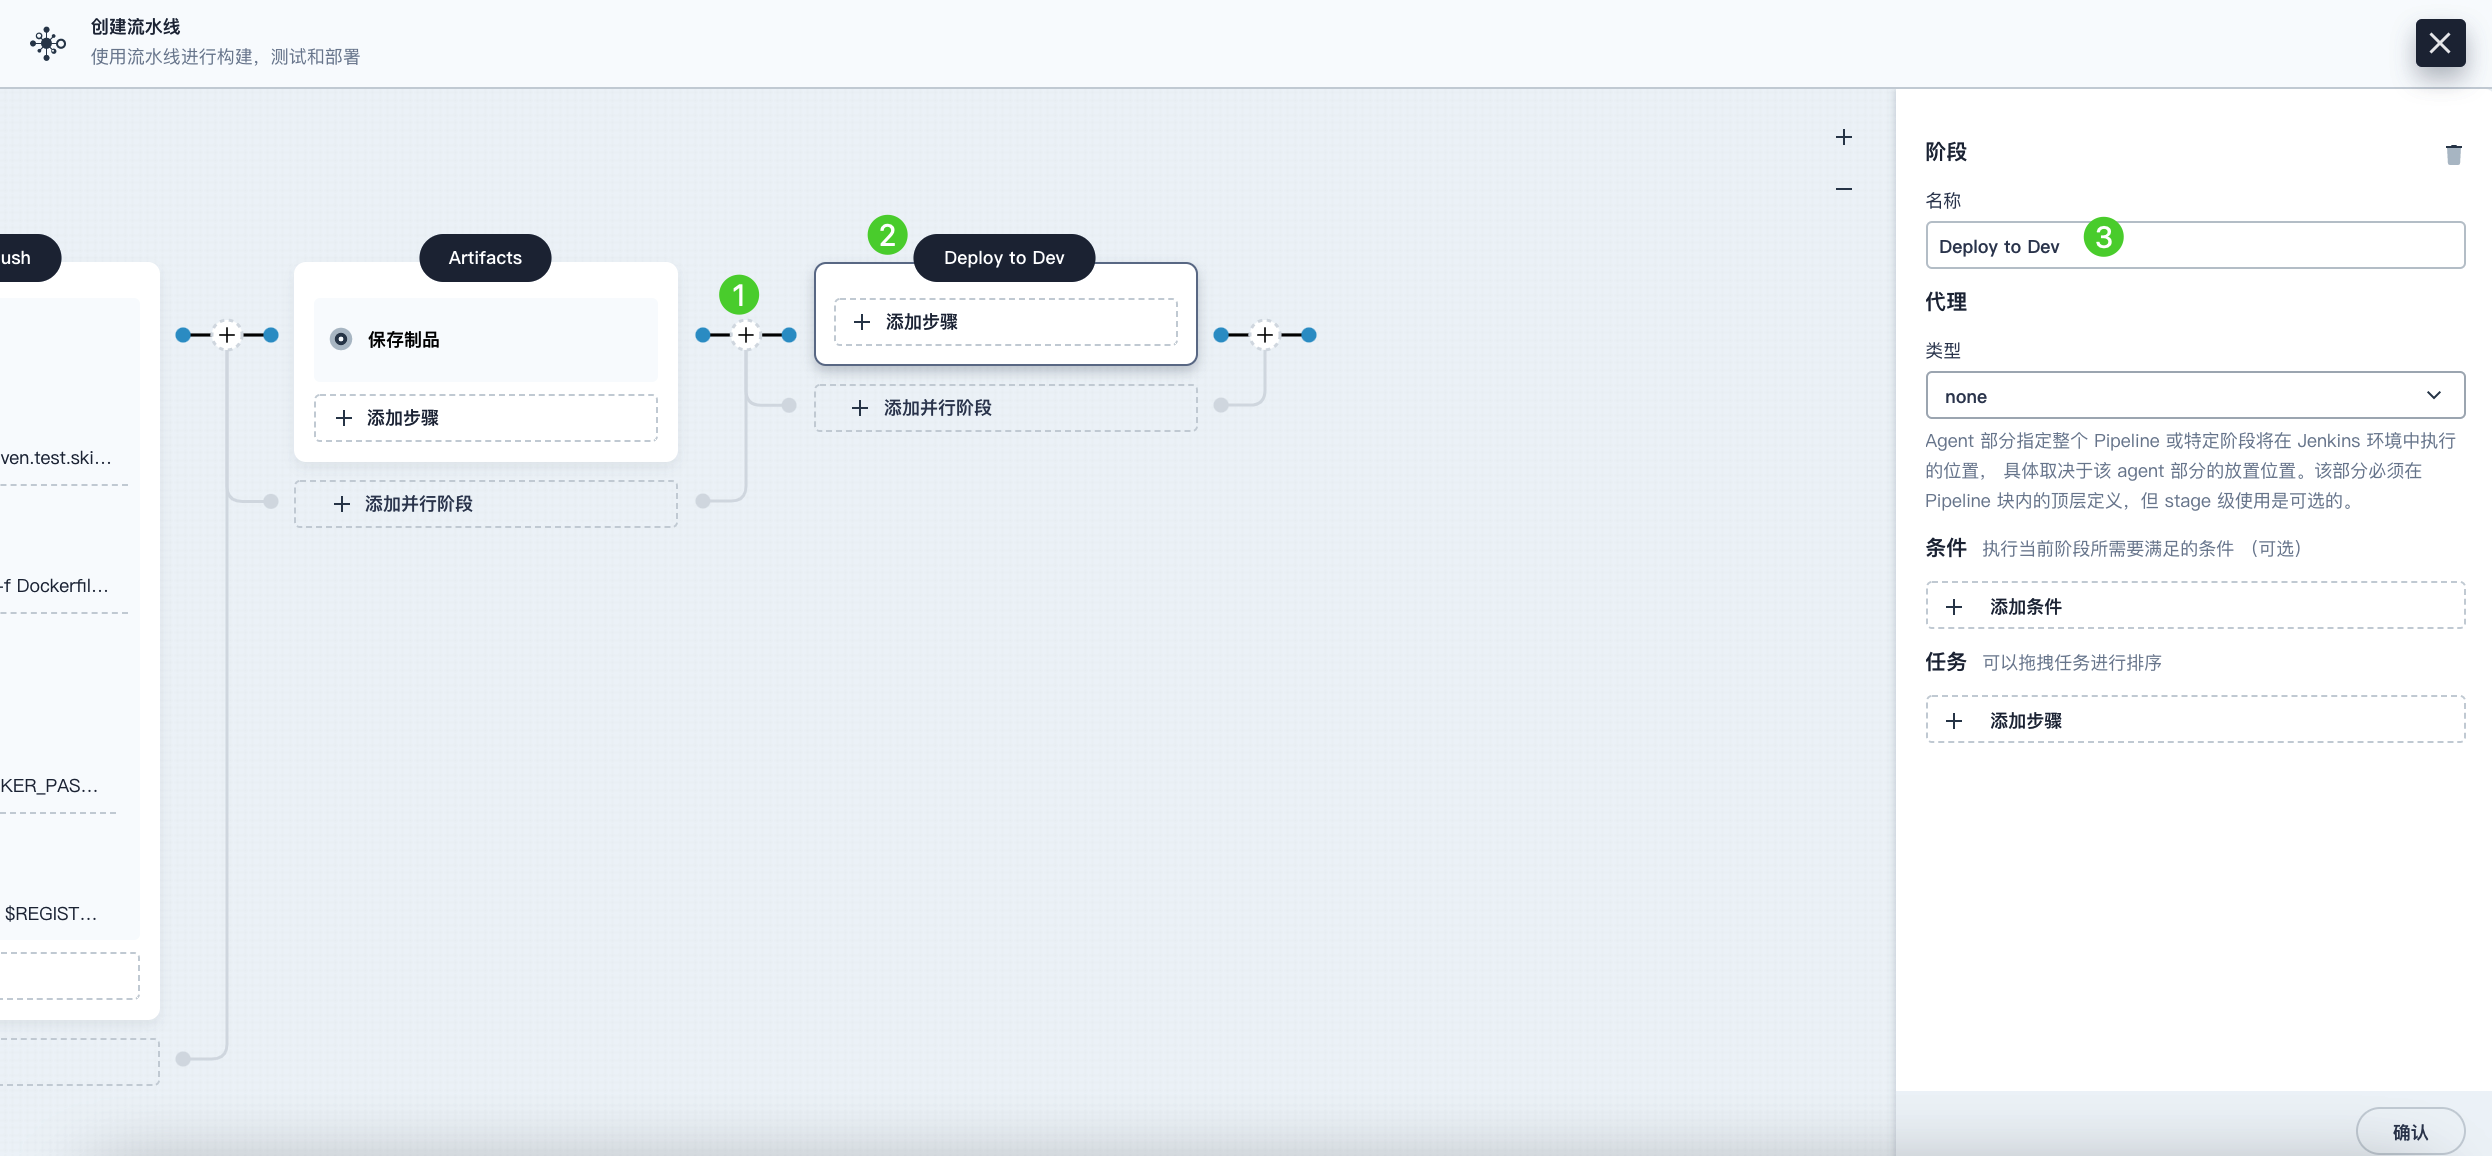
-
Click Add Step under the Deploy to Dev stage, select Input from the list, then enter @project-admin in the Message field. This means the project-admin account will review when the pipeline runs to this stage. Click OK to save the operation.
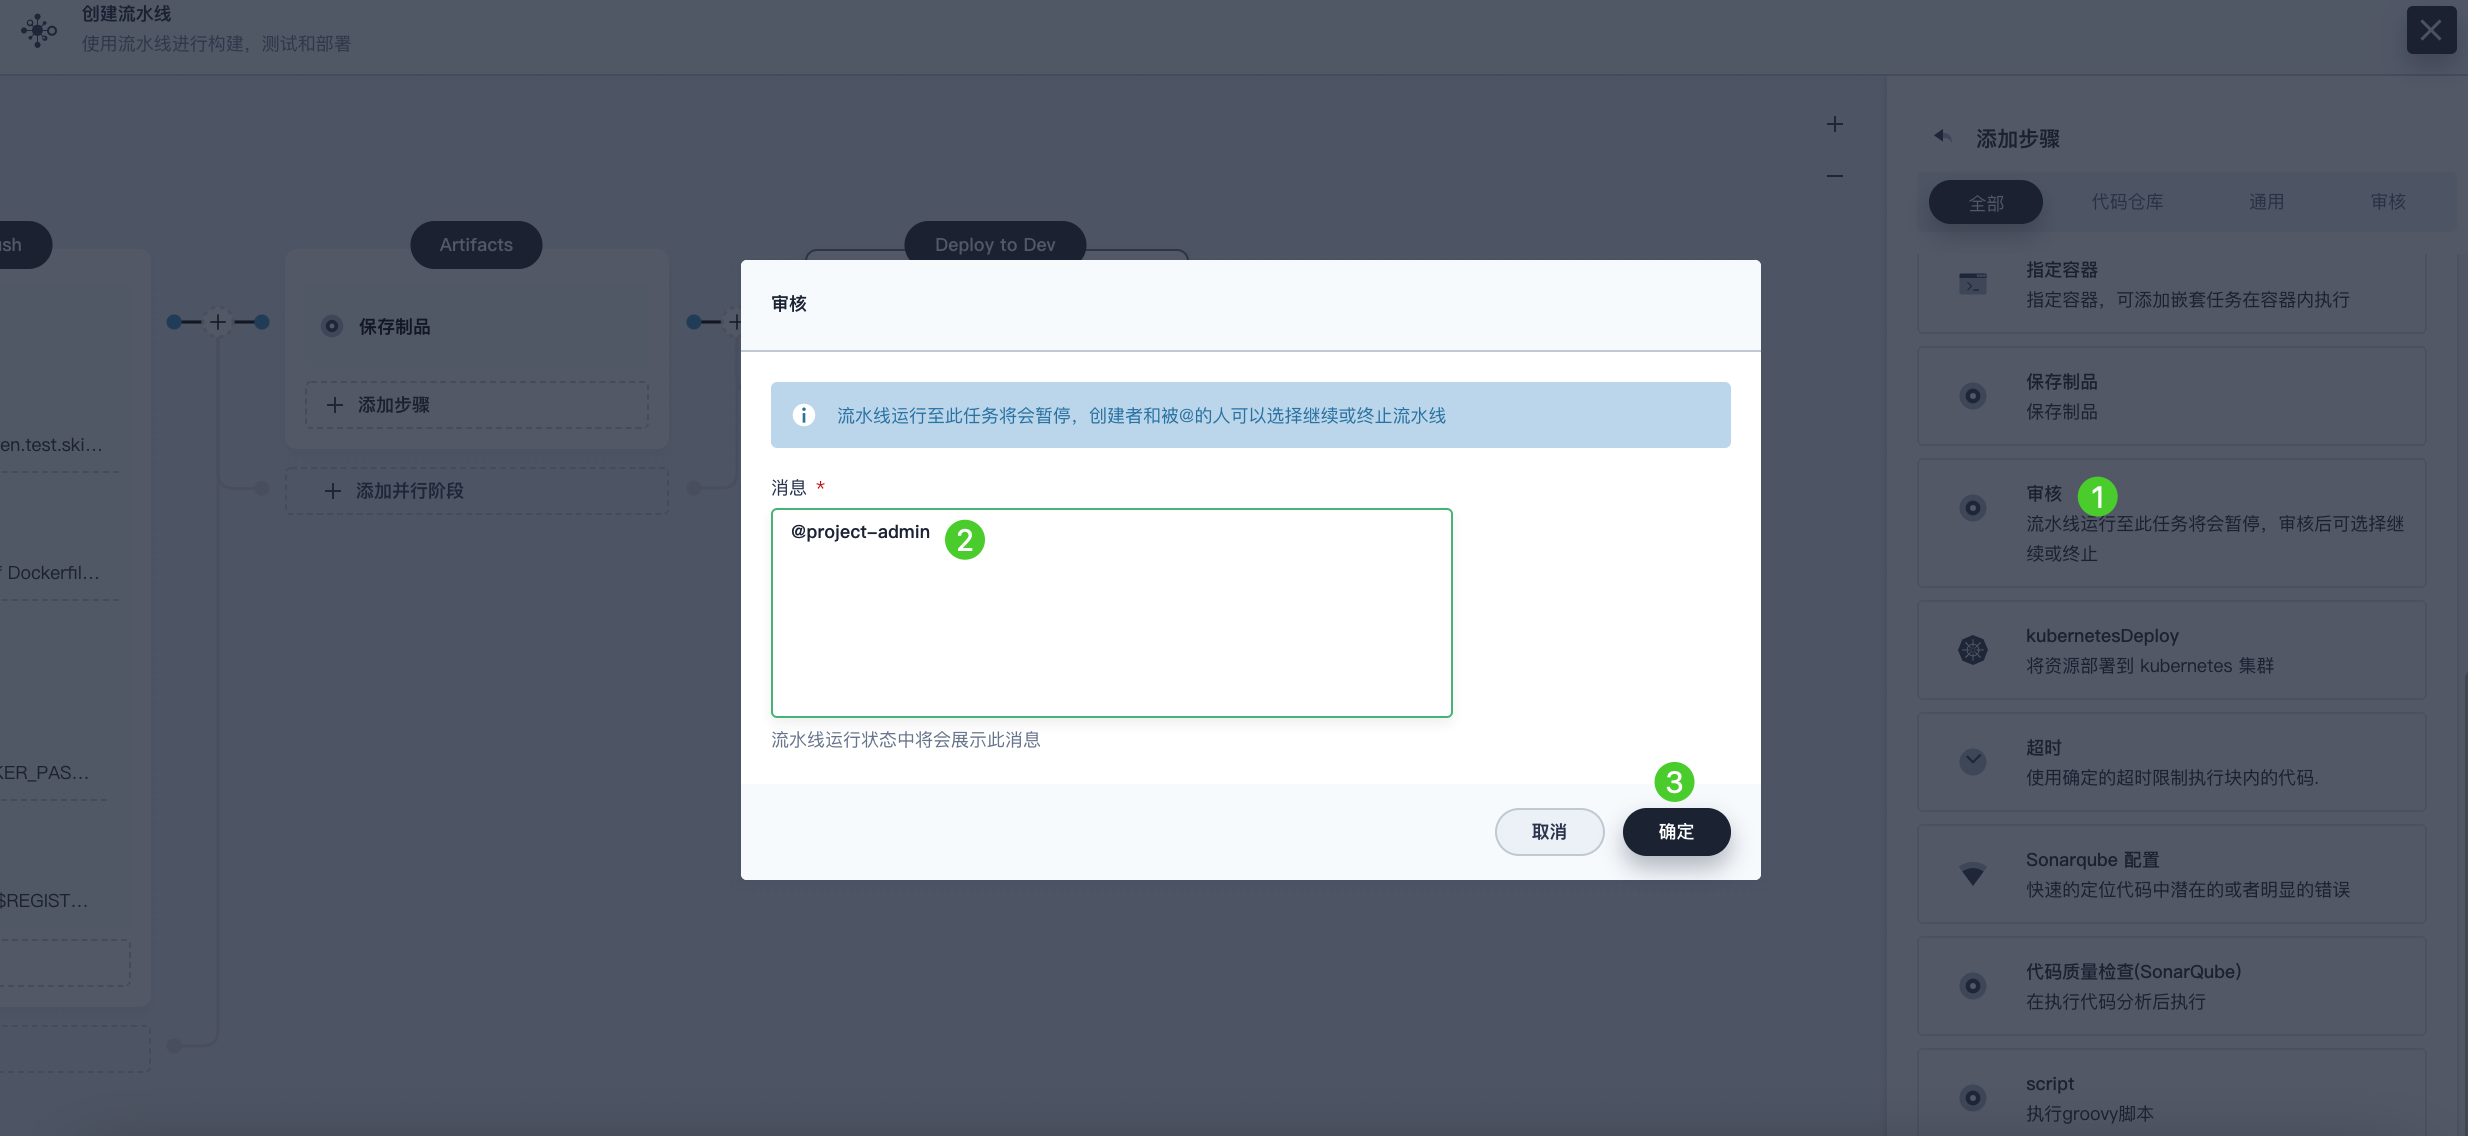
Note In KubeSphere, the account that can run the pipeline can also continue or terminate the pipeline.
Additionally, the pipeline creator, users with the project admin role in that project, or the account you specify also have permission to continue or terminate the pipeline.
-
Click Add Step again under the Deploy to Dev stage. Select Specify Container from the list, name it maven, and then click OK.
-
Click Add Nested Step under the maven container step. Select Add Credential from the list, fill in the following fields in the pop-up dialog, and then click OK.
-
Credential Name: Select the kubeconfig credential you created, for example, demo-kubeconfig.
-
kubeconfig Variable: Enter KUBECONFIG_CONTENT.
-
-
Click Add Nested Step under the Add Credential step. Select shell from the list, enter the following command in the pop-up dialog, and then click OK.
mkdir ~/.kube echo "$KUBECONFIG_CONTENT" > ~/.kube/config envsubst < deploy/no-branch-dev/devops-sample-svc.yaml | kubectl apply -f - envsubst < deploy/no-branch-dev/devops-sample.yaml | kubectl apply -f - -
If you want to receive email notifications when the pipeline runs successfully, click Add Step, select mail, to add email information. Note that configuring an email server is an optional operation. If you skip this step, you can still run the pipeline.
Note For more information on configuring an email server, please refer to Set Up an Email Server for Pipelines.
-
After completing the above steps, click OK in the lower right corner to finish editing the pipeline. The pipeline will display the complete workflow and clearly list each stage.
When defining a pipeline using the graphical editing panel, DevOps automatically creates the corresponding Jenkinsfile. Click Edit Jenkinsfile to view this Jenkinsfile.
Note On the Pipelines list page, click
 on the right side of the pipeline and select Copy to create a copy of this pipeline.
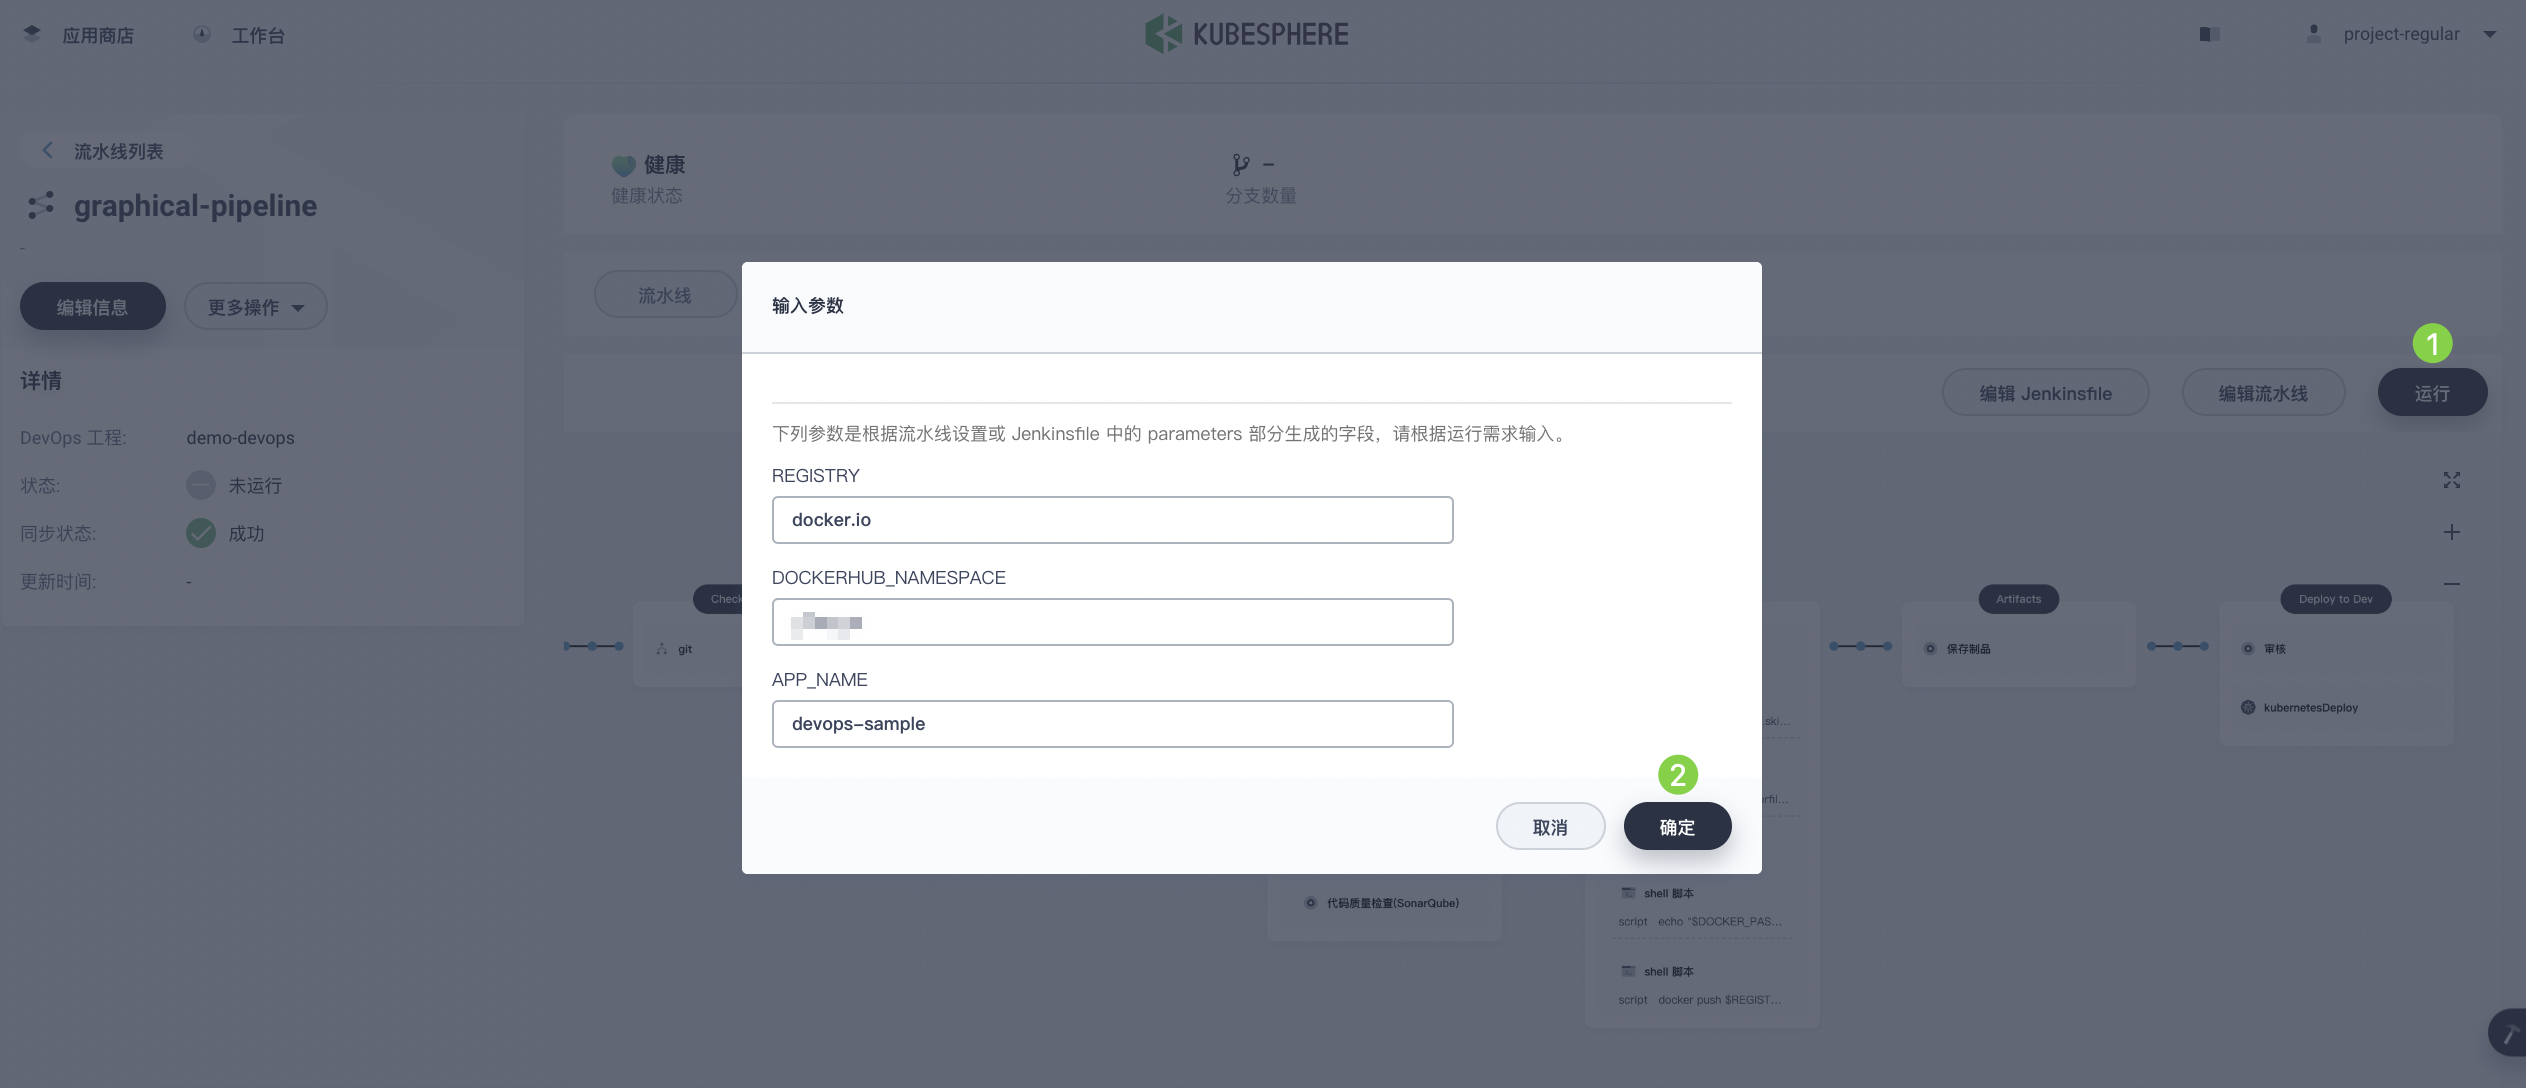
Step 5: Run the Pipeline
-
Pipelines created using the graphical editing panel need to be run manually. Click Run. The pop-up dialog will display the three string parameters defined in Step 3: Create a Pipeline. Click OK to run the pipeline.
-
On the Run Records tab, check the pipeline’s run status. Click the run status to view details.
-
After a short wait, if the pipeline runs successfully, it will stop at the Deploy to Dev stage. project-admin, as the pipeline approver, needs to perform the approval before resources are deployed to the development environment.
-
Log in to the KubeSphere web console as the project-admin user and enter your workspace. On the DevOps > Pipelines page, click the pipeline name to enter its details page. Under the Run Records tab, click the record to be reviewed, then click Continue to approve the pipeline.
| Note |
|---|
To run multiple pipelines that do not contain multi-branches simultaneously, on the Pipelines list page, select all these pipelines and then click Run to run them in batch. |
Step 6: View Pipeline Details
-
Log in to the KubeSphere console as the project-regular user and enter your workspace.
-
On the DevOps > Pipelines page, after selecting the project, click the graphical-pipeline pipeline.
-
Under the Run Records tab, click the record under Status to enter the Run Record details page. If the job status is Success, all stages of the pipeline will show Success.
-
Under the Run Logs tab, click each stage to view its detailed logs. Click View Full Logs to troubleshoot and resolve issues based on the logs, or download the logs locally for further analysis.
Step 7: Download Artifacts
On the Run Record details page, click the Artifacts tab, then click the icon on the right side of the artifact to download it.
Step 8: View Code Analysis Results
On the Code Check page, view the code analysis results for this sample pipeline provided by SonarQube. This section is unavailable if SonarQube is not configured beforehand. For more information, refer to Integrate SonarQube into a Pipeline.
Step 9: Verify Kubernetes Resources
If each stage of the pipeline runs successfully, a Docker image will be automatically built and pushed to your Docker Hub repository. Finally, the pipeline will automatically create a Deployment and a Service in the project you set up earlier.
-
Go to the project (in this example, kubesphere-sample-dev), click Workloads under Application Workloads to view the Deployment created automatically by the pipeline.
-
Click Services under Application Workloads to view the port number exposed by the sample service via NodePort. Use <Node IP>:<NodePort> to access the service.
Note Before accessing the service, you may need to configure port forwarding rules and allow the port in the security group.
-
After the pipeline runs successfully, an image will be pushed to Docker Hub. Log in to Docker Hub to view the result.
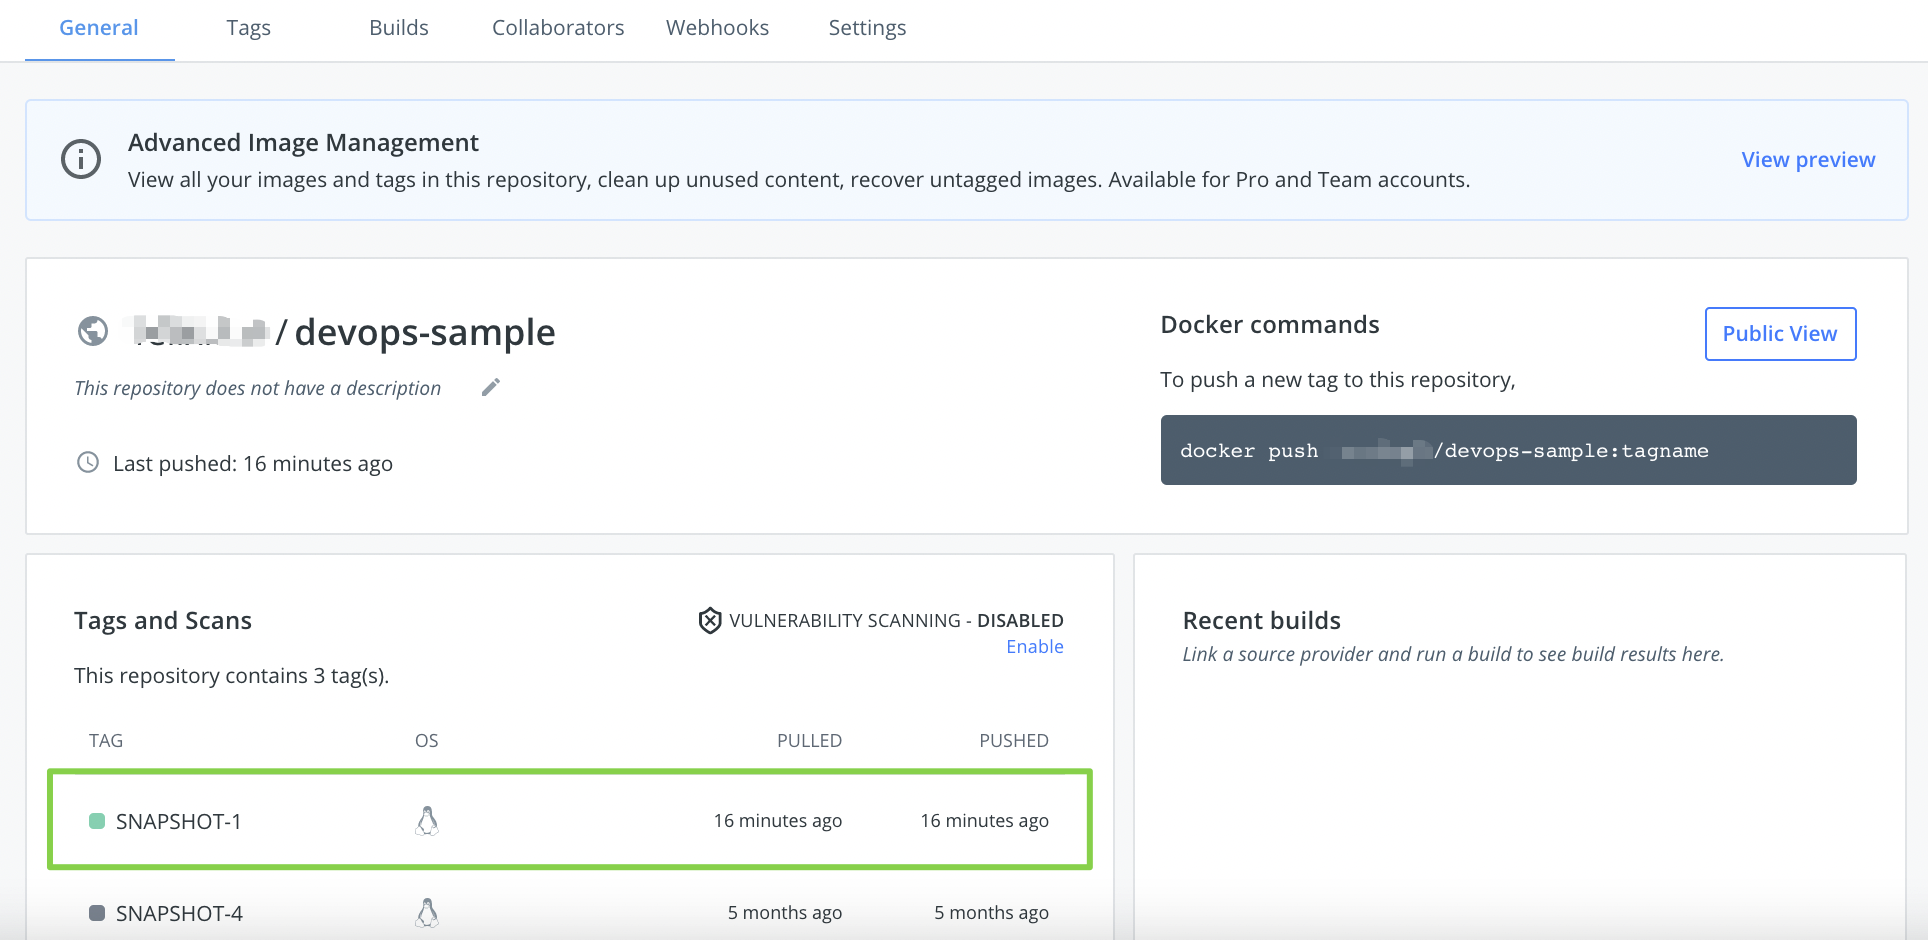
-
The application name is the value of APP_NAME, which is devops-sample in this example. The Tag is the value of SNAPSHOT-$BUILD_NUMBER, where $BUILD_NUMBER is the Run ID recorded under the Run Records tab.
-
If you configured an email server and added email information in Stage 6: Deploy to Development Environment, you will also receive an email notification upon completion.